Did you accidentally delete an important photo or document from your Android smartphone? If you think everything is lost, think again! You can use an Android data recovery tool to help retrieve deleted data. It doesn’t matter how it got deleted, and the only important thing is that it is still somewhere on your device.
In this article, we are looking for the best Android data recovery software in 2024. Check out our reviews and find out the top picks currently available on the market!
Quick Summary
- Our first pick for the best Android recovery software is Tenorshare UltData for Android. It is the specialized version of this tool for Android and offers support for the newest devices and versions of this operating system. The program is incredibly easy to use and comes in free and premium editions. You can use it to recover files like messages, photos, videos, and audios to your device or computer.
- Another fine choice is dr.fone – Data Recovery (Android). It can recover files from broken Android phones and SD cards, which is quite convenient. It also has a toolkit with additional functions available if you purchase the program.
- iMobie PhoneRescue for Android is also a great pick. The tool works on recovering messages, photos, videos, audio files, chat conversations, and media. The software is fairly intuitive and suitable for users with no or plenty of experience.
What Is Android Data Recovery?
Android data recovery software is a tool that allows you to recover deleted files from your Android phone. You might have lost data because of accidental deletion, or the screen is broken, and you can’t access your phone. As long as the files are on the storage of your device, Android data recovery tools can help.
These devices are powerful, but they are intuitive and user-friendly. They usually come with a simple interface. All that users have to do is choose the desired actions, and the tool will complete them.
Who Should Get an Android Data Recovery?
If you have used your phone for a long time, it might be prone to crashing. You might also drop it accidentally and break your screen. Perhaps you wanted to drink some water and spilled it on your device.
It might be that your phone is working perfectly, but you accidentally deleted an image and want it back. All these are situations when you need the best Android data recovery program.
These tools are usually user-friendly, so you can use them even if you don’t have previous experience with this app type. They are very convenient for recovering accidental files and any data you lost.
Advanced users could also benefit from these tools. When you have a lot of work to do, it is helpful to have a fast and reliable tool for file recovery when you need that type of work.
How We Tested and Picked the Best Android Data Recovery in 2024
What are the criteria for choosing the best Android data recovery program? If you ask the experts, these are the factors to take into account:
Supported devices – is the application compatible with the newest series of Samsung and Huawei phones? Can it work with your old Android phone?
Operating system versions – compatibility with the devices largely varies on the supported versions of the Android OS. The most versatile tool should support the latest versions and older variants like Android 4 or earlier!
Supported files – the most important feature is which files you can recover. Depending on the app, they can support messages, call history, contacts, calendars, notes, social messaging apps like WhatsApp and Line, photos, videos, music, etc.
Easy to use – does the software offer an intuitive interface? Is it simple to use for beginners, or is it hard to find your way around the tool?
Free trial available – by offering a free trial, manufacturers allow you to see how the tool works. That can be a very convenient way of trying if the tool suits your needs.
After considering those factors, these are the top picks we selected!
The Best Android Data Recovery Software: Our Picks in 2024
Best Choice: Tenorshare UltData for Android
We will admit that there were many excellent suggestions for the best Android recovery software. However, we picked Tenorshare UltData for Android for good reasons.
First, the tool was designed by a reputable manufacturer, Tenorshare, which is famous for its phone management apps. Also, the software is versatile and user-friendly, which makes it suitable even for those who haven’t used this type of app before.
The main features of Tenorshare UltData include the following:
- Supports Android 12 and previous versions
- You can use it on all popular smartphones, including Huawei, Samsung, and others
- It takes only around 200 MB of space on your hard drive
- Capable of recovering deleted data in several clicks
- It can recover photos, videos, documents, voice messages, chat conversations, and many other files
Is Tenorshare UltData for Android Free?
Tenorshare UltData for Android comes with a free trial. It allows you to test the tool’s interface and see if the app suits your preferences. However, if you want to use its full features, we recommend buying the full version.
Here is the pricing overview of this tool:
- 1-month license – you can purchase a monthly subscription for a single computer and up to five Android devices at $35.95.
- Yearly license – this subscription will cost you $39.95.
- Lifetime license – a one-time purchase that secures infinite use on a single computer and up to five connected devices costs $49.95.
Does Tenorshare UltData for Android Really Work?
What better way to determine if this is the best software for recovering deleted files from an Android phone than testing it? The testing started by downloading Tenorshare UltData from the developer’s official website. Everything is straightforward and shouldn’t take long.
We used antivirus and adware programs to confirm that the tool was free from harmful files. Don’t hesitate to use the app on Windows and Mac since it is safe.
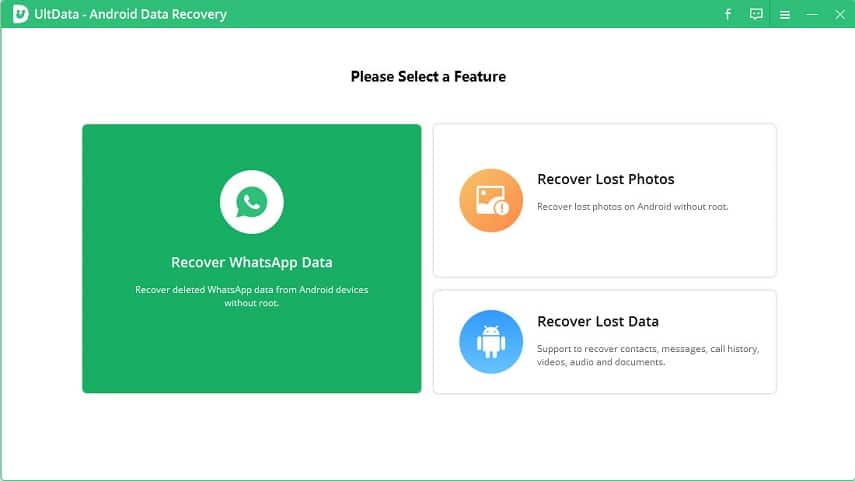
Once you install and start the program, you will need to connect your Android device. You can do that by using a USB cable. Once the device is connected, you can check out the home screen of Tenorshare UltData for Android.
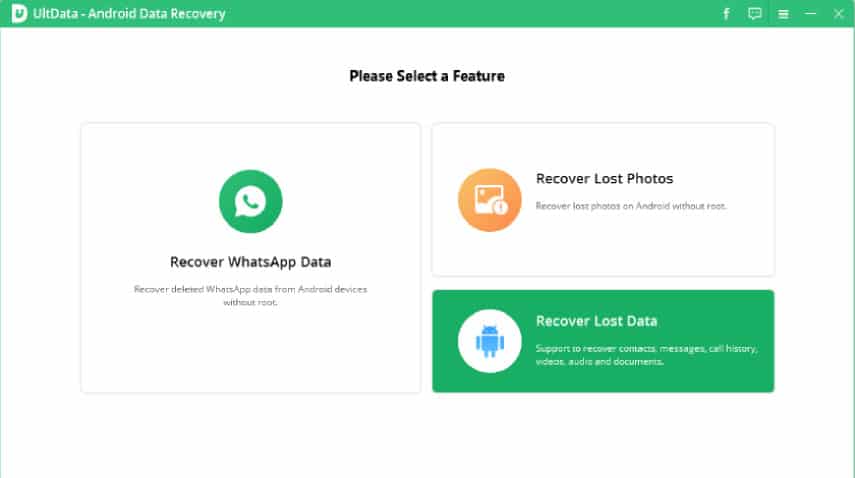
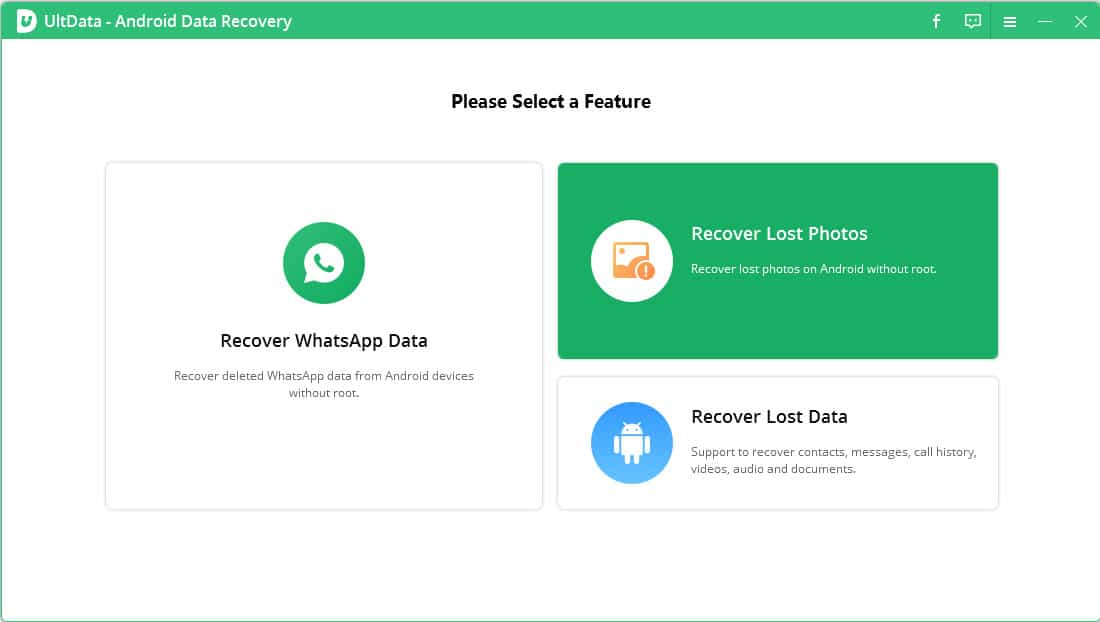
As you can see, you have three options at your disposal – Recover WhatsApp Data, Lost Photos, and Lost Data. The first two are shortcuts to particular options, which is why we decided on the third function.
The software will now detect if your device is connected. If it doesn’t detect the connection, you will notice the following screen:
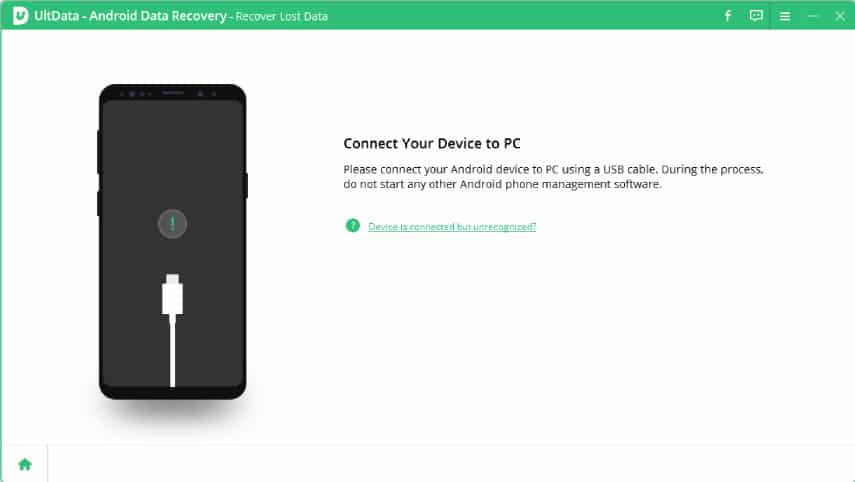
The app always offers help if you get stuck. That is why we believe this is the best Android recovery software. Whatever the problem is, the tool will explain how to fix it or point you to the resource base and contact customer support.
If you connect your smartphone, the next process of setting up the program is to enable USB debugging.

Everything is explained on the screen, but you will need to use your smartphone to activate this option. If you still have problems, you can click the buttons at the bottom to get alternative instructions.
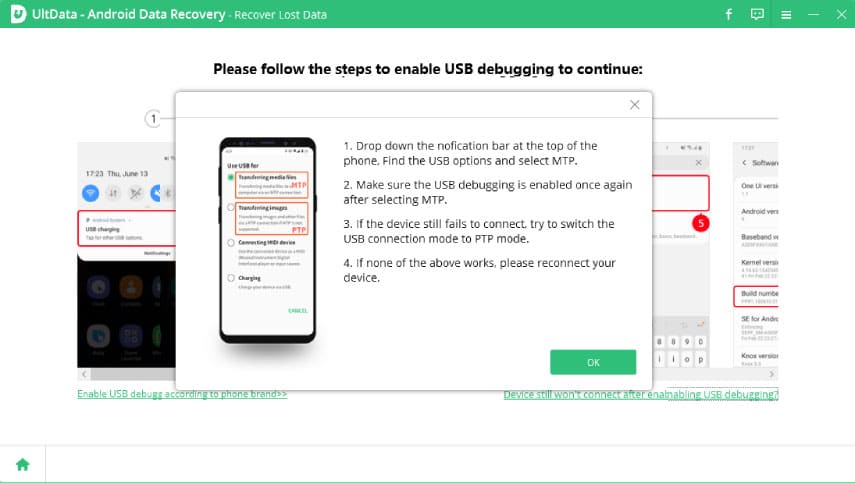
Although it seems complicated, we enabled USB debugging in less than a minute. The only remaining thing to do is to authorize the app on the device.
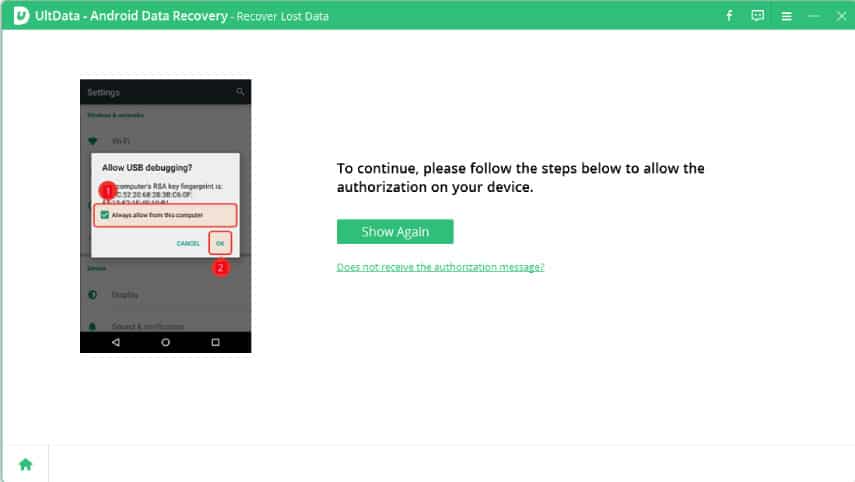
All it takes now is pressing the “OK” button on your smartphone once the system prompts you to confirm USB debugging.
How to Recover Files with Tenorshare UltData for Android?
Setting up your device takes a bit of effort, but once you do that the first time. It is now time to test the recovery process.
Here is the screen that will be shown on your computer:
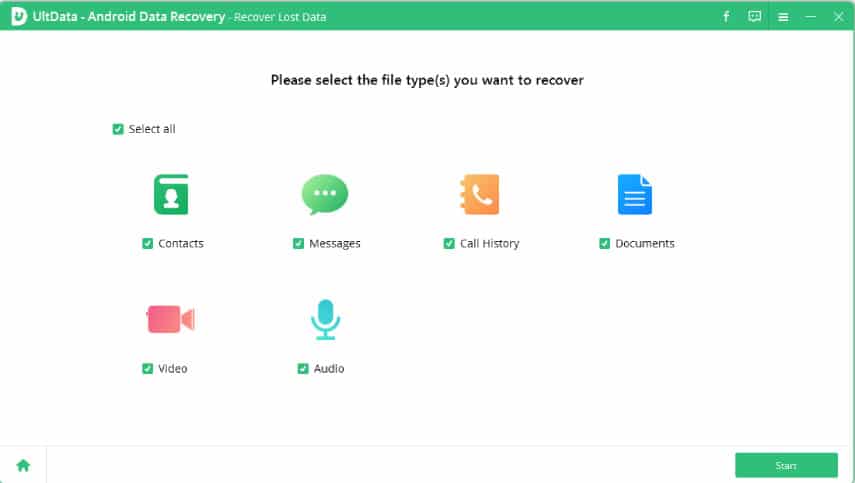
Here is where we confirmed that Tenorshare UltData for Android supports six file types, which is in line with what the developers promised.
You can choose the desired file types to look for or simply pick “Select All” at the top. Once you select the preferred formats, click “Next” to scan your device for deleted data.
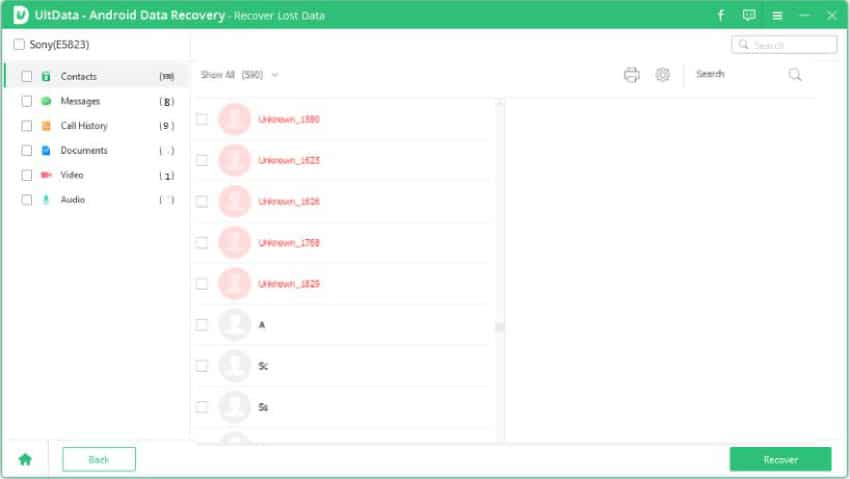
The tool will now show all the deleted and existing files on your device. It might be hard to find your way around first, but take advantage of the parameters shown on top. You can pick between “Show All” or choosing only existing or deleted files.
It is up to you to select the files that you want to recover. Feel free to choose an entire category or a single file. Once you click “Recover,” a pop-up screen will ask you to choose the destination on your PC where you want to save the recovered files.
From there, the software will proceed to recover data. Depending on the files you selected, they will be saved in XLS, XML, XLS, or original file formats.
We tested Tenorshare UltData for Android multiple times, and it was flawless in recovering files. The app proved to be extremely reliable and fast in performing data retrieval.
Can You Recover WhatsApp Data with This Android Tool?
Do you have important conversations on WhatsApp, but you somehow lost or deleted them? If that is the case, Tenorshare UltData can help. Start by connecting your device and choosing the corresponding feature from the main screen.
You will need to have the USB debugging feature enabled, and we explained how to do that in the setup process above. Once you authorize your device, click “Start” to initiate the scan. Don’t forget to confirm that you are logged into the right WhatsApp account on your device.
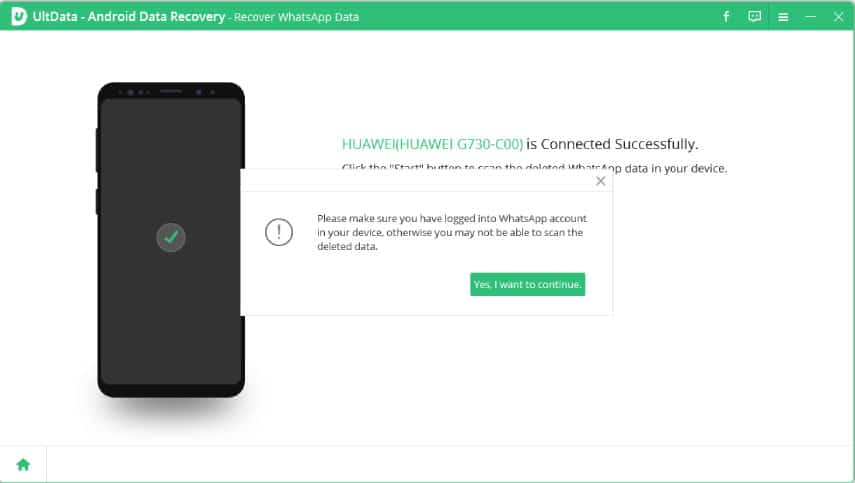
The app will require you to back up WhatsApp files first. That is a safety mechanism to ensure you avoid data loss. It is very convenient and shows the developers thoughts about users.
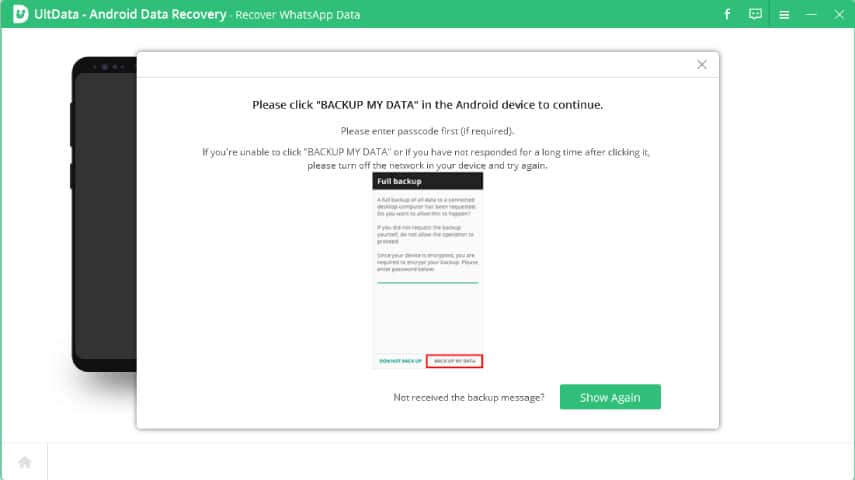
You will notice that it is required to back up your data to proceed with the retrieval of your previous chat and media history.
The scanning process is fast and doesn’t take more than a minute or so. The backup data will show up on the following screen.
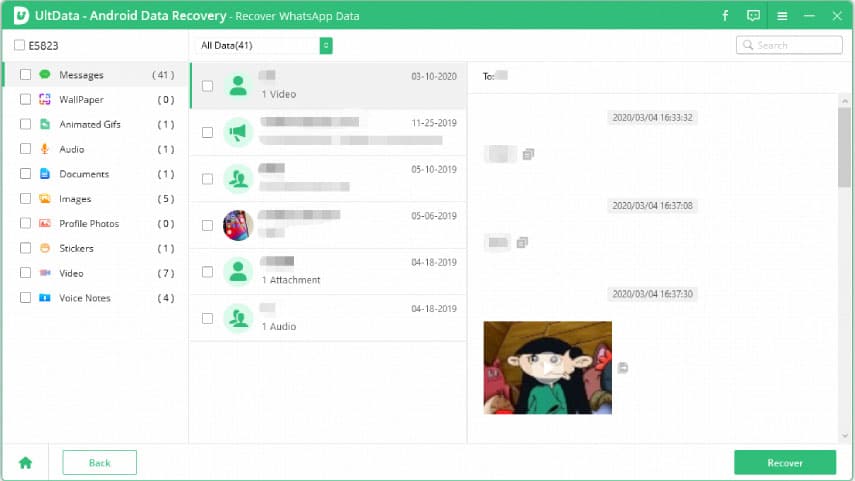
The files are organized conveniently, and you can choose the desired file type on the left. Tenorshare UltData will show messages, but also audio files, documents, videos, and stickers. That will make it easy to find the desired files easily.
Go ahead and choose the desired files. Next, click on “Recover” to start the data retrieval process.
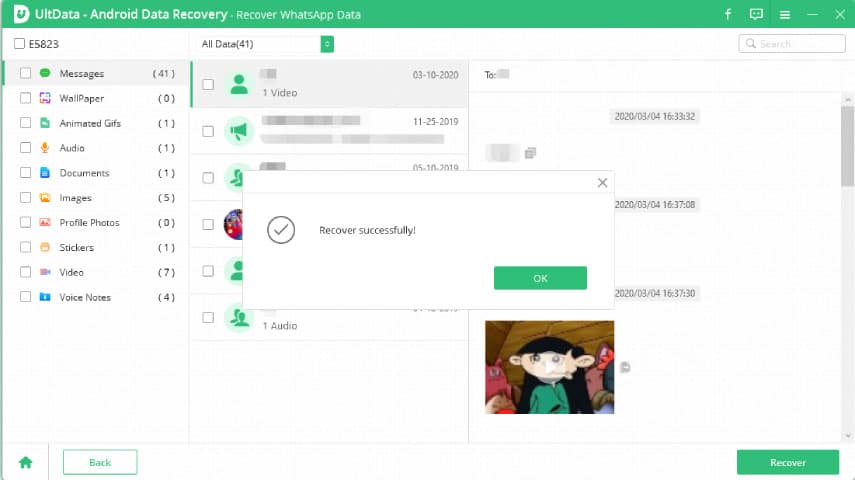
The retrieval goes fast, and we tested it multiple times with different data. The system will send a confirmation message if it recovers the files successfully.
Is It Easy to Retrieve Deleted Photos with Tenorshare UltData for Android?
Most of us care about images stored on our computers. If we delete them accidentally, Tenorshare UltData for Android makes the retrieval effortless.
Start by choosing the desired command from the main interface.
You will now be prompted to connect your device and enable USB debugging. Once that is done, you can initiate the photo scanning. The process is fast, although it requires a bit of patience if you have a lot of images on your device.
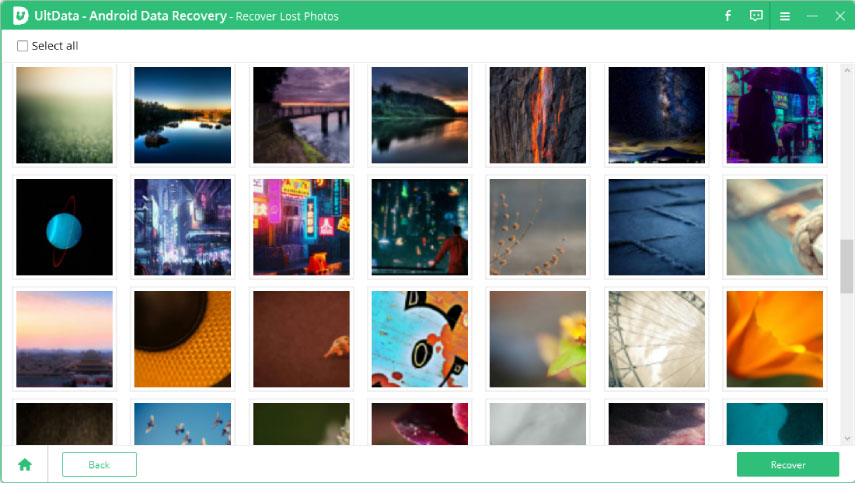
You can preview photos, which is incredibly convenient to ensure you recover the right images.
Initiate the process by clicking “Recover” and let the software do its magic.
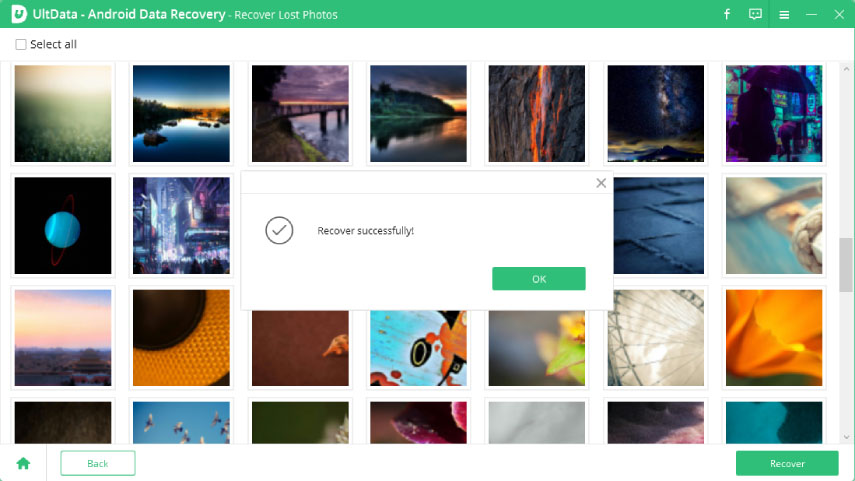
Notice the confirmation message to finalize the process. The software is very reliable and can retrieve any deleted image on the Android disk.
Runner-up: dr.fone – Data Recovery (Android)
dr.fone – Data Recovery (Android) is a tool designed by Wondershare. It is a professional data recovery software for Android and a solution suitable for multiple situations. Whether you want to recover files from an active or broken Android or retrieve data from an SD card, this tool is at your service.
Android data recovery is a part of the dr.fone Toolkit. You need to install the program on your computer first and then choose the “Data Recovery” option in the upper left corner.

The app will look for a connected Android device. Please note that you need to activate USB debugging to ensure the data recovery works properly.
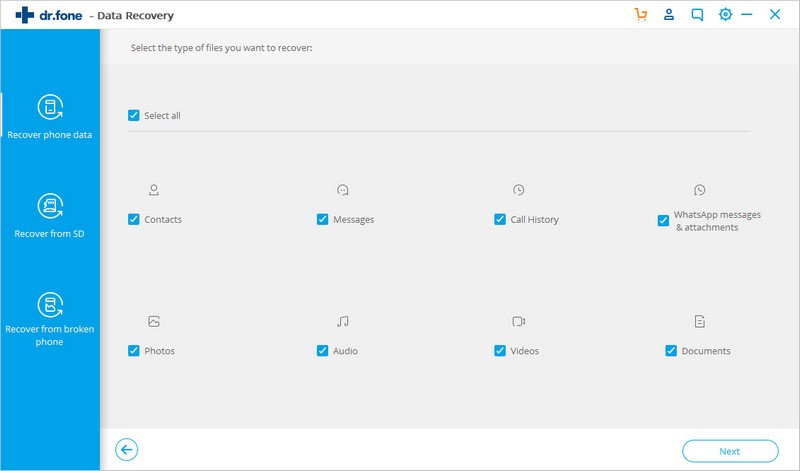
The next step of using dr.fone is to choose the file types to look for on your device. That includes messages, contacts, call history, photos, audios, videos, documents, and WhatsApp messages and media. Although the program has a clean interface, the graphics could be a bit better.
Once you are satisfied with your choice, start the scanning process.
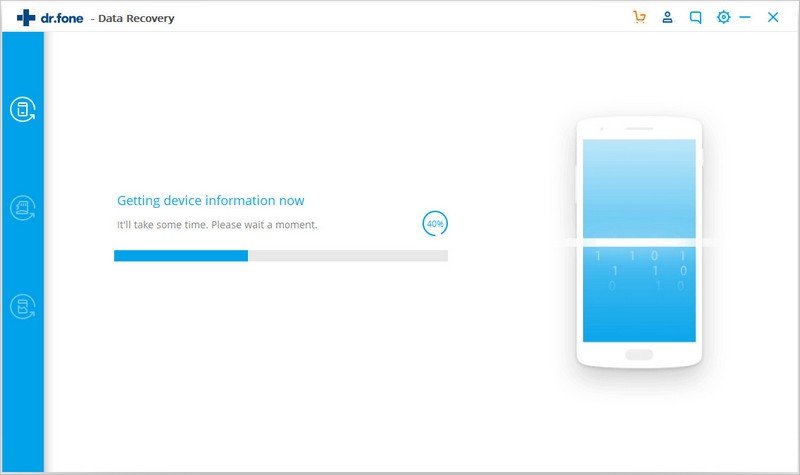
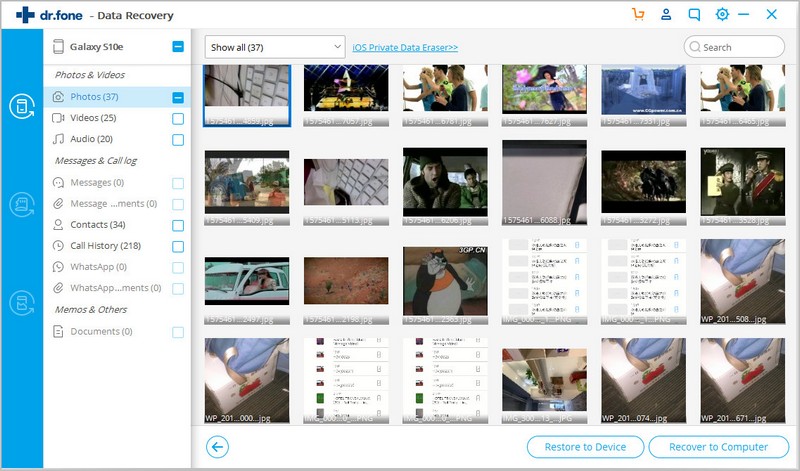
You will need to be patient until the device finishes scanning. From here, you can preview and select the desired data for recovery.
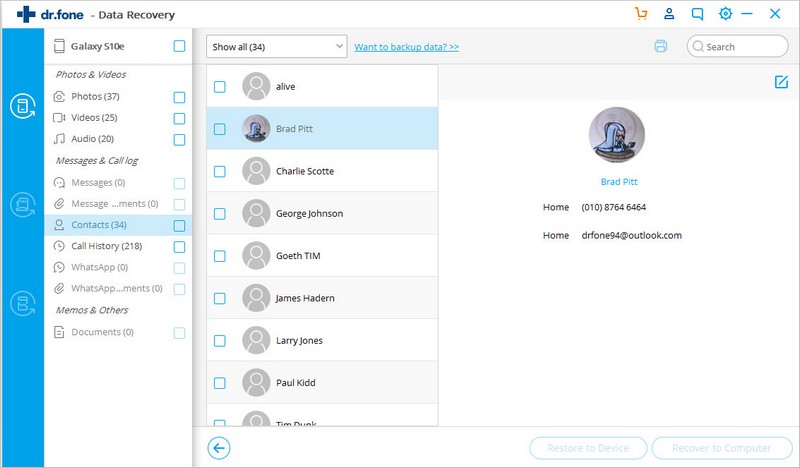
The interface is simple – you have the types of files on the left. Once you select a particular category, you can preview individual files. That way, you can be certain you picked the right ones to retrieve.
Once you are satisfied with your selection, the “Recover to Device” and “Recover to Computer” options will activate. Pick the desired function and initiate it to finish the retrieval.
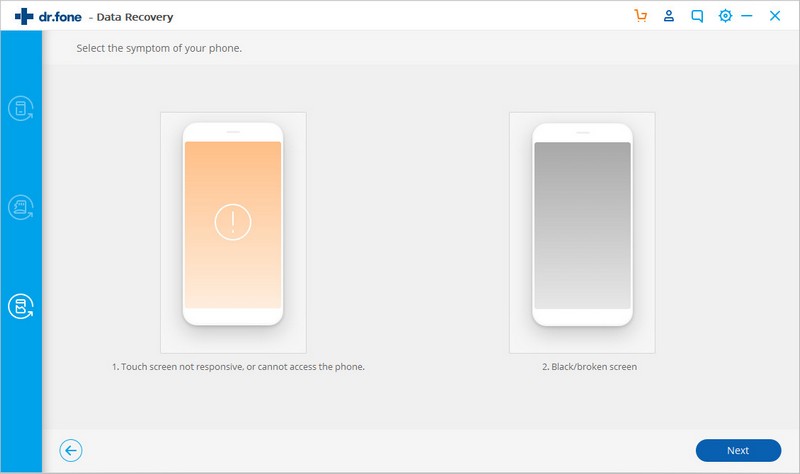
Can I Recover Data from a Broken Android?
dr.fone is a useful tool that allows recovering data even if your screen is broken or you can’t access your phone. Once you connect the device and pick data recovery and file types to look for, choose the problem you have.
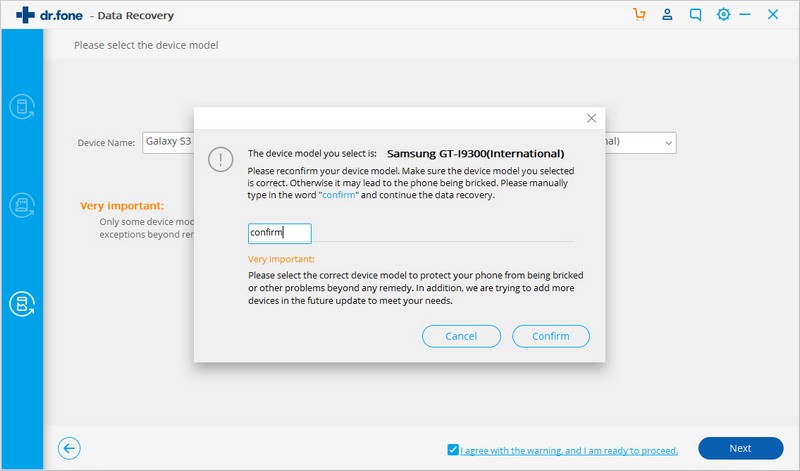
The next step will involve selecting your device name and model. Make sure to choose the corresponding ones for the process to work.
Now, confirm the recovery by manually entering the required letters. It is a mandatory step to ensure maximum protection of your phone.
The next screen will show you how to enter the download mode.
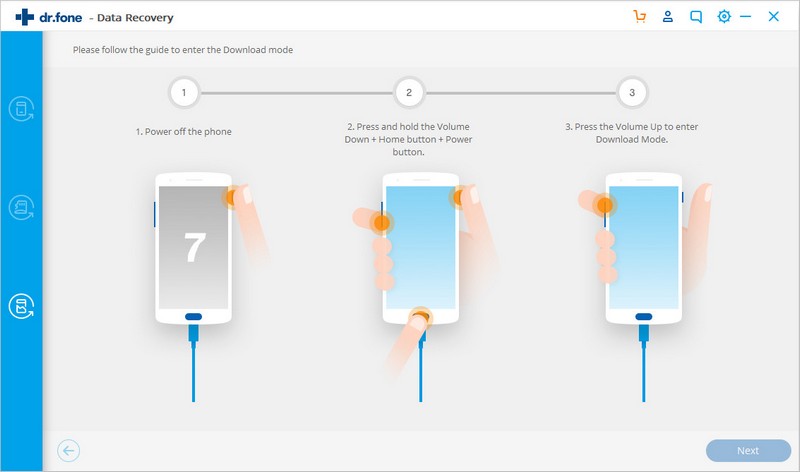
The process is a bit complicated, but it only involves three steps, so even beginners should be able to handle it. Once you download the data from your phone, you can recover the desired files.
>> Get dr.fone – Data Recovery (Android) <<
Also Great: PhoneRescue for Android
PhoneRescue for Android was developed by iMobie. The tool is a reliable solution for data recovery and supports various files. The program is available in trial and premium versions. The trial version only allows scanning and previewing data on the device and removing the screen lock, while the full version allows you to extract and recover files.
The main screen will show once your device is connected, and offer supported files for data recovery.
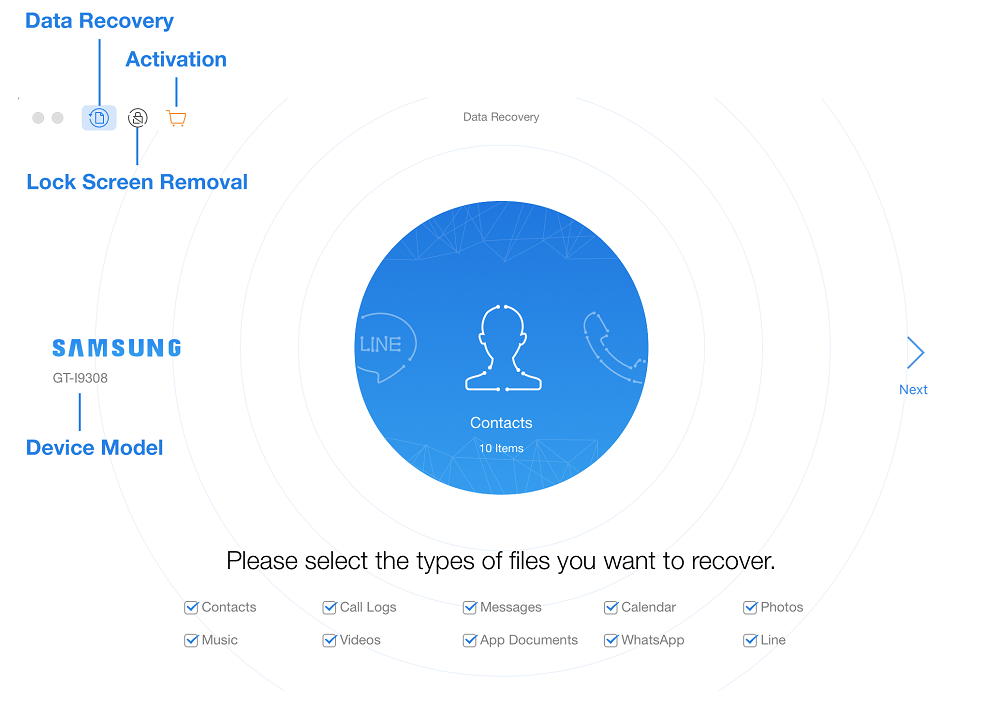
You can choose between messages, calendar data, photos, music, videos, call logs, contacts, app documents, as well as data from WhatsApp and Line social apps.
The process is similar to other tools – once you are ready, click “Next,” and the system will scan the data on your phone.
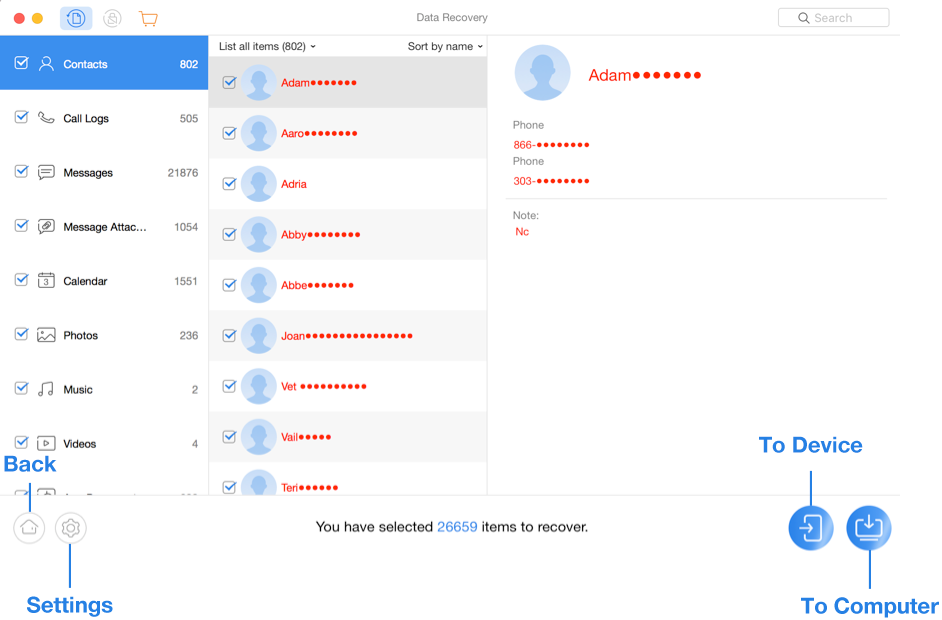
The files will be organized in suitable folders, and you can pick files or entire categories to transfer. You can recover them directly to the device or to your computer.
iMobie PhoneRescue for Android also allows choosing output formats for extracted files.
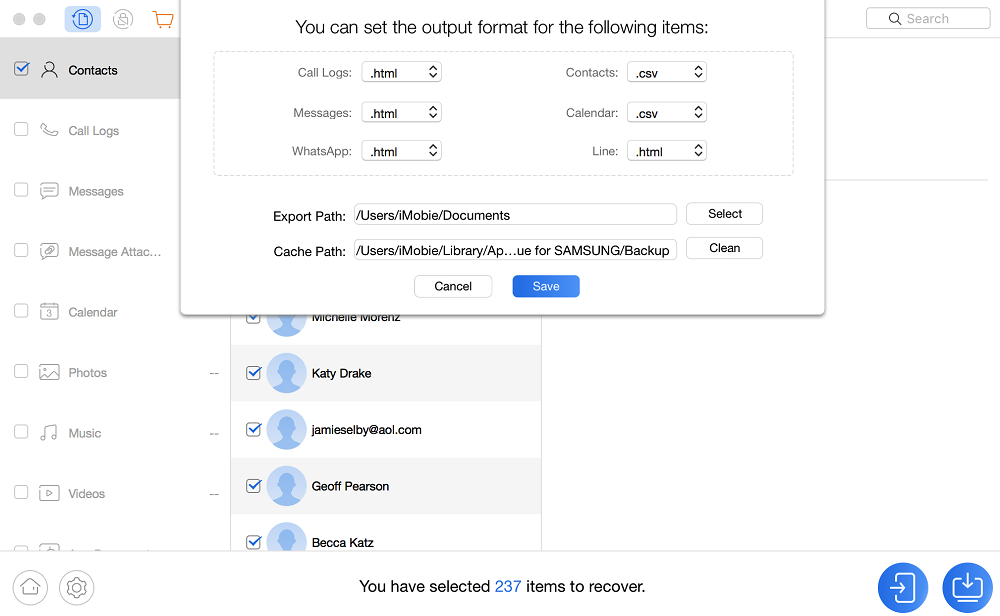
You can access this menu by clicking “Settings” at the lower-left section.
Apart from basic data recovery, the program also offers options to remove screen lock and root Android devices. It is an all-around tool that can be helpful for all smartphone owners.
>> Get dr.fone – PhoneRescue for Android <<
Competition and Comparison
EaseUS MobiSaver for Android 5.0
A tool that achieved the fifth edition deserves to be considered as the best recovery software for Android. It seems like there is still room for improvement, but EaseUS MobiSaver for Android 5.0 is a decent app that you might find useful.
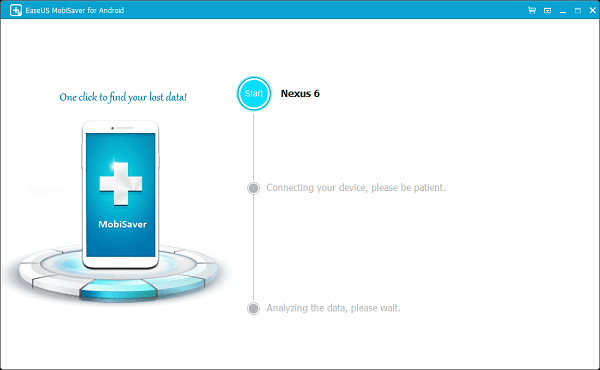
The tool supports SMS, contacts, music, documents, notes, and even voice memos. It is an all-around data management tool. It takes a bit longer to connect your phone and recover files, but it will be worth the wait. The product is available via a free trial, and you can also buy the full version.
>> Get EaseUS MobiSaver for Android 5.0 <<
Stellar Data Recovery for Android
Stellar offers a range of tools to use on your smartphones. As for this data recovery for Android, it is simple and reliable. It is the winning formula for many users, especially since the app supports multiple file types.
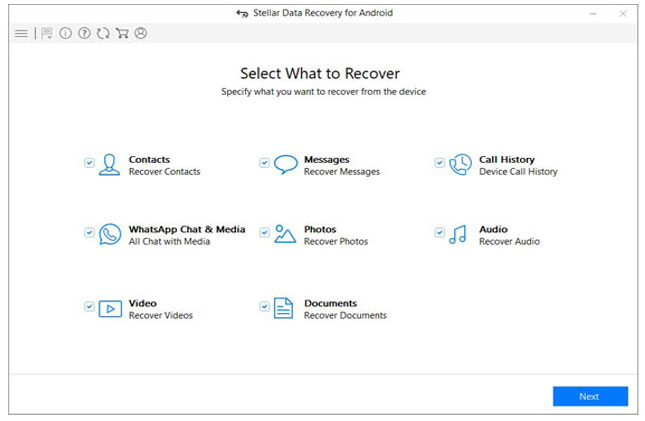
You can recover call history, messages, contacts, audios, photos, videos, documents, and WhatsApp chats with all attachments. If the data is on the device’s internal memory, this tool will recover it even after formatting. Stellar Data Recovery for Android is compatible with the newest operating system versions, but you will need at least Android 4.0 to use it.
>> Get Stellar Data Recovery for Android <<
FoneLab Android Data Recovery
Here is a program that is more than simple data recovery. It also allows you to backup and recovers data by browsing backups. The software will show you the previews of files to ensure you picked the desired ones for recovery.
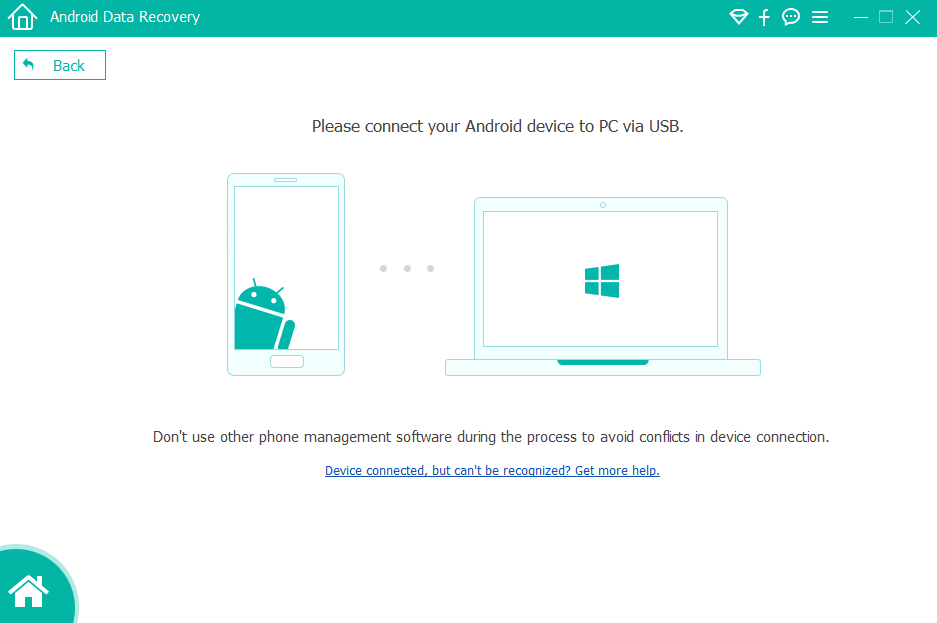
FoneLab Android Data Recovery has unusually high tech specifications. It is compatible with Windows XP through 10 and with Mac OS X 10.7 or newer. However, it will also require 1GB of RAM, which is more than some similar programs.
>> Get FoneLab Android Data Recovery <<
Jihosoft Android Data Recovery
Jihosoft boldly claims their Android data recovery is “the world’s best.” Although that is arguable, it is a decent tool that can help both amateurs and professionals. The software is suitable for all Android versions from 2.3 to 9, which makes it very versatile.
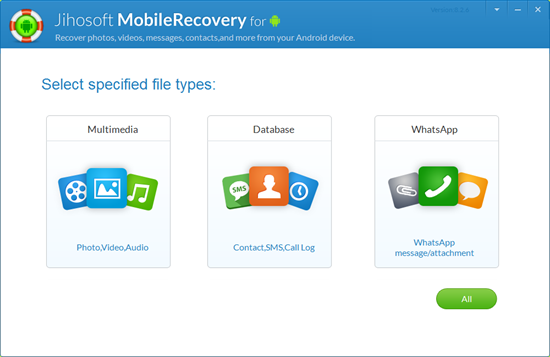
The process of recovering data is simple and only takes three steps. You can use Jihosoft Android Data Recovery on both Mac and Windows, but the price varies depending on the platform. The tool supports messages, call history, contacts, audios, images, videos, chat conversations, and document recovery. The graphics are cartoonish, but they hide a useful app behind that design.
Coolmuster Lab.Fone for Android
At first glance, Coolmuster Lab.Fone for Android is exactly what you expect from a professional data recovery software for Android. The simple interface will show which devices you connected and which smartphone is currently active.

The top screen will show you available functions, and you can also choose the desired file types to recover. It is interesting to note that Coolmuster also included SD card recovery and a toolkit with extra features.
DiskDigger for Android
DiskDigger for Android is an interesting tool because you can download it directly to your device. The mobile app comes as a simple tool to recover and undelete lost files. However, the app requires rooting to perform most of the recovery actions.
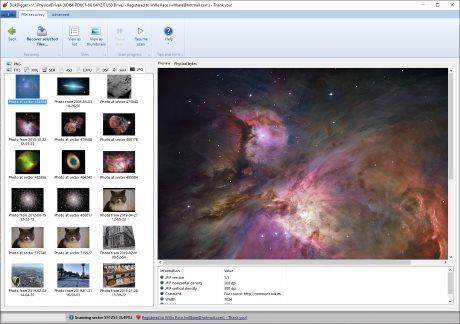
Alternatively, you can try the PC app, which supports Windows and Linux. The tool seems simple, but it is very powerful. It supports various photo files, as well as videos, documents, compressed archives, and miscellaneous file types. The tool will take a bit of time to complete the desired actions, but it seems reliable. Although there are file recovery apps for Android with a simpler user interface, you should learn how things work quickly.
MiniTool Mobile Recovery for Android
Although the manufacturer’s name is MiniTool, there is nothing minor about this tool. On the contrary, it is quite versatile and suitable to recover files from both Android phones and SD cards. The app supports recovering photos, audios, videos, documents, contacts, messages, and even WhatsApp and its attachments.
The software is free to use, but it comes with a limitation. You can transfer only ten files of a particular type each time. If you want to unlock transferring without limitations, you will need to purchase the full version.
Conclusion
You have numerous fine choices for recovering files from your Android smartphone. That is why it all comes down to your taste and preferences. Think about the features you need and choose the best Android data recovery program accordingly.
Our advice is to try the tool via the free trial option. It is an excellent way to confirm the product is easy to use and meets your preferences. Once that is settled, you can purchase the full version and see the power of Android data recovery!

