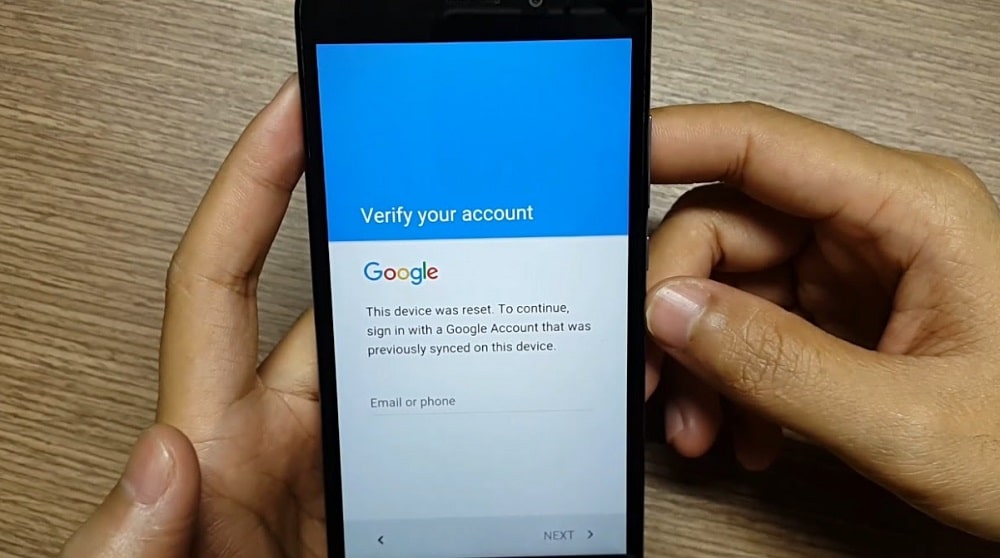
If you are about to perform a factory reset on your Android phone, but then the device asks you to enter your Google login, then know that this phone is protected by FRP. If it’s your phone, don’t bother about this lockout because helping you remove FRP lock is the aim of this guide.
The FRP feature is great for protecting your data from malicious persons and thieves. However, when it backfires and gives you a taste of its effectiveness, without following a working solution, you may be locked out forever.
Here in this article, you will learn how to remove FRP lock using proven, easy methods. At the end of the guide, you will be fully equipped to do a Google lock removal on your own.
Part 1. What is FRP Lock, and How Does it Work?
If you’re asking, What is FRP lock? then you’re on the right track. Learning how to remove Google FRP lock on any phone is easier when you know what the lock is all about.
FRP stands for Factory Reset Protection, and it is an airtight security feature of Android devices since version 5.1 (Android Lollipop). FRP lock protects your Android phone or tablet by requiring the user to enter the email and password of the Google account linked to the phone before performing a factory reset.
Thanks to FRP, a thief would find it tough to reset your missing phone because he or she won’t have a clue of what your Google credentials are. Without passing this verification stage, the thief or unauthorized user is stuck at the verification page.
Part 2. How to Remove Google FRP lock on any phones
If you are the owner of the device, but you just forgot the Google credentials, then this part of the article will show you how to remove FRP lock.
Method 1. Best Way to Remove FRP Lock
When one’s stuck at the verification screen and eager to learn how to remove FRP lock, it’s always recommended to use a professional Google lock removal software. Many of these tools are available, but my pick in Tenorshare 4uKey for Android. Here’s more about this handy application.
Key features:
- This Android Unlocker is not limited to a specific device or Android version. Rather, it removes FRP lock on every Android device model, as well as the Android version.
- You don’t need to manually do anything on your device, because 4uKey for Android will detect every important detail about the phone and prepare it automatically.
- The Google lock removal procedure is really quick. The entire unlocking takes only a few minutes.
- Tenorshare 4uKey for Android bypasses not only FRP locks; you can use this program for forgotten PINs, pattern, password, and every lock screen type.
>> Get Tenorshare 4uKey for Android Coupon (30% OFF) <<
Steps to remove FRP Lock with Tenorshare 4uKey for Android
Step 1. Connect the locked phone
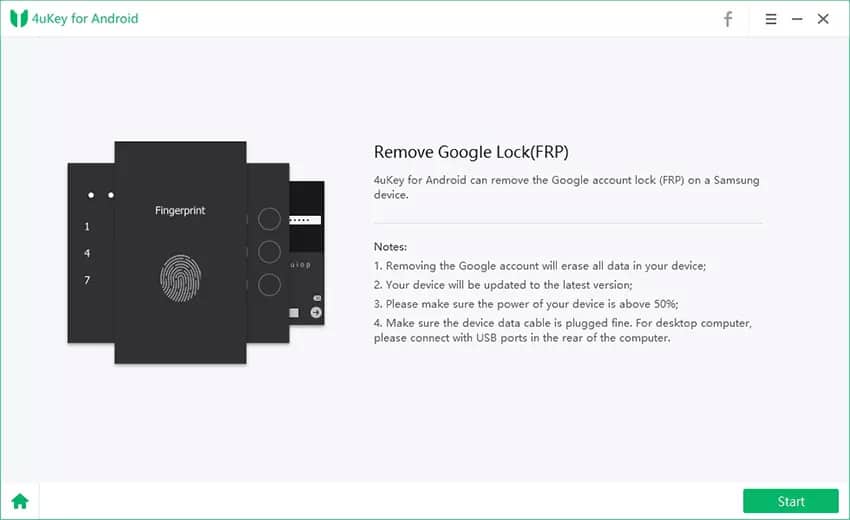
Download and install Tenorshare 4uKey for Android, and to use it for the Google lock removal, open the program and connect your phone to the computer. First, you will be shown two working modes – Remove Screen Lock and Remove Google Lock (FRP) modes.

Connect your phone, and from this first screen, select the “Remove Google Lock (FRP)” option. Before you proceed, ensure that your phone’s battery is charged up to at least 50%. Keep the device connected throughout this process.
Step 2. Put the phone in Recovery Mode
After connecting your phone and selecting the Remove Google Lock (FRP) mode, you will see a screen warning you about what the operation entails. Read through this, and if you are okay with the terms, hit the “Start” button at the bottom.
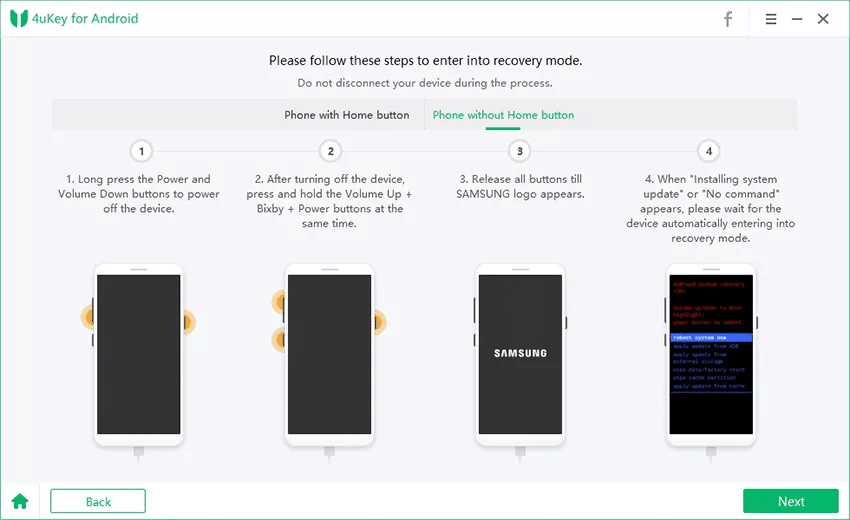
Now, select the brand and model of your Android phone on the following screen. Next, put your device in Recovery Mode following the detailed guide that 4uKey will provide at this point.
How to enter Recovery Mode on devices with a Home button:
- Press and hold down the Power button until it goes off completely.
- Next, with the device off, press the following key combination and hold it – Volume Up + Power + Home button.
- Hold down the above key combination until you see the manufacturer’s logo.
- Now, just wait for the phone to boot into Recovery mode.

how to put phones with a home button into recovery mode
How to enter Recovery Mode on devices with no Home button:
- Long press the Sleep/Wake button to turn off your phone.
- On the switched off phone, press and home the Volume Up and Power buttons (+ Bixby key on Samsung).
- Next, let go of the buttons when the manufacturer’s logo shows on the phone screen.
- Wait for the phone to boot into the Android Recovery mode.
Step 3. Choose additional device information
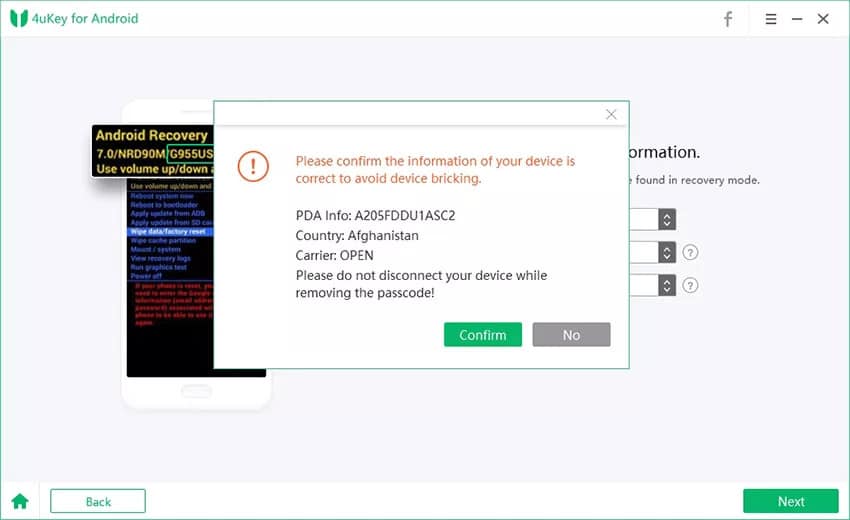
After your device enters Recovery Mode, 4uKey will open a page where you are to enter details about your Android phone. Here, fill in the PDA device, country, and carrier. Click on the “Next” button when you are through with that.
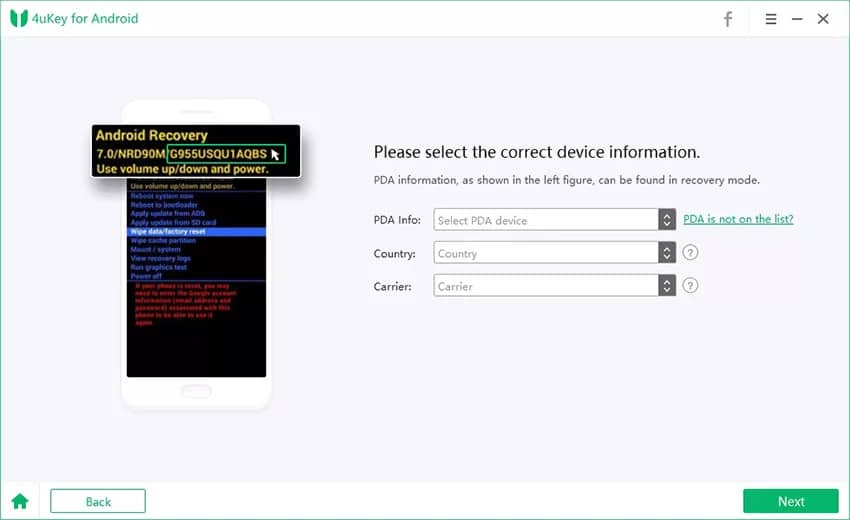
When Tenorshare 4uKey for Android confirms that the information is correct, you will be alerted via a popup. If you entered the wrong information, you might experience complications of the device. Hit the “Confirm” button in the popup.
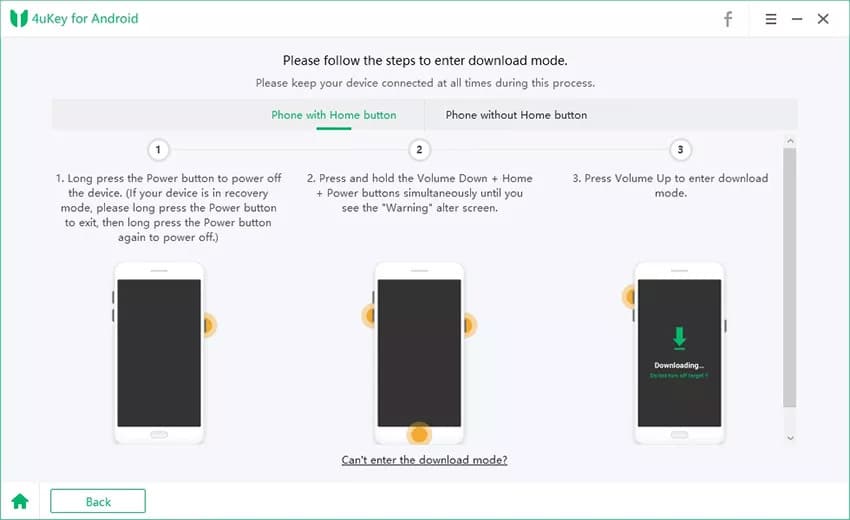
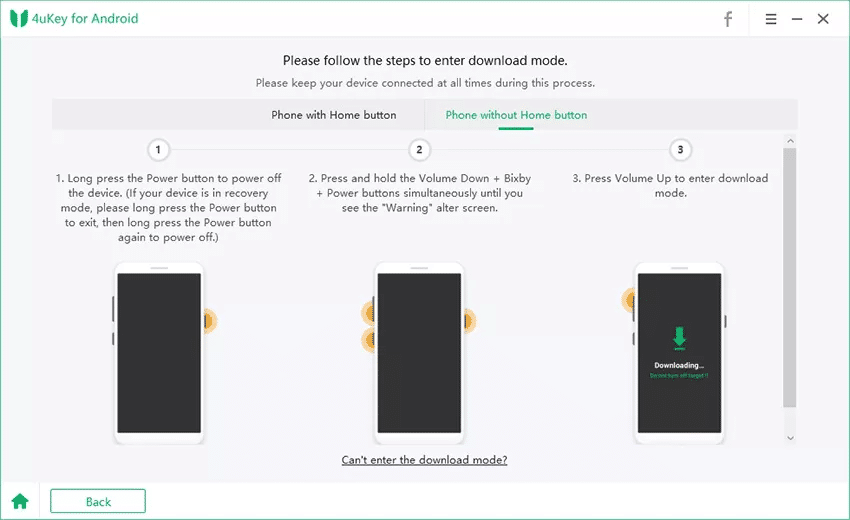
Step 4. Put the phone in Download Mode
Next, you should now put the phone in Download Mode. Thankfully, 4uKey provides a detailed guide for this. The screenshots below show the steps that 4uKey will provide in its interface.
How to enter Download Mode on devices with a Home button:
How to enter Download Mode on devices with no Home button:
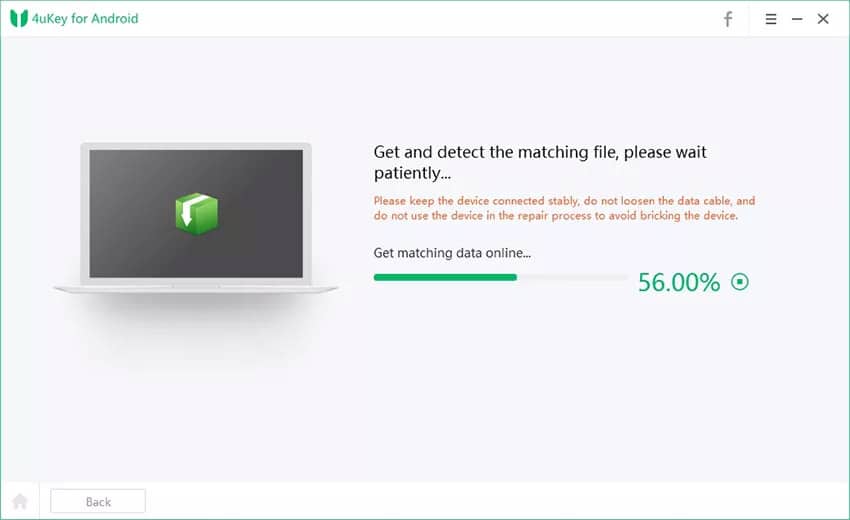
Step 5. Download the firmware data package
Now, at this point, your Android phone should be in Download Mode. You are now going to download a relevant firmware package for the device. The download starts automatically, so you don’t have to do anything.
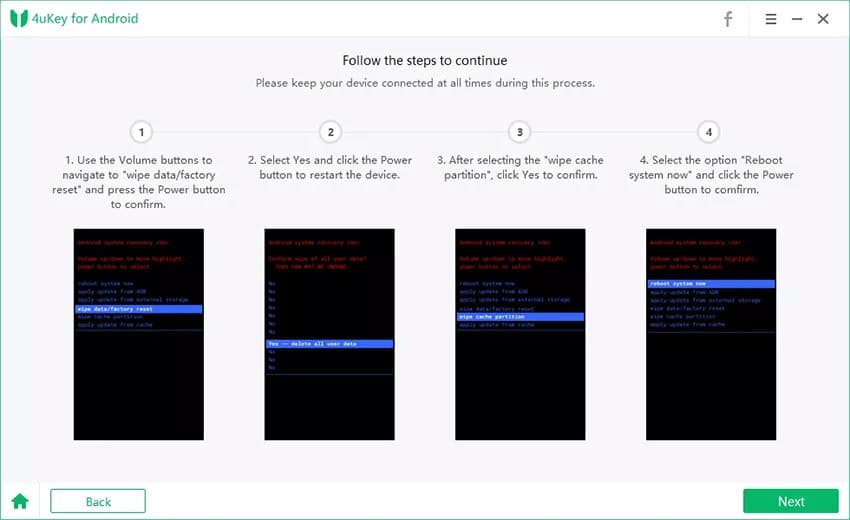
On completion of the firmware package download, put your phone into Recovery mode once again. This time, the steps will also be on the page like the last time. Follow the guide and then hit “Next” when you finish.
In Recovery mode, follow the provided steps for factory resetting your Android device and clearing its cache partition. Have a look at the steps in the screenshot below:
Step 6. Remove FRP lock
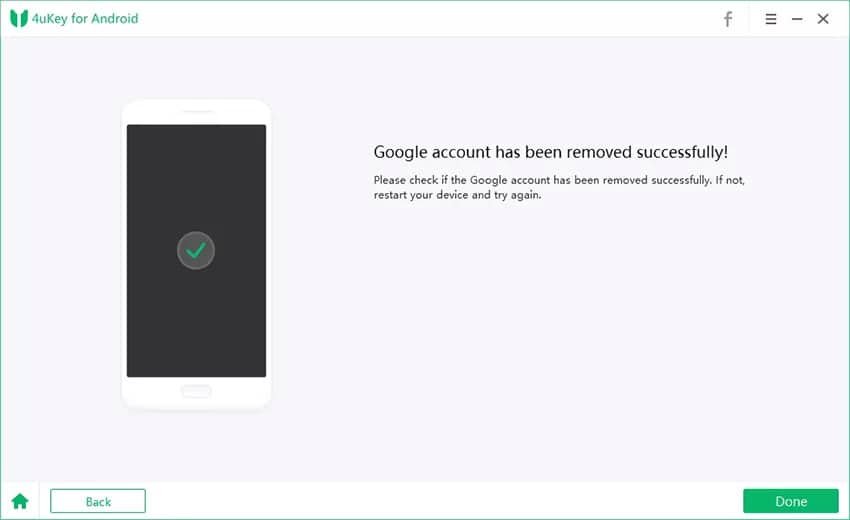
Finally, your device is prepared for the big task. Tenorshare 4uKey for Android takes it over from this point. Once the program detects your device connected with its firmware package downloaded successfully, it begins to remove the FRP lock from it.
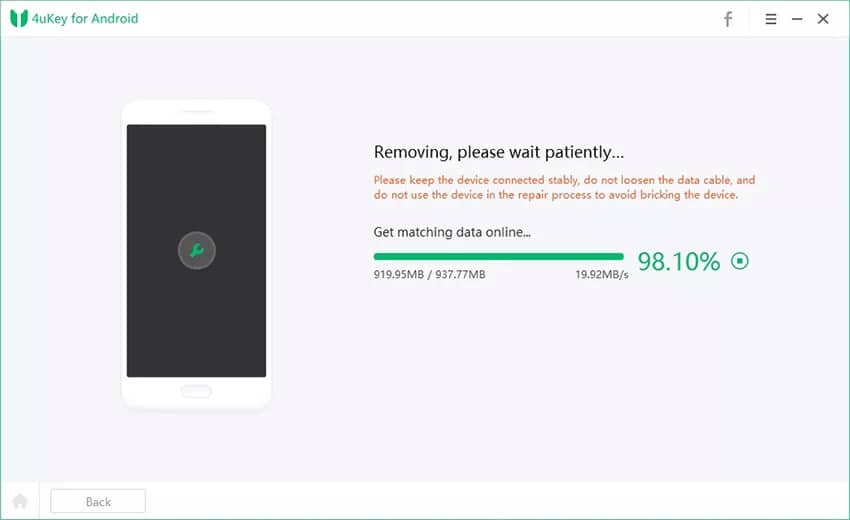
In around 10 minutes, your phone will be unlocked, and you can now set it up, restore your backups, and use a password, PIN, or pattern that you will remember every time.
Method 2. How to remove FRP lock on Any Android Phone without Password
Without a password, Google lock removal is tricky, but it’s possible. The procedure I will use to show you how to remove FRP lock is a trick on the Wi-Fi settings of your phone.
After removing FRP lock on the device using this method, you will lose all your data because you will end up doing a factory reset. If you are okay with this and wish to continue, then follow the steps that follow.
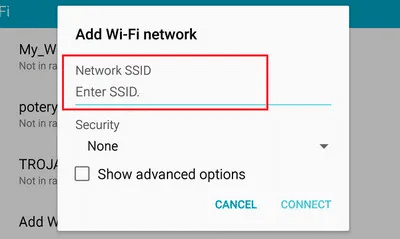
Step 1. Power on your Android phone and leave it to boot. Since you are locked out by FRP, you can’t get past the verification screen.
Step 2. So, return to the screen where you were asked to select a wireless network. Next, tap on “Add Network.” Configure the SSID (name of the network) with any random string of numbers and/or letters.
Step 3. After entering the network name, tap and hold it so that it gets highlighted. Next, from the highlight options, select “Share.” A little list will pop up now; tap on “Gmail.”
Step 4. Next, go to “Notification” > “App Settings” and tap on the hamburger icon at the top right-hand corner of the screen. Select “Account” from the resulting options.
Step 5. Navigate to the “Settings” page now, following the prompt, and select “Continue” to verify the operation.
Step 6. Finally, tap on “Backup & Reset” and then choose “Factory Data Reset.”
Method 3. Remove FRP Lock Using Google Credentials
You probably won’t be searching for how to remove Google FRP lock on any phone if you have your Google account login. Maybe you know only a part of the credentials, such as your username or password and can’t remember the other half?
If you only remember your email address but forgot its password, then you’re in luck. The guide below teaches you how to remove FRP lock on your phone.
Step 1. Visit google.com on an internet browser. Next, click on the blue “Sign in” button at the top right-hand corner of the web page.
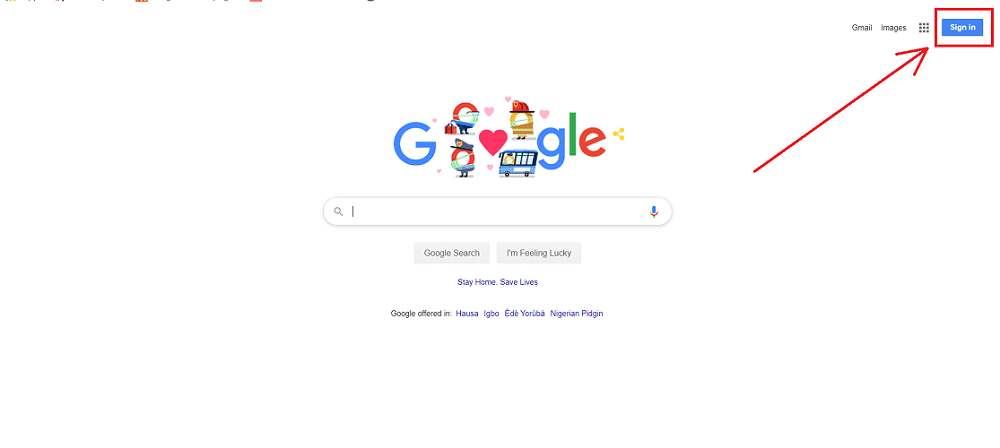
Step 2. Next, enter your Google username if you remember it and hit enter. On the next login page where you are supposed to enter the password, click on the “Forgot password?” link.
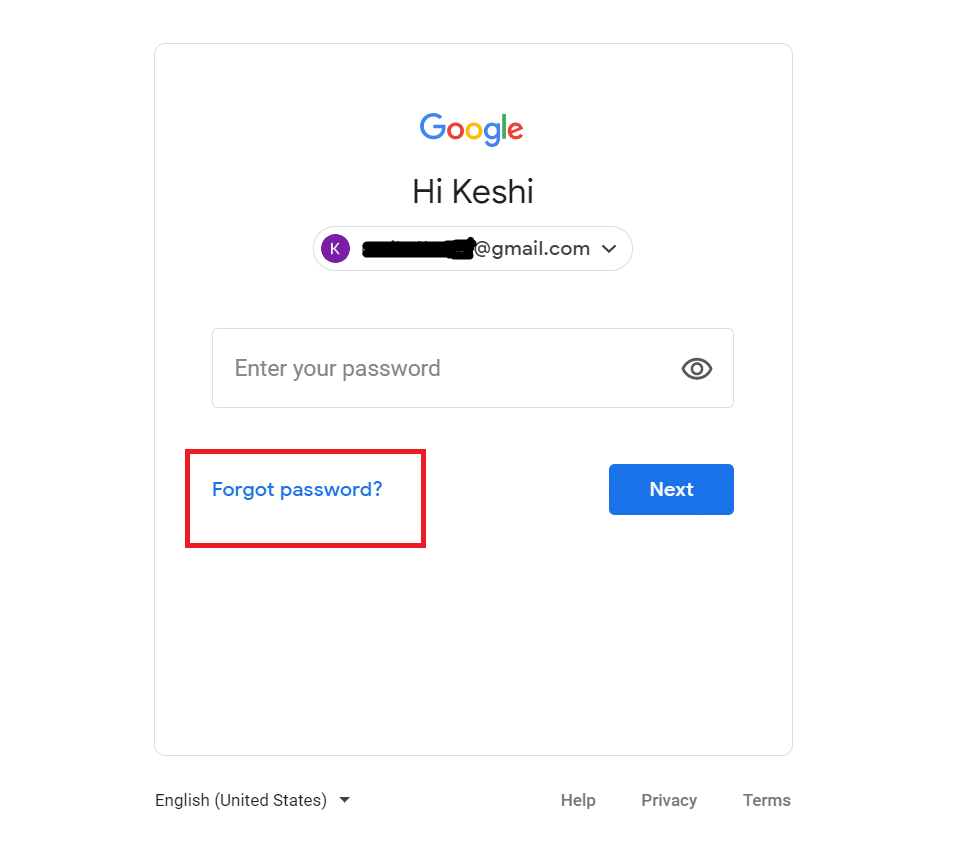
Step 3. Next, Google provides you with multiple ways to recover your lost or forgotten password. If you remember a previous password for this account, you can enter it in the box presented. The other method involving the Google notification will not work because you are locked out of the device.
Step 4. Follow the easy password reset steps. When you successfully recover the password to the linked Google account, then you can now sign into the locked Android phone with this password.
Conclusion
These are simple ways to do a Google lock removal. For the first two methods, your data will be completely erased, and after the Google lock removal, it is the time to restore it and get back your deleted data.
Now that you know how to remove Google FRP lock on any phone, go ahead and unlock yours. If you have any questions, leave it as a comment below.
After entering a network name then as I press and held the network name I have entered, as a window pop up, there is no share option nothing in it sort. So what do I do from there???¿
My phone is an LG
This method is a little complicated, and it doesn’t always work, if it doesn’t work, you can try the method 1.