“Hello, I downloaded an important Word document I received through email. However, when I open the Word document, I find it in read-only mode and cannot edit it. Kindly let me know how to change a Word document from read-only to normal?”
When a Word file is in read-only state, you can only read the document but cannot make any changes. When you download any Word document from the internet, MS Word marks it as read-only by default due to security reasons. It is also possible that the owner of the document has marked the document as read-only to prevent any change to the final version.
Whatever the reason behind the read-only mode of your Word document, you can change the document from read-only to normal. Thereafter, all the editing restrictions get removed, and you can make changes to the document as required. We will illustrate all the possible methods on how to change Word docs from read-only to normal.
Method 1. Disable Protected View
When you download any Word document from the internet and open it on MS Word, it will open in Protected View by default. Since Office 2021, all the downloaded Word documents are put into Protected View automatically for security reasons.
When a document opens in Protected View, it is literally in Read-only mode, and you cannot edit the document. You need to first disable the Protected View to change the document from read-only to normal. Here are the steps on how to change Word doc from read-only when it is in Protected View mode.
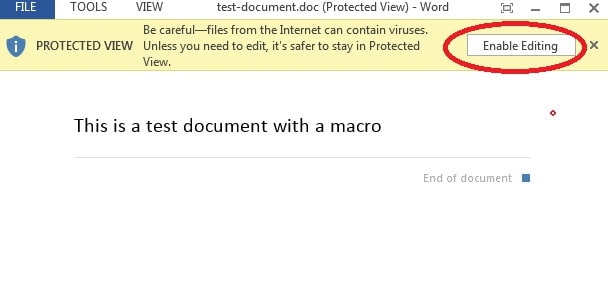
Step 1: Double-click on the downloaded Word document to open it. Once it opens, you will see a yellow bar stating “Protected View.”
Step 2: Find and click the Enable Editing button on the top yellow bar. This will disable the Protected View on the document, and the Word document will reload in normal mode.
All the editing options that are disabled and hidden in Protected View will be enabled as soon as the document turns into normal mode.
Method 2. Stop Marked as Final
When you open a Word document and see that the top yellow bar shows “Marked As Final,” it means the document is in read-only mode. The document’s owner has marked it as final so that none can make changes to the final version of the file.
However, if you need to edit the file and make changes, you have to change the Word file to normal mode from marked as final mode. Here are the steps to follow.
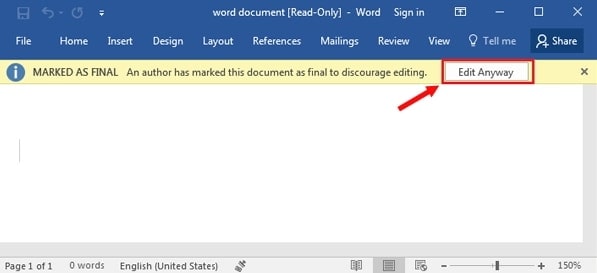
Step 1: Double-click on the Word document to open the file. You will see the yellow bar at the top showing “Marked As Final.”
Step 2: Find and click the Edit Anyway button on the top yellow button.
The Word document will refresh and reappear in normal mode, where you can make changes and save the document.
Method 3. Stop Protection in Restrict Editing with Password
If the owner of a Word document is adamant that no one should edit the document, he can turn on Protection in Restrict Editing with a password. If you receive and open such a document, it will be read-only. You will need the password set by the owner if you want to edit the document.
If you try to edit the document without the password, you will see the error message “You can’t make this change because the selection is locked.” Here are the steps on how to change a Word document from read only by stopping protection in restrict editing.
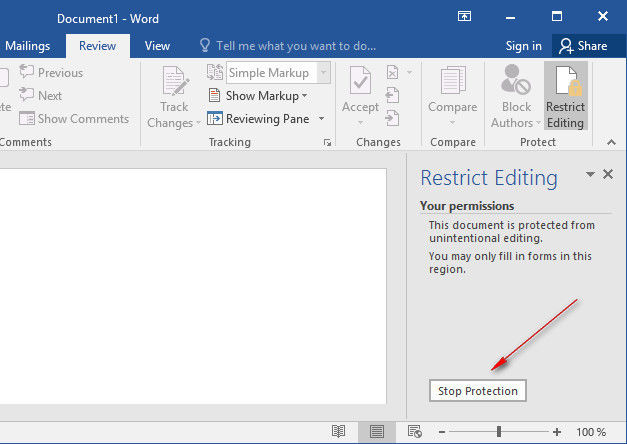
Step 1: Open the Word document with Protection in Restrict Editing turned on. Go to the Review tab located at the top menu.
Step 2: Click the Restrict Editing option on the right side. From the right panel, click on the Stop Protection button.
Step 3: You will be prompted to enter the password set by the file owner to turn off the protection. Enter the password and click on the Ok button.
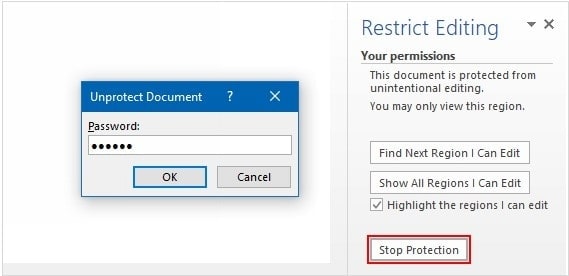
After you enter the correct password, the document will refresh, and you can edit the file as usual.
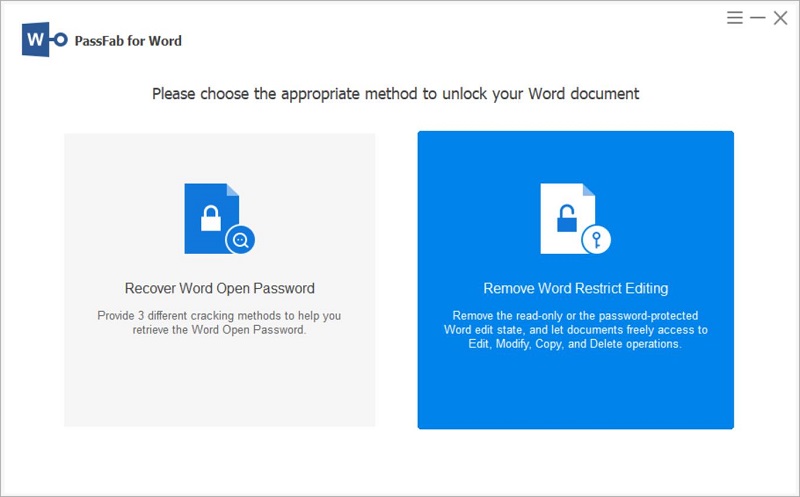
Method 4. Remove Editing Restriction without Password
We have already stated that a Word document can be password protected so that no one can edit the file. If you do not have the password to remove the restriction in editing, you have to use a professional Word password recovery tool to unlock the Word document.
We recommend PassFab for Word as you can unlock password-protected Word documents instantly and successfully.
PassFab for Word supports all the different Word document formats and Word versions. It uses an advanced algorithm to remove the read-only or password-protected state. Thereafter, you can freely access the document and make changes as required. Here are the steps to remove editing restrictions without password via Word Password Recovery.
>> Get PassFab for Word Coupon (30% OFF) <<
Step 1: Download and install PassFab for Word on your computer. Launch the tool and click on the Remove Word Restrict Editing option.
Step 2: Click on “+” icon to import the password-protected Word document.
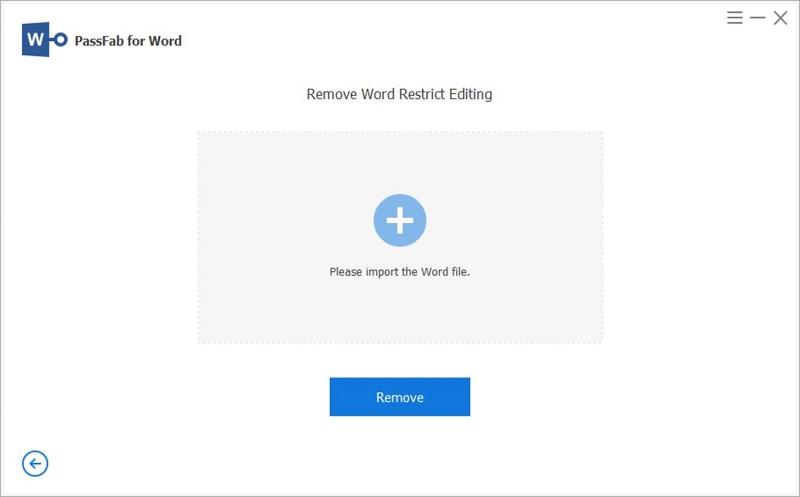
Step 3: Once you import the Word document, click on the Remove button.
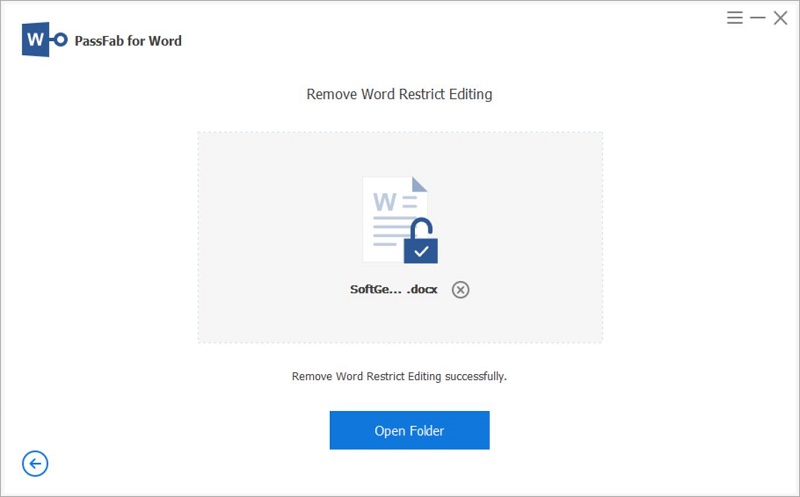
After a few seconds, you will see a confirmation message “Remove Word Restrict Editing Successfully.” Now, when you open the document, it will open in the normal state, and you can edit freely.
Method 5. Remove Read Only from File’s Properties
A Word document can be marked as Read-only from the file’s properties. If you have received a Word document where the owner used the file’s properties to mark it as read-only, you can also turn off the read-only mode from the file’s properties. Here are the steps on how to change Word doc from read-only via Properties.
Step 1: From the File Explorer, go to the location where the read-only Word document is present.
Step 2: Right-click on the Word document and select the Properties option.
Step 3: From the Properties window, go to the Attributes under the General tab.
Step 4: Uncheck the Read-only option and click on the Apply button. Click on the Ok button to finish it off.
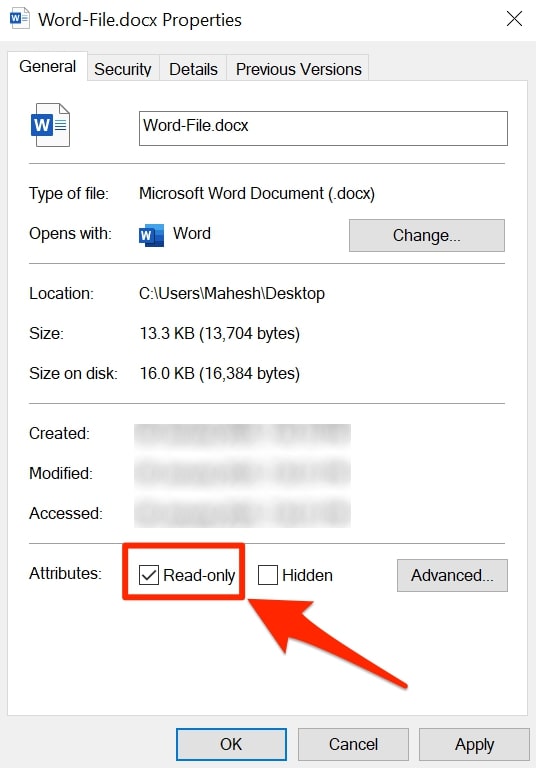
Now, you can open the Word document in its normal mode and make changes as necessary.
Method 6. Copy and Paste Content to A New Word Document
When none of the above-mentioned methods are working out for you, the only option you have is to copy the content of the read-only document. Thereafter, you have to paste the copied content into a new Word document. Even though you are not getting rid of the read-only mode in the original document, you are virtually creating a duplicate file in normal mode. Here are the steps to follow.
Step 1: Open the read-only Word doc by double-clicking on the document.
Step 2: Select the part of the content you need using the mouse pointer, or select the entire content by pressing the Ctrl+A keys.
Step 3: Create a blank Word document by pressing Ctrl+N keys.
Step 4: Press Ctrl+V keys to paste the copied content into the new document. Make the changes as required.
Step 5: Save the new document by pressing Ctrl+S, and you should select the location and mention the filename for the new document.
Frequently Asked Questions About Read Only on Word
Why is Word document read-only?
There are several reasons why a Word doc can be in a read-only state. The document’s owner can mark it as the final version or restrict editing with a password. In both cases, the document will be in read-only mode. If you have downloaded the document online, MS Office makes it read-only for security reasons. Besides, the owner can mark it read-only from its properties as well.
How do I Make a Word document editable?
You can go to File>Info> Protect Document> Enable Editing to make it editable instantly. This is applicable when the Word document opens in Protected View mode. You can also stop Marked as Final status or change the file’s properties to remove the read-only state. If it is password protected, you have to use a professional tool like PassFab for Word to change it from read-only to normal mode.
Conclusion
If you often deal with Word documents, you will come across some documents open in read-only mode. We have explained the different scenarios when a document can open in read-only mode. Accordingly, you have to take the appropriate steps to change the Word document from read-only to normal mode. If the document is password-protected to restrict editing, you can use PassFab for Word to remove editing restrictions.