
Internet is an essential requirement for an individual as well as an organization. In the earlier days, internet usage was only possible on computers, but with the evolution of smartphone technology, it is now made available on mobile devices. iPhones are one of the most advanced mobile phones which have the most influential internet connectivity through Wi-Fi systems, but at times it is observed that iPhone won’t connect to Wi-Fi.
Sim card data is the primary source of internet connection on iPhones, but since the rates are too high, the majority of users prefer to use Wi-Fi internet connections. The Wi-Fi networks if they are from a broadband connection, provides spectacular speed and bandwidth. Free Wi-Fi zones can easily be found in restraints, stations, offices, colleges, and many other commercial places, to attract a large group of mobile users. But it is frustrating when everybody is busy on mobile gaming or chats while you are questioning yourself why is my iPhone not connecting to Wi-Fi.
Above is not an individual’s problem as there is a long list of requests where people write “my iPhone Wi-Fi is not working,” and want instant solutions. There are ample of fixes available online that claim to rectify the problem but mostly confuse the users. We have brought forward the best applicable tricks that may assist or otherwise an efficient software solution, Tenorshare ReiBoot, which can resolve the Wi-Fi issue permanently. Let us discuss the problem in detail and decode the reason for which the Wi-Fi is not working on iPhone.
Why Is iPhone Not Connecting To Wi-Fi?
There are a lot of iOS users who have registered complaints about different mediums about Wi-Fi connectivity, where they ask, “why is my Wi-Fi not working on my iPhone.” Once you are out of network, it becomes a necessity to apply the recovery method and connect the device as soon as possible. But with that, it is equally important to finding out the reason behind the fault. The issues like Wi-Fi not working on iPhone may have appeared due to many typical reasons. It can be because of hardware failure or due to technical faults, and this is why it is crucial to scrutinize the mobile thoroughly.
As an immediate step, you should check the device settings like whether the Airplane Mode has enabled accidentally, which hinders networks. There are chances that everything is in reasonable working condition but the iPhone not connecting to Wi-Fi because it is too far from the Wi-Fi router. In that case, try to stand closer to the router, or it would be better if you could check the network simultaneously on your friend’s iPhone. This will assure you of any issues with the router or the device antenna.
Most often it is observed that the iPhone won’t connect to Wi-Fi although it is placed sufficiently in the range of the network. No matter how long you wait for, but the iPhone is unable to detect the network. Sometimes the phone manages to catch the Wi-Fi network which is in good strength, but the connection is still not made. No need to wait any more for a successful link, because the problem can be due to errors in the iOS system. It can occur by downloading corrupt files, unauthenticated apps, or overuse of mobile, which can disturb the working and create unprecedented failures. It is easy to overcome the troubles of the iPhone won’t connect to Wi-Fi with the help of secure iOS system recovery software.
Solution 1. Toggle Wi-Fi On And Off
When your iPhone not connecting to Wi-Fi, the first and foremost thing you can do is to turn Off/ On the Wi-Fi on your mobile. This does not ensure the network recovery, but at the least, it is going to refresh the signals. The step is vital because sometimes with continuous fluctuation in the signal strength, the phone gets stuck as a glitch in the system. So you can give the process a chance if it repairs itself and never repeats later on. If you do not remember the process to switch ON/ Off the Wi-Fi, learn it from the steps given below.
Step 1. Go to the “Settings” app on your iPhone.
Step 2. Click on the “Wi-Fi” section, and slide the button in left direction to turn Off.
Step 3. Restart your iPhone using the Power button, which will refresh the device.

Step 4. Now follow the above process to reach the “Wi-Fi” section, and slide the switch towards the right to turn it On.
Wait for some time to see if the mobile connects to the Wi-Fi network. If the trouble persists, check out other ways.
Solution 2. Delete All The Wi-Fi Networks Stored On Your iPhone And Reconnect.
If toggling the switch doesn’t help and still the Wi-Fi not working on iPhone, probably there is a problem with the credentials. There may be a bulk off stored networks in the list which are hustling the device connectivity and creating difficulties for network detection or connection over Wi-Fi. Deleting the entire listing from your device and then trying to reconnect with the preferred network is one of the simple tricks to resolve the problem. So if erasing the saved networks is not a problem for you, since it is presumed that you remember the correct password, or else copy it somewhere, and follow the given process to delete all the Wi-Fi networks.
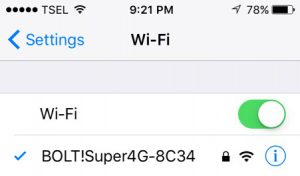
Step 1. From the “Settings” app on your iPhone, and go to the Wi-Fi section.

Step 2. Choose any of the networks shown and click on the “i” icon given in front of it.
Step 3. A diagnosis section of the selected network opens up.
Step 4. Click on the “Forget This Network” option, later on, the “Forget” button on the pop-up window that appears.
Step 5. Repeat the same process with all the networks.
This process will ultimately erase all the networks from the list. Now you can again start searching and try to connect with one of your choices by entering the password.
Solution 3. Reset Network Settings
To reset the network settings is an advisable solution from many iOS users if you tell them “my iPhone is not working.” For anonymous reasons sometimes the network settings get disordered which in-turn creates difficulty in Wi-Fi or cellular connections. When you choose to reset the network settings, the process will erase all the network connections along from the device. The cellular, Bluetooth, APN & VPN settings, and network passwords will also get removed. Before applying the process, you should note down the password of corresponding networks.
Step 1. Click on the “Settings” app, and open the “General” section.

Step 2. Down below you can find and click over the “Reset” option.
Step 3. Now click on the “Reset Network Settings” and verify it.
The above process will set the network settings to default. Now you can try to connect once again by searching Wi-Fi network.
Solution 4. Reset Wi-Fi Network Router
Since you are still facing issues with Wi-Fi network, there are a few chances of problems persisting in the router. Wi-Fi router is the device which transmits the net to your iPhone. If you are trying to connect a signal in a Wi-Fi zone of some organization, then you cannot do anything with the device. But if you are in your home network, then you can attempt to reset the network router itself. The reset will erase the router and Wi-Fi username and password along with any other preset settings you have made. For those who think, “why is my Wi-Fi not working on my iPhone,” can follow the steps to reset the network router.
Step 1. Power On the Wi-Fi router, and lift it to check the side which has the “Reset” button.
Step 2. The button can be close to the connecting wires. Take a pointed pin and insert it into the button space continuously for approx 30 – 40 seconds.
Step 3. When the lights start to blink on the router, you can release the button.
Your router is now on the factory condition. Create a new username and password and check if your iPhone can connect to the network.
Solution 5. Reset All Settings
The mobile phones are commonly provided with an option known as “Reset All Settings.” The process whenever applied will bring back the mobile to its original factory settings position. The thought behind suggesting the reset all settings option is to eliminate any known/ unknown changes occurred in the device framework, as there may be some of them which are hindering the signal and making the iPhone not connecting to Wi-Fi. You also need the passcode of the iPhone, without which you will be prohibited from resetting the mobile. Read the steps to know how to reset all settings on your iPhone.
Step 1. From the “Settings” menu on your iPhone, go to the “General” section.
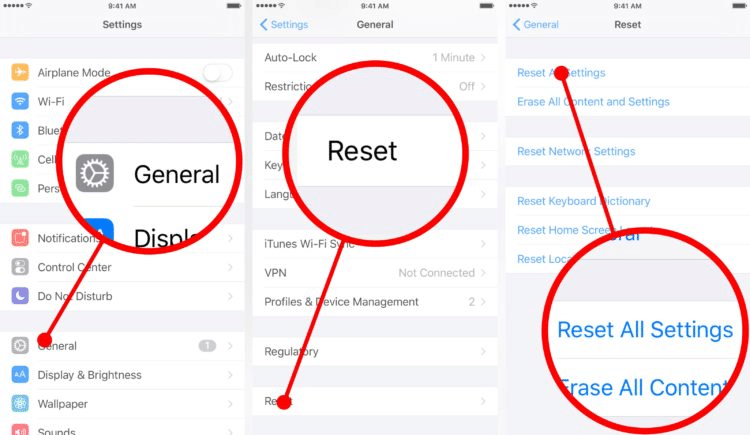
Step 2. Scroll down and click over the” Reset” button.
Step 3. Now click on the “Reset All Settings” option and enter the passcode.
As you verify the reset choice, the process starts and takes a few minutes. When everything is back to normal, try again to get connected with your Wi-Fi network.
Solution 6. Repair iOS System (Fix All iOS Issues)
Trying out random tips and tricks on the iPhone, can easily corrupt or damage the system files and put the device into a dead state. But even after going through a few of the applicable methods, my iPhone Wi-Fi is not working. I must not waste my time searching or connecting as there is a vast possibility of some technical faults. When the iPhone does not restore the Wi-Fi network, it can be due to iOS issues, which requires iOS system repair from an expert tool.
Tenorshare ReiBoot is ranking on the top among the iOS system repair solutions available on the internet. Tenorshare is already a famous brand for the developing standard quality of software repair products for mobiles and computers. The ReiBoot is a popular product by Tenorshare and is powerfully capable of resolving the maximum number of causes for iOS troubles. Problems like Wi-Fi not working on iPhone can be instantly cured by recovering the device using Tenorsahre ReiBoot.
Tenorshare Reiboot has been regularly updated to perform reluctantly and is powerful enough to reform 50 plus iOS obstacles, with a guarantee of “no data loss” in the process. To get away with the inconvenience of iPhone not connecting to Wi-Fi, you can go ahead to download and install ReiBoot on your PC and link it with your iPhone. The experienced development team has designed a user-friendly software panel, while the tool can comfortably handle the device and works smoothly over the computer. Tenorshare products including the ReiBoot are compatible with all the latest or earlier launched iPhones & iPads, and supports Mac & Windows PCs.
A limited feature edition of the complete software is provided for free to download on the official Tenorshare website, which gives an idea about the interface and working of the tool. If there are other issues like enter/ exit recovery mode troubles, you can use this software. But if you want to know “why is my iPhone not connecting to Wi-Fi,” the pro version is the suitable option. The pro edition is available on Monthly, Yearly, and Lifetime license basis for five iDevices at nominal prices. You can buy a special edition for more than five device support on a Yearly license basis. Lets us discuss some more features of Tenorshare ReiBoot blow. Or read our ReiBoot review here.
Key Features Of Tenorshare ReiBoot:
- The ReiBoot supports both Windows & Mac systems and is compatible with all the iPhones and iPads launched till date from iPhone 11/ 11 Pro, iPad Pro, etc., to the oldest ones.
- It can deal with 50 plus iOS troubles, including iPhone not connecting to Wi-Fi.
- There is a guarantee to secure the internal data of the device during system repair.
- The user can comfortably downgrade the iOS Beta to the latest iOS version, which is usually troubled while restoring from iTunes.
- Problems faced during backup & restore using iTunes can be quickly resolved without data loss.
- For factory resetting the device passcode, security code, or iTunes is not necessary.
- The free edition of ReiBoot has a feature of 1-click Enter/ Exit Recovery Mode enabled.
- The user interface is comfortable to understand, with simplified steps.
>> Get Tenorshare ReiBoot Coupon (30% OFF) <<
Detailed Steps To Use Tenorshare ReiBoot:
The Tenorshare ReiBoot is one of the easiest third-party software, which can most efficiently resolve the queries like, “why is my Wi-Fi not working on my iPhone.” To work over your iPhone and rectify the problem turn On your PC and download & install the Tenorshare ReiBoot software. Now go through the guideline given below to get connected.
Step 1. Connect your iPhone to the PC via USB, and launch the tool.
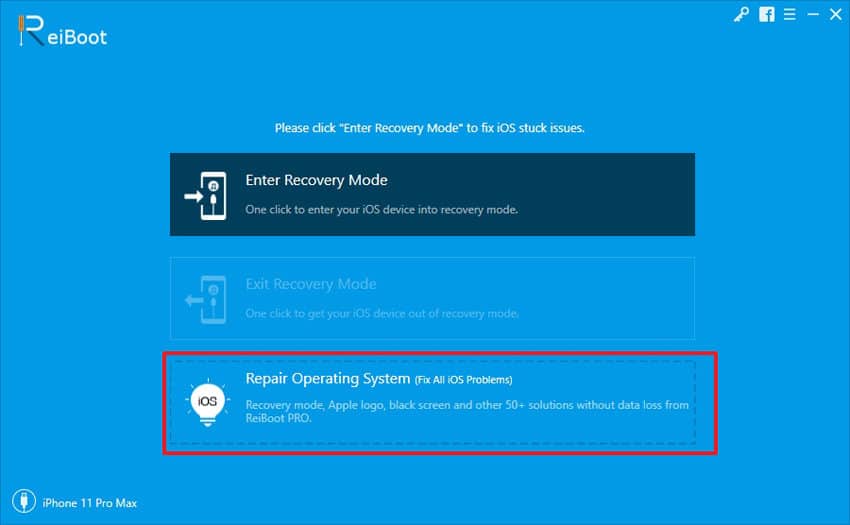
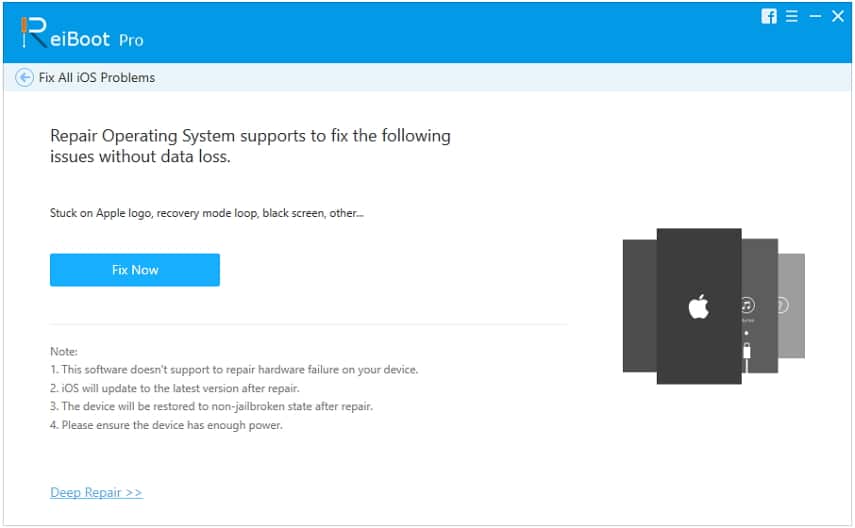
Step 2. The Wi-Fi problem requires you to repair the OS of the device; so you need to go with the last option “Repair Operating System,” and proceed.
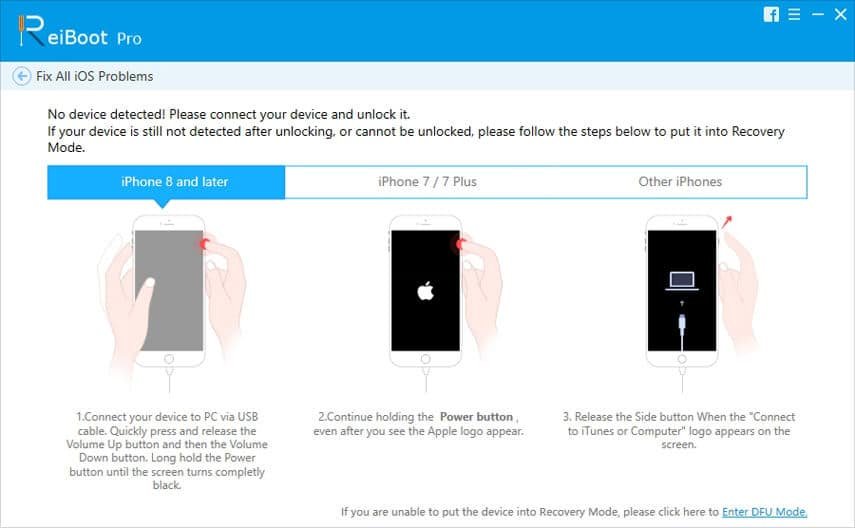
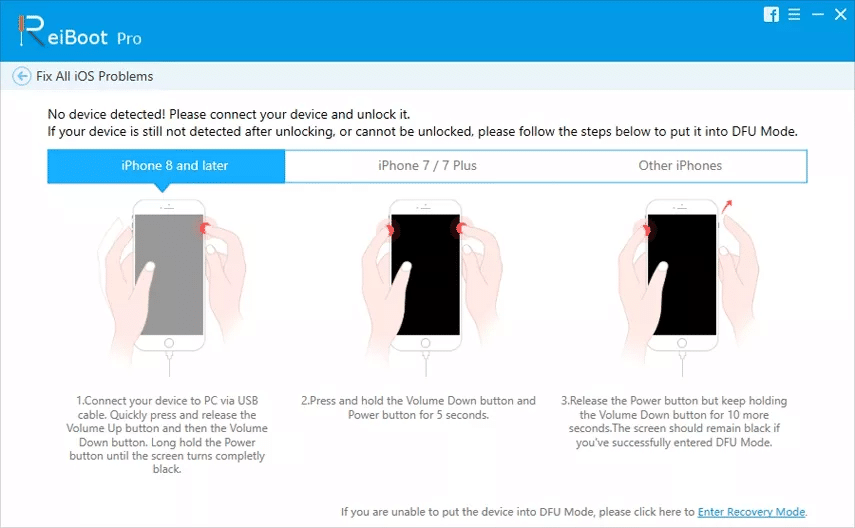
Note: As a rare chance if the tool is unable to fetch the model number, you can either opt to enter the “Recovery Mode” or “DFU Mode” manually, by applying the steps that are provided on the software panel according to the iPhone model.
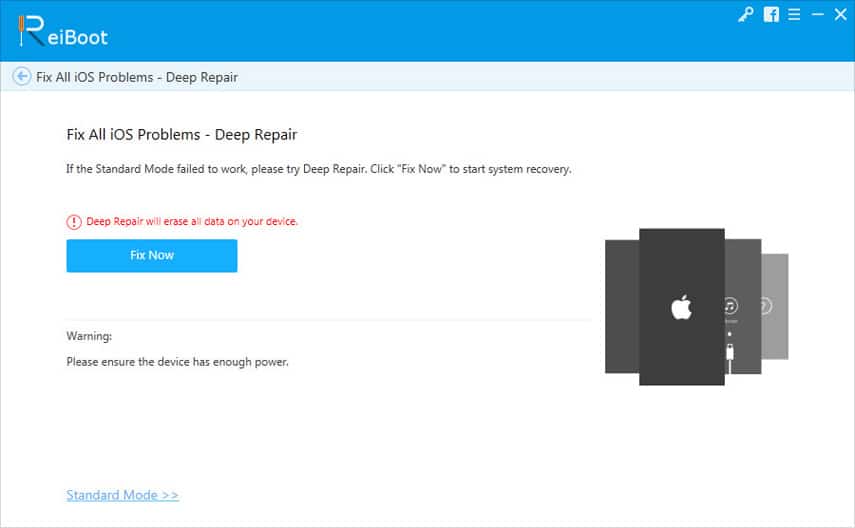
Step 3. Above is the “Standard Mode” of the software. If this was unsuccessful, you could go with the “Advanced Mode” by clicking on the “Deep Repair” link, but this will erase the data on your mobile.
Step 4. The next page shows the device model details after a few seconds when the tool detects it.
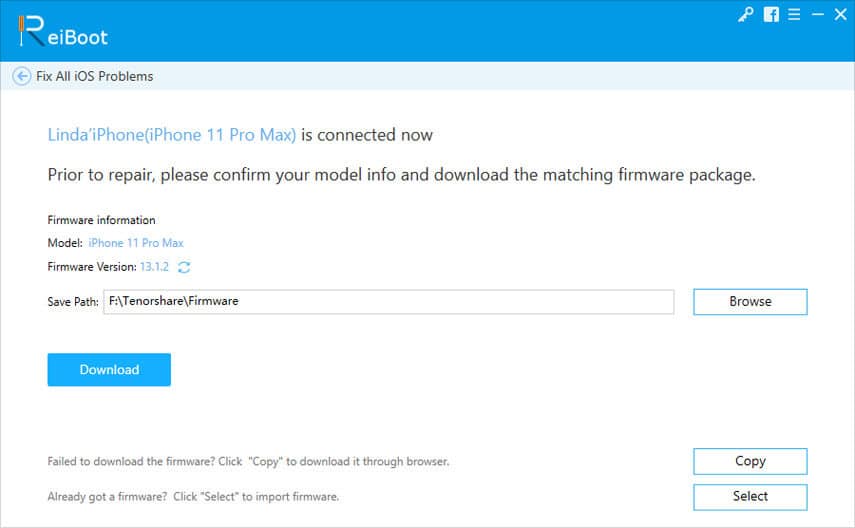
Step 5. When the ReiBoot detects the iPhone model, you get provided with a firmware link which you have to download on your system. The page gives the options to change the download file location, or import a pre-downloaded file from your PC. If you face any issue while downloading, there is an option to copy the link and download the file.
Step 6. Once everything is done, click on the “Repair Now” button to begin recovery.
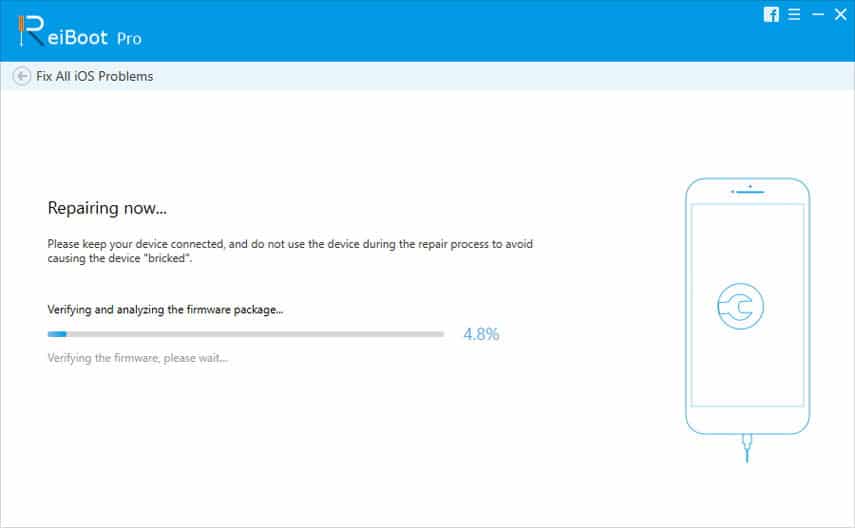
The iPhone reboots after the recovery process finishes, and you can instantly verify that Tenorshare Reiboot fixes the iPhone won’t connect to Wi-Fi problem.
Solution 7. Put Your iPhone In DFU mode & Restore It With iTunes
All the iDevices, and other mobile formats too, have a system to upgrade the device firmware through a unique procedure, which is known as DFU mode. This is not meant to be used by the consumers or ordinary iPhone users, because the process makes you change the software version directly. But since the whole method can refresh & restore the iOS firmware, it can even be tried out as a means to overcome specific technical issues on the device. So if you are still worried, “why is my iPhone not connecting to Wi-Fi,” and want to try the firmware upgrade, then carefully follow the method below. Entering the DFU mode is only recommended if it is done under the assistance of specialized tools since they help to restore the system perfectly. Make sure to take a backup of the iPhone data, as the restore through DFU mode will delete everything from the device.
Step 1. Check the iTunes app on your PC to keep it updated to the latest version,
Step 2. Now connect your iPhone to the computer using USB wire.
Step 3. Press the below-given buttons on your device according to the model number and wait until the message “iTunes has detected iPhone in recovery mode” is shown on the screen.
- For iPad, iPod, or iPhone 6s and lower series: Long press the “Home” button with the “Side” button, and wait for the message on the screen.
- For iPhone 7 and 7 Plus series: Long press the “Volume Down” button with the “Side” button, and wait for the message on the screen.
- For iPhone 8 and higher series: Press the “Volume Up” button, and instantly release it. Repeat the same procedure with the “Volume Down” button. Now long press the “Side” button and wait for the message on the screen.

Step 4. The iPhone is now in the DFU mode.
Step 5. Now you can restore your iPhone from iTunes app on the computer.
You may have to repeat the process several times because it usually halts in between and gets corrupted. Check out the Wi-Fi network when the recovery process finishes.
Conclusion
iPhones are superb quality mobile devices with unmatched features and functions. The processors and antenna used in the Apple devices are of high frequency which can catch the Wi-Fi signals from long distances, while the iOS system is unquestionable at any point. Your mind gets tensed even after a good purchase when the iPhone not connecting to Wi-Fi.
The iPhone is solidly built to protect the hardware inside, which hardly creates any problem for Wi-Fi. There are a few typical methods which work to improve the connection by connecting the network. But for technical errors or issues on the iOS system that create troubles like iPhone won’t connect to Wi-Fi, the user can always prefer to take help from Tenorshare ReiBoot. It is a reliable and cost-effective tool that can diagnose all the existing glitches and refreshes the mobile with the immediate recovery process.