
If your iPhone screen won’t turn on, and you need guidance on getting it back on, read this article. Various problems can cause this issue, so the solutions can either be easy or technical. In this article, you will learn everything about this challenge and what to do when your iPhone won’t turn on.
Part 1. Why Won’t My iPhone Turn On?
When your iPhone won’t turn on, the cause could either be from the hardware or software. Regarding the software issue, sometimes, processes or applications get corrupt and/or crash. When this happens, the iPhone won’t turn on. Hardware issues have to with the physical components of the iPhone. When they malfunction, they too can prevent the device from turning on.
Another reason why iPhone screens won’t turn on is that the charger or USB cable is not certified, hence capable of turning it on. To troubleshoot the issue, you should replace the charger and lightning cable. The next section of this article will show you what to do when your iPhone won’t turn on.
Part 2. What to Do When Your iPhone Won’t Turn On
Now that we are clear about the real reasons why your iPhone won’t turn on, we will now get to the solutions for fixing the issue.
Solution 1. Charge the iPhone That Won’t Turn On (Also Check Your Lightning Cable And Your Charger)
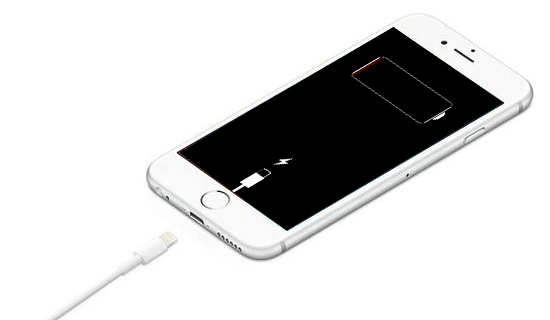
Sometimes, your iPhone won’t turn on simply because there is no juice left in it. An iPhone on a dead battery will not turn on. Before proceeding to more complicated solutions on this guide, get an OEM USB cable and use it to plug your iPhone into an external power source. Leave it for around an hour until it is fully charged, and then attempt to turn it on.
If the reason the iPhone screen won’t turn on was a dead battery, it should be all good now. But if the device still does not come on after one hour of charging, confirm that the lightning cable and charger used are reliable and certified.
Instead of wondering why won’t my iPhone turn on, I first try to charge the device. Apart from the USB cable and charger, check the power outlets and adapters. Even if this solution does not fix your iPhone, you would need a fully-charged battery for the following solutions. Proceed to solution 2 if charging your device does not repair the issue.
Solution 2. Try Hard Restart When iPhone Won’t Turn On
The iPhone equivalent of removing your smartphone battery and re-inserting it is the hard reset. It is used for repairing minor iOS system challenges. Here, we will hard reset the iPhone that won’t turn on to fix the problem. There are different ways to hard reset the various iPhone models, and we will have a look at them.
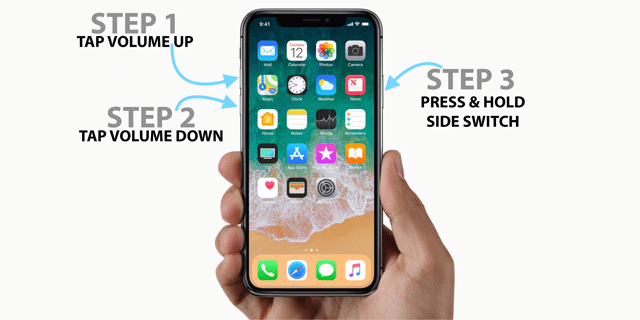
How to hard reset iPhone XR, iPhone X, iPhone 8, iPhone XS, and iPhone 11/12 series:
Step 1. First, press the Volume Up button and release it.
Step 2. Next, press the Volume Down button and also let go of it.
Step 3. Click the Power button and hold it down till the power-off menu slider shows on your screen. Now, don’t yet let go of the Power button.
Step 4. Hold down the Power button until the iPhone screen lights up and the Apple logo comes up. Then release the Power button.
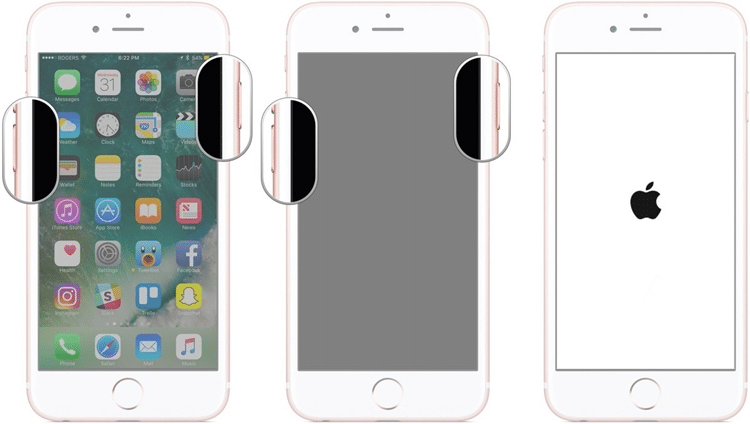
How to hard reset iPhone 7 and iPhone 7 Plus:
Step 1. First, press the Power button and the Home button, and hold them down simultaneously. When the power off slider shows on your screen, do not let go of the buttons.
Step 2. The iPhone will go off and restart automatically. Wait for the apple logo to show up, and then let go of the Power button and Home button.
Step 3. Finally, the hard reset process will begin, and after a few seconds, when the device reboots, your screen should totally come up.
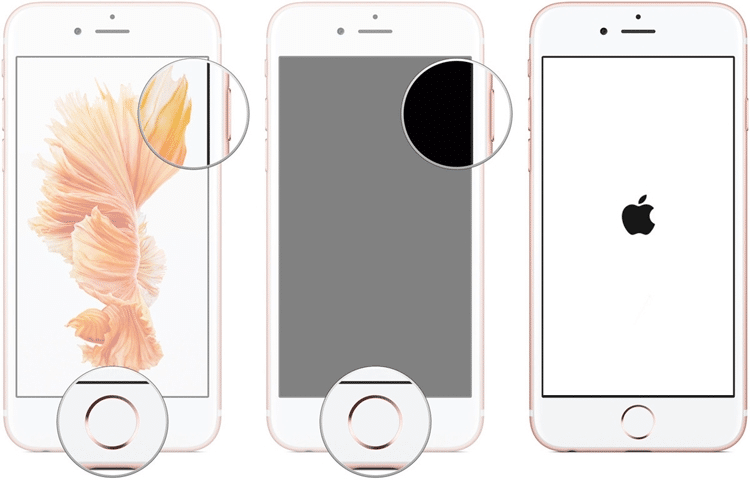
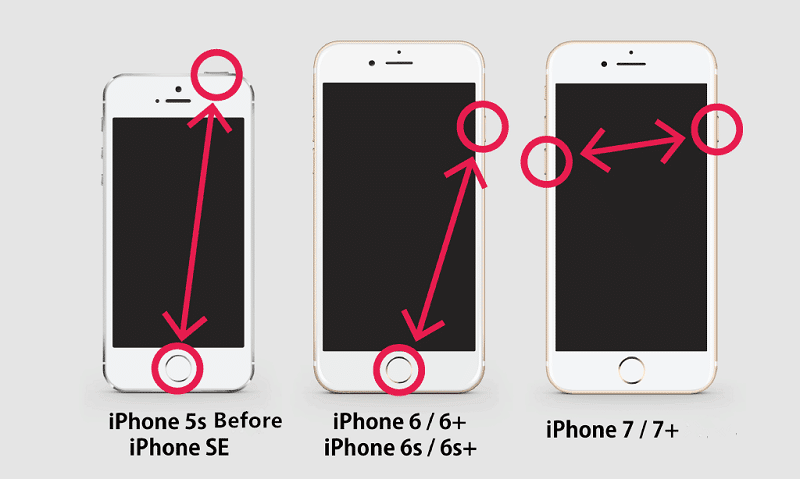
How to hard reset iPhone 6S and earlier devices:
Step 1. Press and hold the Power button.
Step 2. With the Power button still held down, press the Home button and hold down both buttons together for around 10 seconds.
Step 3. Keep holding them down, and you will see the Apple logo light up your iPhone screen. At this point, you can let go of the Home button and Power button.
Solution 3. Fix iPhone Won’t Turn On with an iOS System Recovery (No Data Loss)
Here is an iOS system recovery software for PC and Mac systems called Tenorshare ReiBoot. It repairs many iPhone problems and works on iPhone screens that won’t turn on. With ReiBoot, you connect your iPhone to your computer and use the software to fix any iPhone software issue. Learn more from this Tenorshare ReiBoot review. We will now go through a detailed guide on how to use ReiBoot to repair an iPhone that won’t turn on.
Key Features:
- Unlike most other iOS repair tools, Tenorshare ReiBoot does not delete the data saved on your iPhone in the repair.
- It supports the newest iPhone models – iPhone 12, 11, 11 Pro, XS, XS Max, XR, etc., as well as older iPhone models.
- After fixing your current issue, you can also use this same ReiBoot to repair more than 50 other iOS problems if the need arises.
How to use ReiBoot to fix iPhone won’t turn on:
Step 1. Download the software
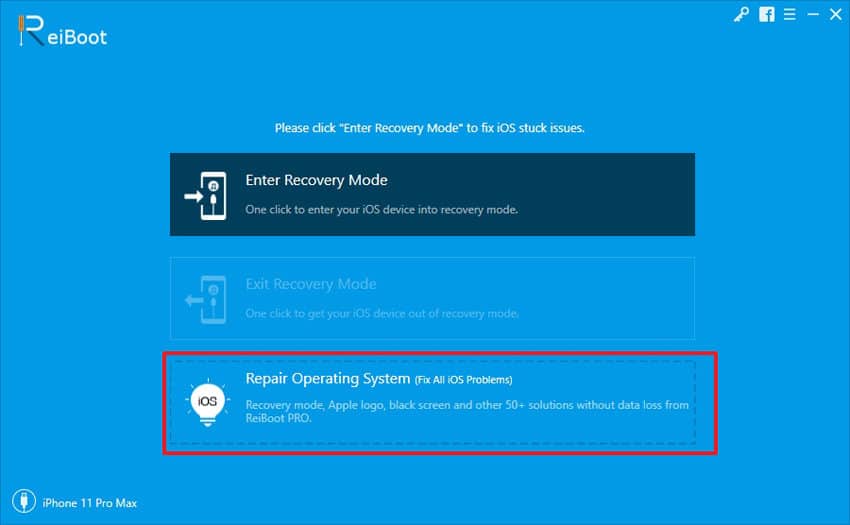
Either on a Mac or PC, you can download and install Tenorshare ReiBoot software on it. After the installation, launch the software and connect your iPhone to the machine using a reliable USB cable. On your computer screen, click on the “Repair Operating System” mode when ReiBoot detects your device.
>> Get Tenorshare ReiBoot Coupon (30% OFF) <<
Step 2. Begin the iPhone repair
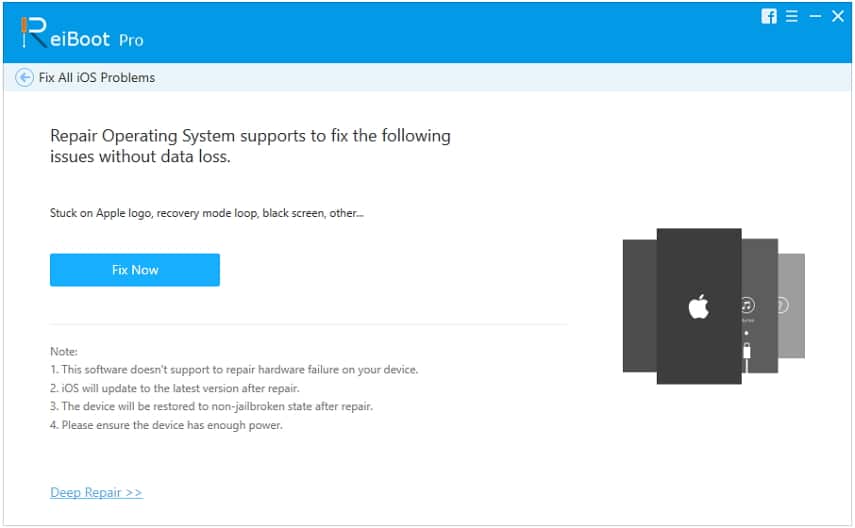
On the next interface, you will be warned of the implications of this operation you have chosen. To authorize ReiBoot to continue with the repair, hit the “Fix Now” button for ReiBoot to start working on your iPhone.
Notes:
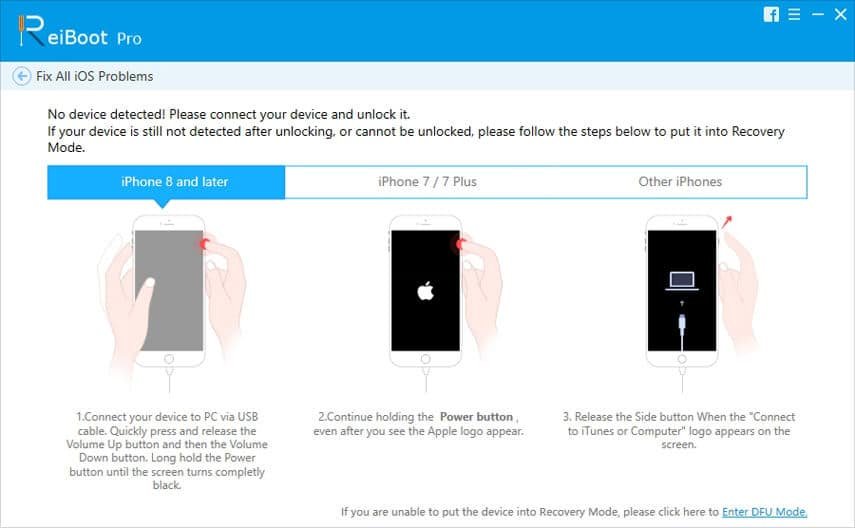
1. If your iPhone is not automatically detected by Tenorshare Reiboot, you have to boot the device into Recovery Mode to proceed. ReiBoot will display on-screen instructions to do this if you do not know how to boot into Recovery Mode. Check out the steps on the screenshot below:
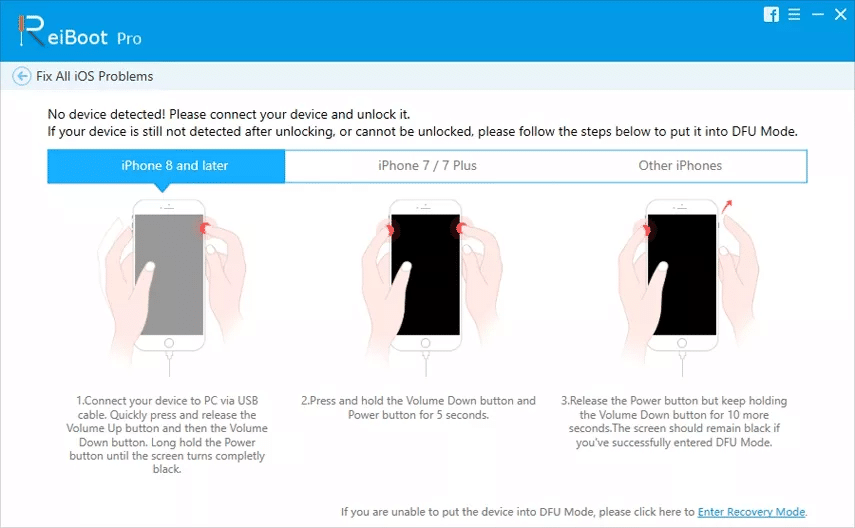
2. If you boot your iPhone into Recovery mode, but ReiBoot still does not recognize it, then you should now put the device in DFU mode. Like in the case of Recovery mode, ReiBoot also shows you steps to put your iPhone in DFU mode. Find the steps in the screenshot below:
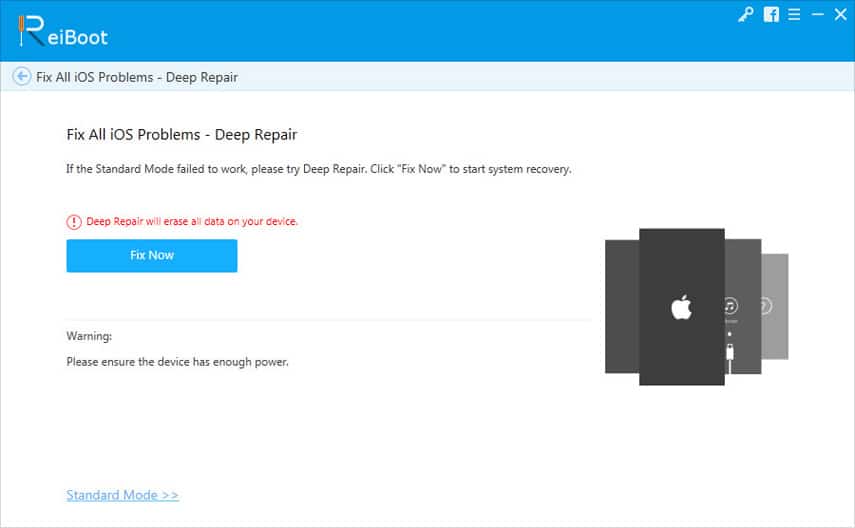
3. Also, note that if all fail or the final repair process does not work, you can retry the entire repair using the “Deep Repair” mode. This mode is more advanced than the default system-wide recovery mode. It also fixes more in-depth issues, but the disadvantage is that it wipes your iPhone in repairing the device.
When your device is finally detected, on your computer screen, click on the “Fix Now” button to begin the real operation of repairing the iPhone that won’t turn on.
Step 3. Download the iOS firmware package
Now, you are supposed to download the iOS firmware for your iPhone. To set the download directory, click “Browse” and then hit “Download” to get it from the internet.
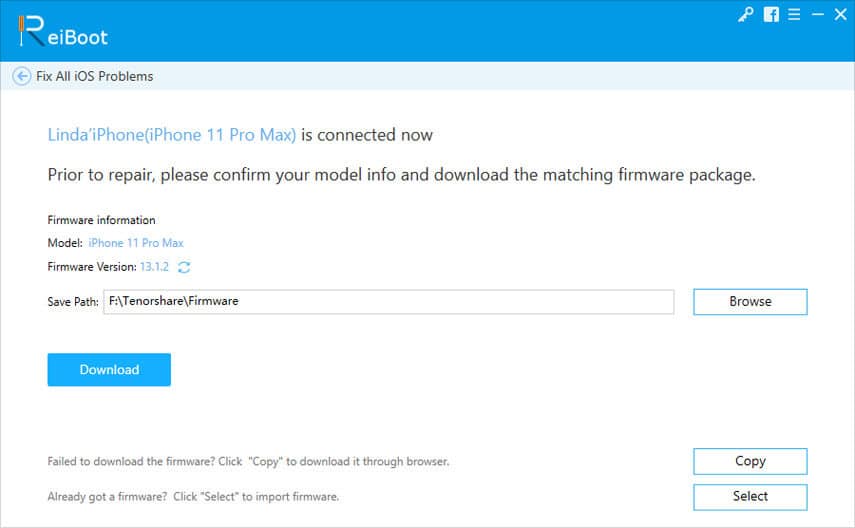
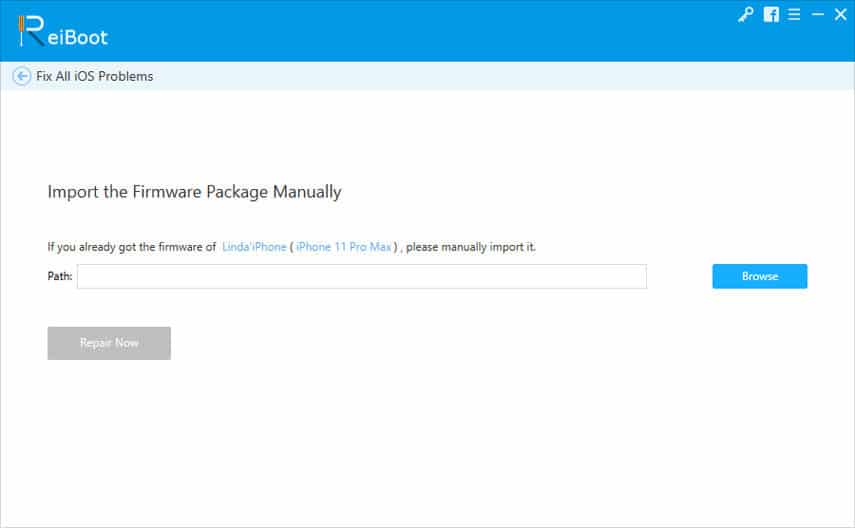
You don’t need to download this firmware package if you have it on your system already; all you have to do is click “Select” and find the file. On the next screen, you can select where you wish to import the zip file from.
Step 4. Repair iPhone that won’t turn on
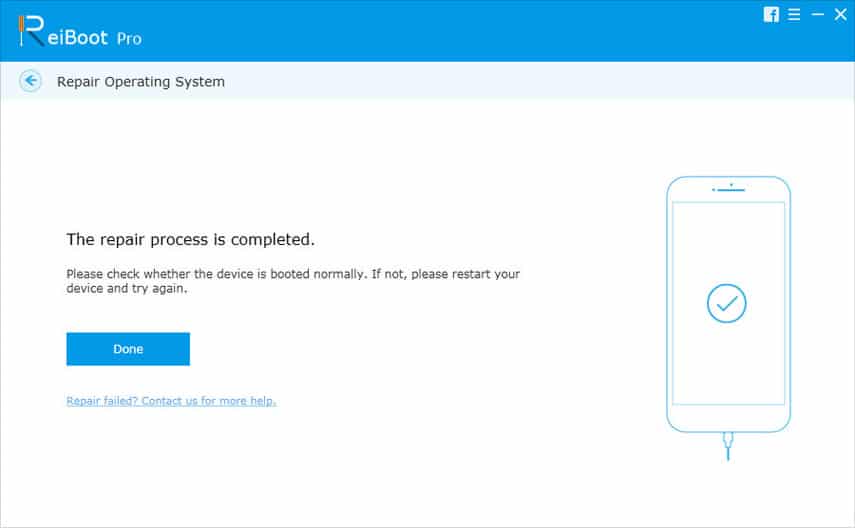
Wait for the firmware package to download completely to your machine. When that happens, trigger the repair process by clicking on the “Repair Now” button.
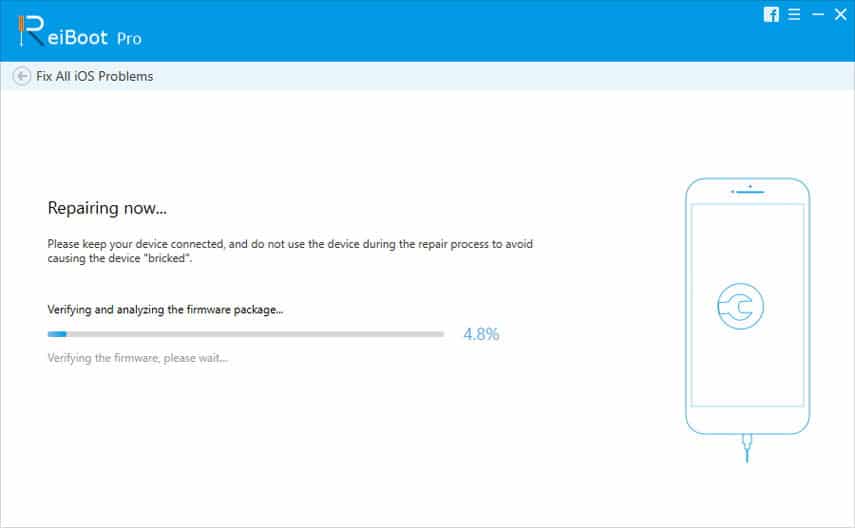
There is nothing else to do here except waiting for the operation to finish. You will know when this happens because the ReiBoot window will show up the prompt saying that the process is complete. Finally, click “Done” and allow the iPhone to reboot.
Solution 4. Restore your iPhone to Factory Settings with iTunes
This method of repairing iPhones that won’t turn on is fast and effective. However, note that it will wipe your device of everything on it. That means that after repairing your iPhone, there will be no music, pictures, calendars, settings, etc. on it. Below are the steps for restoring your iPhone with iTunes.
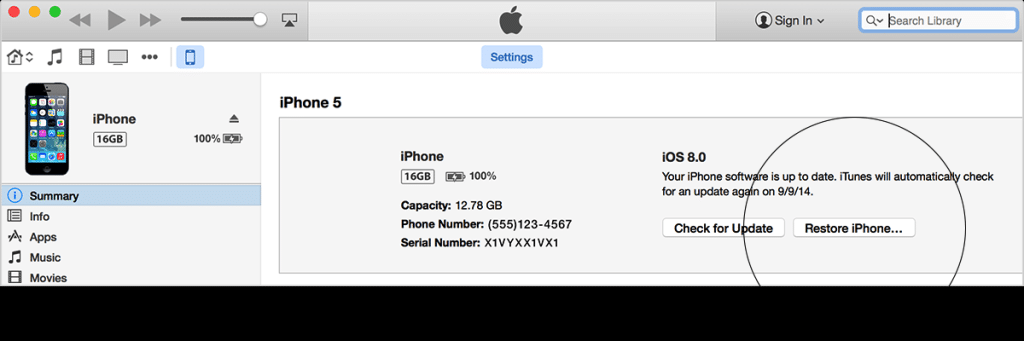
Step 1. Install the latest version of iTunes on your computer, connect your iPhone to the computer, and then launch iTunes.
Step 2. iTunes will show you some basic information about your connected iPhone now. On this window, click on the “Restore iPhone” button, as you see in the screenshot below.
Step 3. Next, authorize iTunes to restore your iPhone to factory settings and delete all that is on it. After that, iTunes will begin to download your iPhone’s firmware package, and after that, proceed to use this firmware to factory restore the device.
Step 4. A couple of seconds later, your iPhone will restart. Slide it up to set up the device as a new iPhone. If you have a backup, you can also now restore it.
Solution 5. Restore Your iPhone to Factory Settings in DFU Mode
This fifth solution is the last one we will proffer if your iPhone won’t turn on at all. Restoring your iPhone to factory settings in DFU mode will also wipe the device. It involves only two steps – first, put the iPhone in the DFU mode and then trigger the factory reset process.
In the course of the factory restore, your device will also be updated to the newest iOS version. For this guide, let us begin by putting the iPhone in DFU mode. Here are the steps:
How to put iPhone 6s and earlier models in DFU mode:
Step 1. Press and hold the Sleep/Wake/Power button. With this button still held down, press and hold the Home button now.
Step 2. Now release the Sleep button while the Home button is still held down.
Step 3. Finally, wait till your iPhone enters DFU mode, then let go of the Home button.
How to put iPhone 7 and 7 Plus in DFU Mode:
Step 1. Press and hold down the Power button, and then press the Volume Down button also. Hold both buttons down for around 10 seconds.
Step 2. Next, let go of the Power button but keep holding Volume Down until the iPhone enters the DFU mode.
How to put iPhone 8, 8 Plus, iPhone X, and iPhone 11/12 series in DFU Mode:
Step 1. First, tap the Volume Up button but don’t hold it.
Step 2. Do the same with the Volume Down button. Tap it, and don’t hold it.
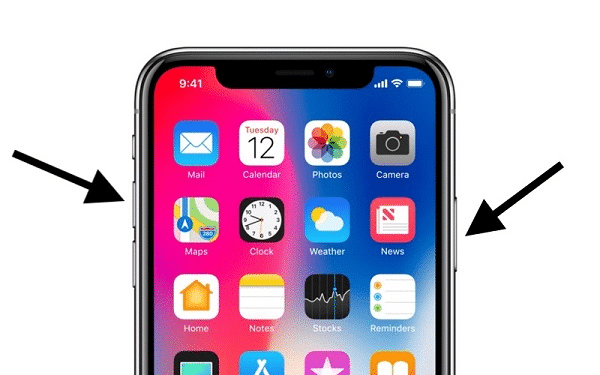
Step 3. Next, press the Power button now and wait until the screen goes off. Well, for this fix, the screen would already be off. Just hold it down for around 6 seconds.
Step 4. With the Power button still held down, press and hold down the Volume Down button together with the Power button.
Step 5. Do not release these buttons for around 6 seconds. Next, let go of the Power button, but keep the Volume Down button down.
Step 6. Finally, when your iPhone enters into DFU mode, release the Volume Down button.
Now, with your iPhone successfully put in DFU mode, it’s time to factory reset the device. Follow the guide below to do this:
Step 1. Install the latest version of iTunes on your computer, and then plug your iPhone into the machine.
Step 2. When your iPhone is in DFU mode, iTunes will recognize it but find an issue with the connected device.
Step 3. Agree with iTunes’ suggestion to reset the iPhone by clicking “OK.” Your device will be restored to factory settings.

Tips: Rescue Your Data from iPhone That Won’t Turn On
Here is something that you must know before using any of the methods here that will wipe your data from the iPhone. If you have important items on your device whose iPhone screen won’t turn on and would need to salvage them, here is an iPhone data recovery tool that lets you do this quickly. Tenorshare UltData is perfect in this scenario. It’s fast and highly efficient at recovering data of all formats.
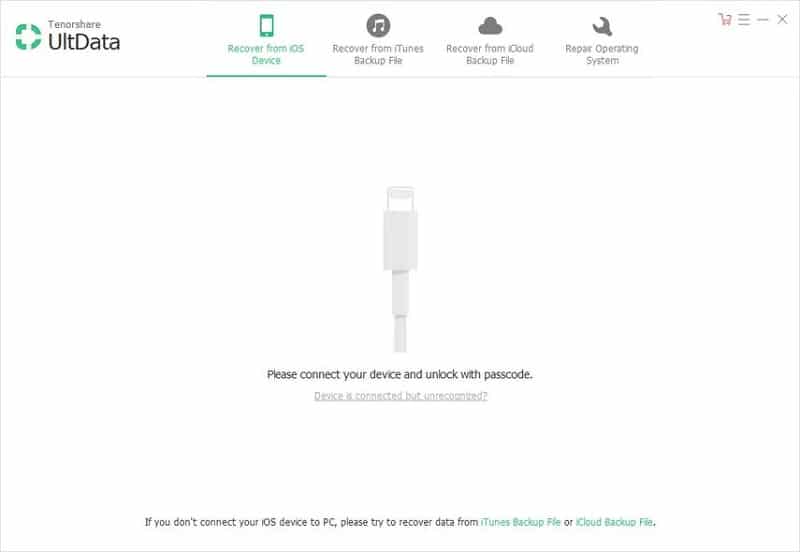
Further, even if you have already performed the operation and lost data in the process, you don’t have to worry too much because Tenorshare UltData can also recover formatted data. Simply launch the program and select the scenario in which the file(s) were lost. Finally, choose the formats for recovery, and in no time, you will get back your lost data. Learn more from Tenorshare UltData review here
Conclusion
When your iPhone screen won’t turn on, it could be as a result of software or hardware issues. In this post, we have run through why your iPhone won’t turn on and 5 excellent ways to fix it. Knowing that some of the techniques will wipe your iPhone, we have also recommended Tenorshare UltData to recover your data after the operation.