To edit a read-only Word document, you only have to disable the read-only file attribute. Disabling read-only means you can edit (i.e., write) Word files instead of just view (i.e., read) them. Fortunately, it is really simple to remove read-only in Word! This article will provide several possible fixes and explains how to edit a read-only file attribute from a Word document.
Scroll down to discover why a Word document has a read-only file attribute. After that, you will find ways to turn off read-only in Word documents and can edit the files as desired.
What is Read-only on Word?
Read-only on Microsoft Word documents means a protected view to restrict further formatting or editing of the content. In other words, you can only view the file’s contents but cannot write to it (saving or changing content will not be possible).
Reasons for Read-Only:
- All Word documents downloaded from the internet automatically have the protected view (by default). Microsoft does this for additional security concerns. Here’s what you see when the read-only mode is enabled only for security reasons:

- At the same time, some authors modify the file attribute of the Word document and change it to read-only. So, they can restrict others from formatting or editing the Word document.
- Sometimes, it is the third-party antivirus that can force you to open a Microsoft Word file only read-only, regarding it as potentially unsafe.
- Reduced Functionality Mode is another potential reason you can access the documents in read-only mode. It means your Microsoft Office license is expired or you do not have an active subscription.
The list goes on. Whatever the reason, read on to learn how to edit a read-only document.
How to Remove Read-only from Word Document?
This list contains potential solutions for Word documents with a protected view.
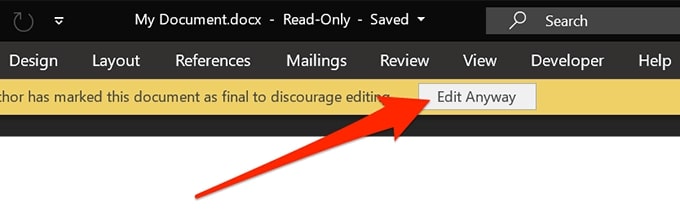
1. Edit A Read-only Word by Disabling Mark as Final
Some Word documents are MARKED AS FINAL but are not password-protected. You can easily disable the Mark as Final status by clicking on the “Edit Anyway” tag in the Message Bar.
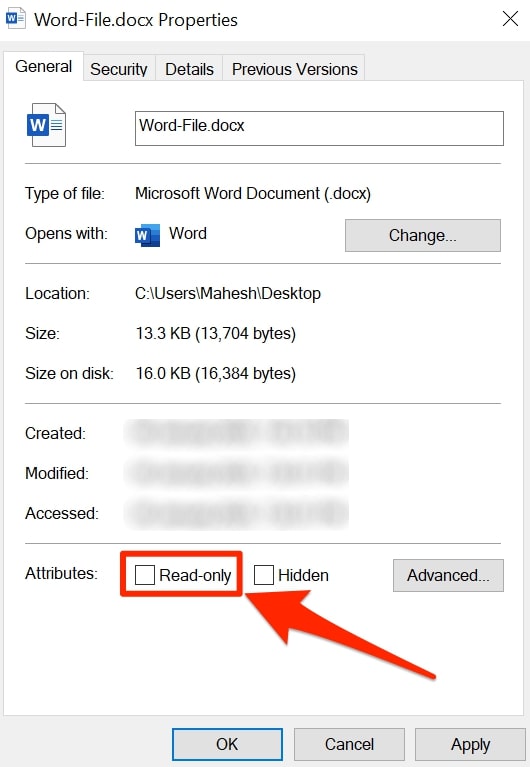
2. Edit A Read-only Word by Removing the Read-Only Attribute
Another alternative to the previous solution, you can also choose to remove Read-only file attributes from the file properties.
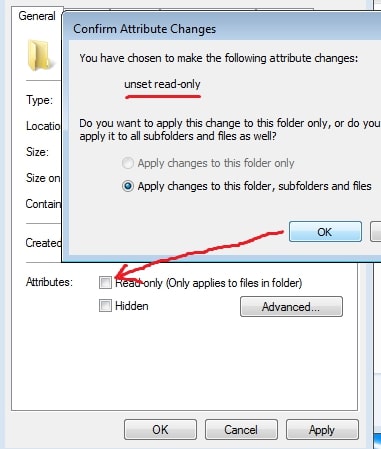
Clicking on “Edit Anyway” from the Message Bar is the way to go when you are handling a single file. However, if a folder containing several Word documents has read-only attributes, this method is useful for the sake of efficiency.
Here’s How to Edit a Read-only Word document by Changing the File Attribute:
- Right-click the Word file. From the drop-down menu options, choose Properties.
- Uncheck the box assigned to Read-only and click OK.
If you are changing the read-only file attribute of a folder containing Word documents, follow the same steps. Once you click on “OK,” you will see a pop-up with two options. Ensure to check the option assigned to — “Apply changes to this folder, subfolders, and files.”
If the read-only attribute is removable, then the document must be editable.
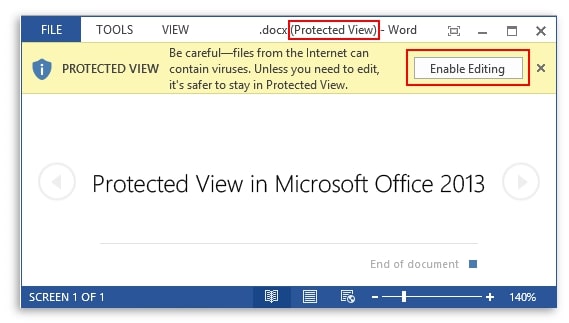
3. Turn Off Read-only in Word By Disabling Protected View
If you have downloaded a Word file from the internet, by default, Word opens the file in Protected View. If that’s the case — you can click on the “Enable Editing” option in the Message Bar to disable the Protected View.
Alternatively, you can turn off read-only in Word via the File option.
- Go to File.
- Select Info.
- Choose Protect document.
- Select Enable Editing.
4. Remove Read-only from Word By Disabling Edit Restrictions
Word documents have a Restrict Editing feature that allows the original creator to assign a read-only view and set a password to prevent unauthorized modifications. So, you will need the password to disable Restrict Editing from Word documents.
Here’s How to Remove Read-only from Word documents by Disabling Edit Restrictions:
Step 1. Locate the Word document with Edit restrictions and open it.
Step 2. In the ribbon, click on Review.
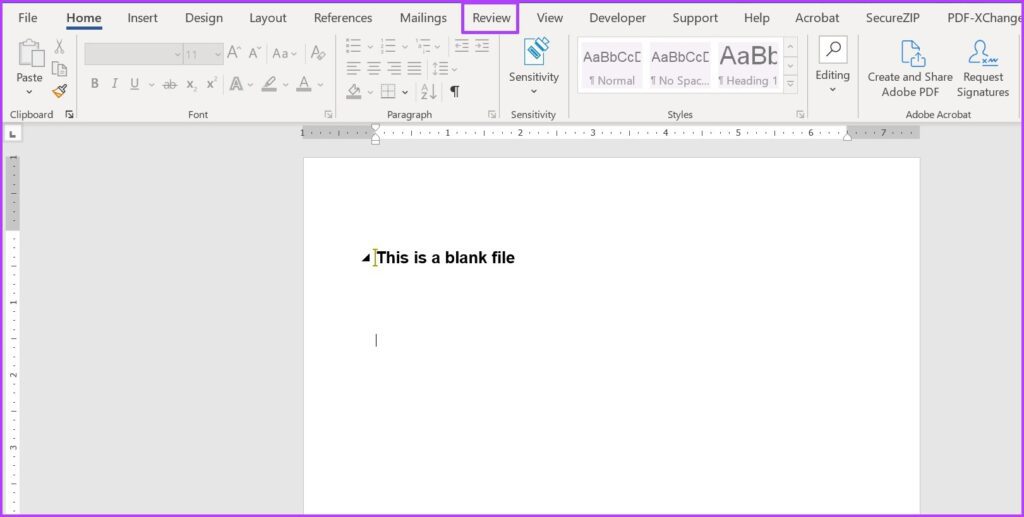
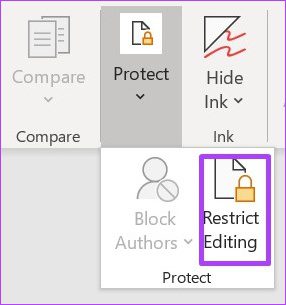
Step 3. From the top-right corner of the ribbon, click on the down arrow under the Protect option.

Step 4. Select Restrict Editing.
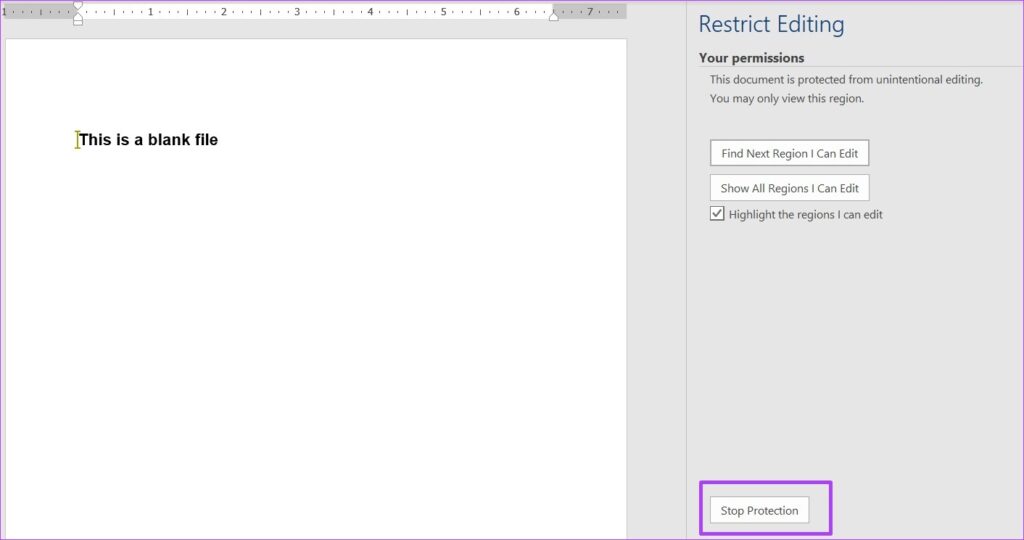
Step 5. In the Restrict Editing pane on the right-side, click on the Stop Protection option (at the bottom).
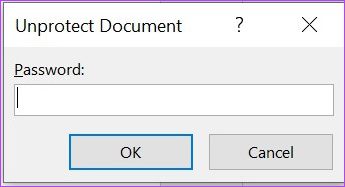
Step 6. Enter the Password in the pop-up box.
Click OK to change a Word document from read-only status and edit its contents. (If you do not know the password, skip to the next solution).
Step 7. Ensure to Save the file to retain the Restrict Editing changes. Go to File> Save. And confirm by clicking OK on the dialog box.
5. Remove Editing Restriction from Word Document without Password
The previous solution works if you have the password to remove the read-only in Word documents.
But what if you do not have the password?
You can rely on a third-party Word password recovery tool like PassFab for Word to remove read-only from Word documents and make them editable.
PassFab for Word is an unlocking utility that allows you to remove all kinds of restrictions from a Word document and gives you complete access to the file’s contents.
Here’s how to remove read-only from Word documents using PassFab for Word:
Step 1. Download PassFab for Word.
>> Get PassFab for Word Coupon (30% OFF) <<
After installing the tool on the Windows computer, open the program.
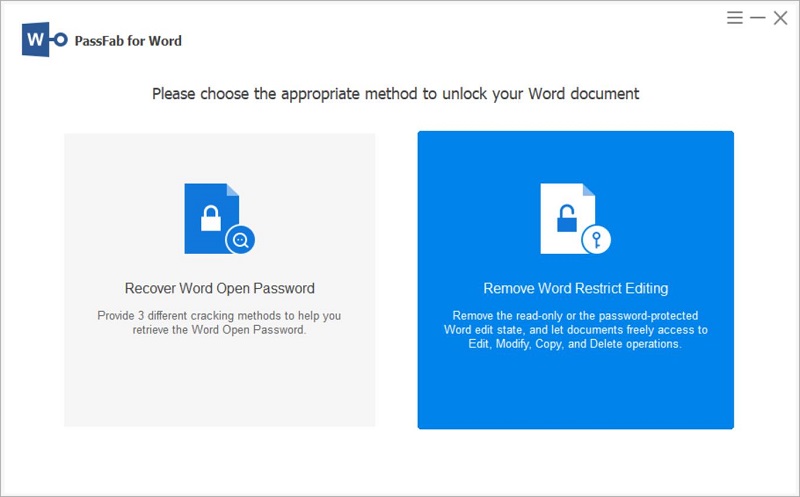
Select Remove Word Restrict Editing from the main interface of PassFab for Word.
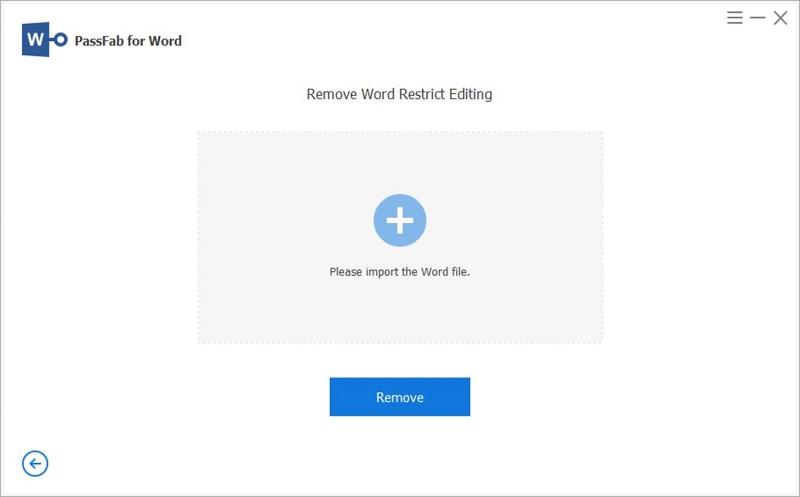
Step 2. Remove read-only in Word.
- Upload the locked Word document.
- Click on Remove.
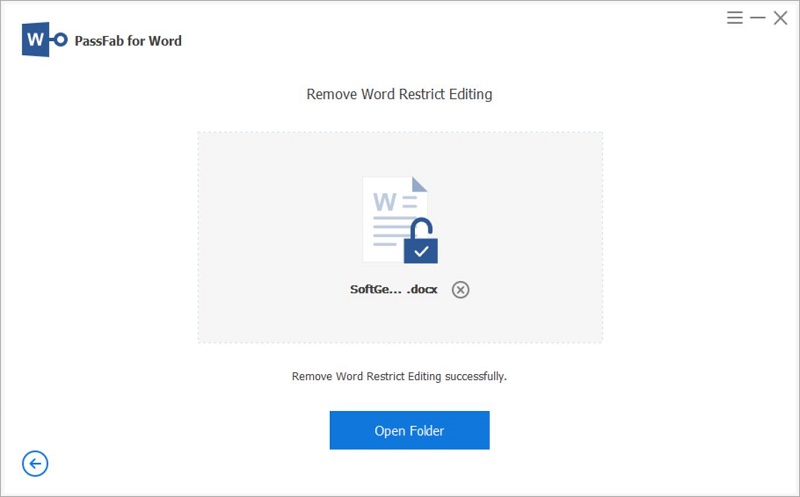
Step 3. Wait for PassFab for Word to remove all the Editing restrictions.
After the removal, you can edit the Word document seamlessly.
That’s how simple it is to change a Word document from read-only, even if you do not have the password.
6. Copy and Paste to A New Word Document (Text Only)
Even in the read-only mode, Microsoft Word allows you to copy the text content from the files and paste them on another document.
Here’s Copy and Paste to A New Word Document (Text Only):
- Open the Word file.
- Select all the content that you want to copy.
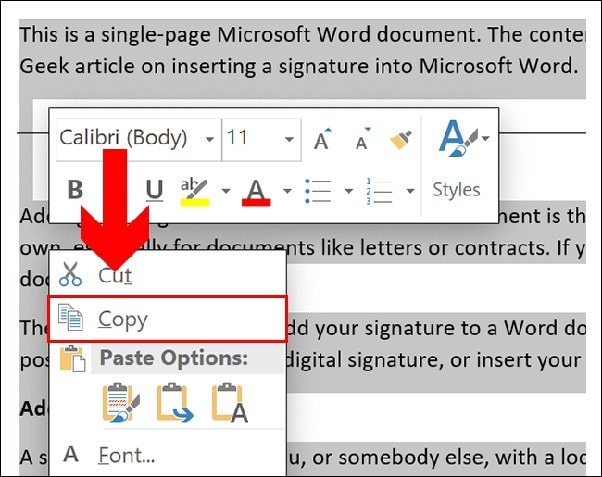
- Open another Word document on the computer.
- Paste the selected content (Ctrl+V).
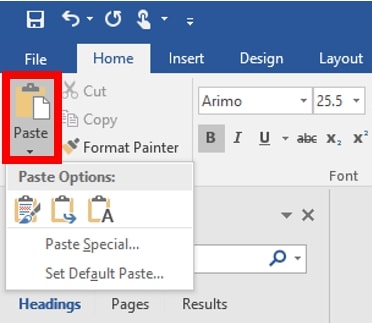
It is important to note that the format of the text will change to your defaults. So, you have to reformat the text content again in the new file.
7. Remove the Read-Only Recommended Option
Some authors set editing restrictions without a password and only want to inform you to open the Word document in a read-only mode — for the sake of caution.
If that’s the case, you will see a dialog box while opening the Word file asking you whether to open the document as read-only. Choose No to turn off read-only in Word.

8. Change the Settings of Your Antivirus.
Some Antivirus programs also enforce Protected View settings as they perceive the file to be a threat. You will have to change the Settings of your Antivirus to disable the Settings that are preventing you from editing the document.
BitDefender is one prime example. Microsoft asks users to talk to customer care about their Antivirus services if they cannot bypass the read-only mode using one of the suggested methods.
How Can I Change Protected View Settings in Word?
You can change the Protected View settings altogether and remove the read-only recommendations when opening a new Word document. This solution is not applicable if the Word document’s file attributes are changed to read-only by others. For context, if someone has set editing restrictions with a password, you will still need the password to remove read-only in Word documents.
Still, you can remove the read-only recommended options to open a new Word document downloaded without Protected View and edit them directly:
To change Protected View settings:
- Open any Word document.
- Go to File.
- Click on Options.
- Select Trust Center from the left pane.
- Choose Trust Center Settings from the right pane.
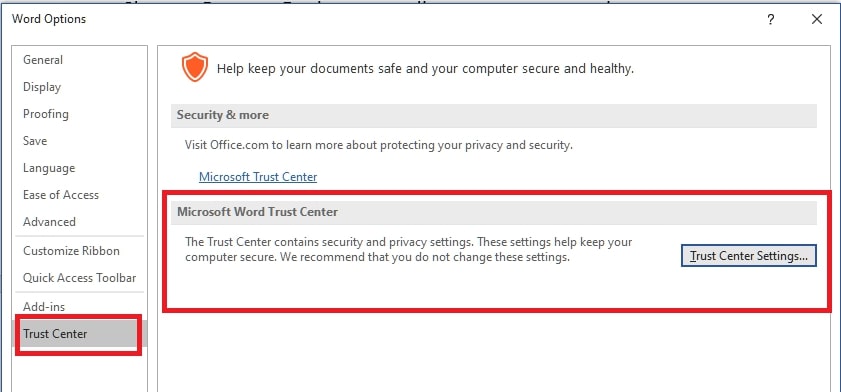
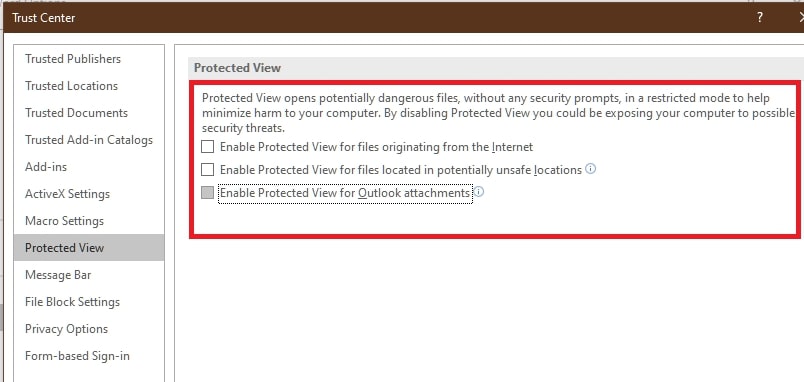
Under the Trust Center Settings, make the selections you want.
How Should I Choose Whether to Exit the Protected View (read-only) mode in Word documents or not?
If you’re wondering whether you should edit a read-only Word document, the answer is “it depends.”
For instance, it is best to avoid exiting the Protected View mode.
- The Word file with read-only attribute came from someone you don’t know (or don’t trust).
- You weren’t expecting the Word file even from someone you know.
- You do not necessarily need to interact with the file and change its content.
- Seems suspicious? Like a bill for something, you have never purchased.
However, if you were expecting the file or it came from someone you trust, then there’s no harm in editing the Word file with a read-only attribute.
Frequently Asked Questions About Read-only Word Document
Why can’t I exit Protected View (Read-only mode)?
If you cannot turn off read-only in Word documents, your administrator has set some Settings preventing you from exiting the Protected View mode. You can communicate with the administrator and ask them to change the Settings.
If you have a personal computer and cannot exit the Protected View mode, there’s a good chance your Antivirus is preventing you from exiting the read-only attributes.
How can I edit the Word documents that are in Protected View?
Follow the above solutions to edit a Word document with a read-only file attribute.
How Can I Enable Editing Restrictions on my Word docs?
- Open the Word file on which you want to enforce editing restrictions.
- From the ribbon, choose Review.
- And then Restrict Editing.
- Under the editing restrictions options, check the box assigned to Allow only this type of editing in the document.
- Choose the list that says No changes (Read only).
- Select Yes, Start Enforcing Protection.
Conclusion
Hopefully, one of the solutions on how to edit a read-only Word document must have worked for you. As mentioned, the reasons for read-only mode in Word documents are many. You can easily distinguish the type of read-only mode via the notifications in the Message Bar (like Security, Editing Restrictions, and so on). Even if you cannot distinguish why you are viewing the Word document in read-only mode, try all the solutions one by one to remove read-only from Word documents.