
Most iPhone apps serve as easy replacements for everyday objects. An example is the Notes app. With iOS Notes, you can scribble down just about everything, from shopping lists to business ideas and even to-do lists.
But what happens when you mistakenly delete one of the notes on your device? In this post, we cover how to recover deleted notes from iCloud.
iCloud is Apple’s backup solution to help its users store their data online. This solution allows you to back up all kinds of data, including music, videos, contacts, photos, and notes.
Best Way to Recover Deleted Notes from iCloud selectively
iCloud is free, and anyone can create an account. Users get up to 5GB of cloud storage, but this can increase with a specific cost. iPhone users can also configure their Notes app to ensure all information within gets backed up to the cloud.
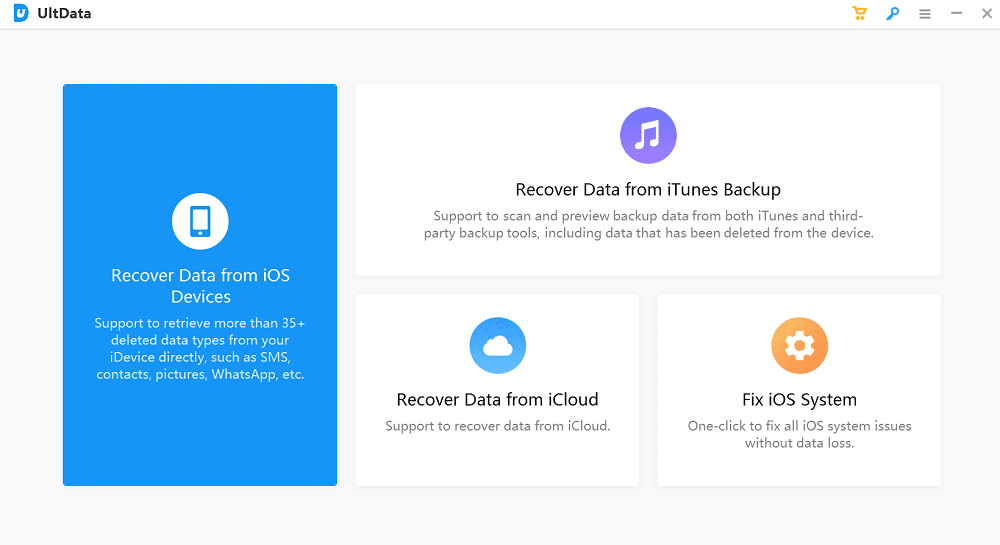
In the case of a wrongful deletion of Notes, you can make use of a third-party iPhone data recovery software such as Tenorshare UltData to recover your deleted notes from iCloud selectively. This tool is particularly useful when all you want to do is recover notes instead of restoring the entire backup saved to iCloud.
You can use it to recover other pieces of data, even when there is no backup. Tenorshare UltData makes it easy to choose what notes you are recovering as it allows you to preview notes. This way, you don’t have to recover notes that aren’t useful.
Here’s how to selectively recover your deleted Notes from an iCloud backup:
Step 1: Download Tenorshare UltData to your PC (Mac or Windows) and install it.
>> Get Tenorshare UltData Coupon (30% OFF) <<
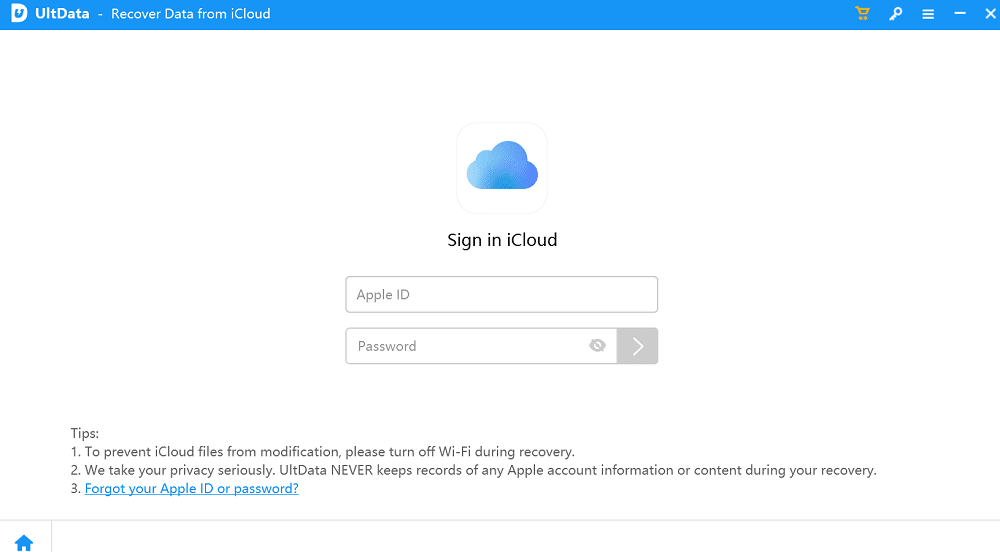
Step 2: Launch the software, then click on “Recover Data from iCloud.”
Step 3: Enter your iCloud details.
Step 4: Plug your iPhone into your PC using a data USB cable.
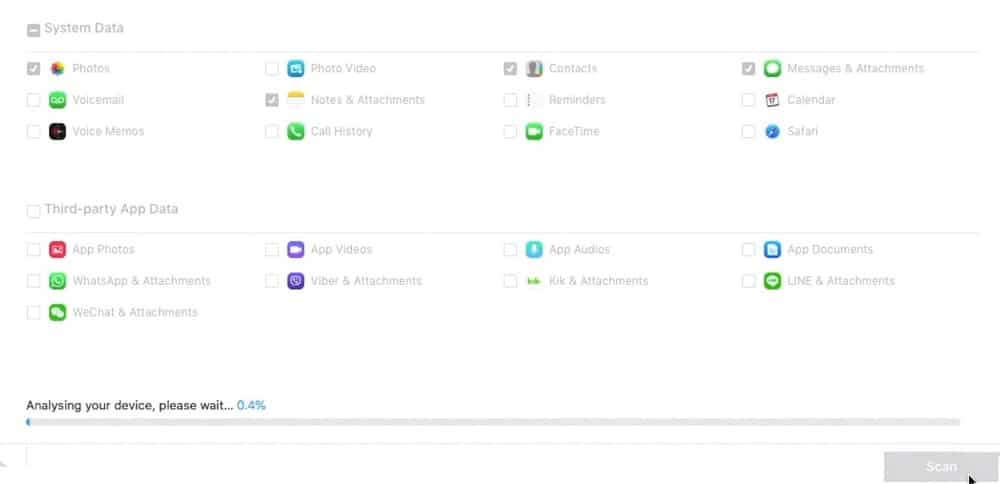
Step 5: Select “Notes & Attachments” as the file type you want to recover.

Step 6: Click ” Start Scan ” to continue the process.” After this, wait for a while to allow the process to finish running.
Step 7: Look to the left pane of the software window to see the different folders on your device. Click on “Notes” to see all your deleted notes. You can click on each one to preview the notes and decide on the ones you need to restore.
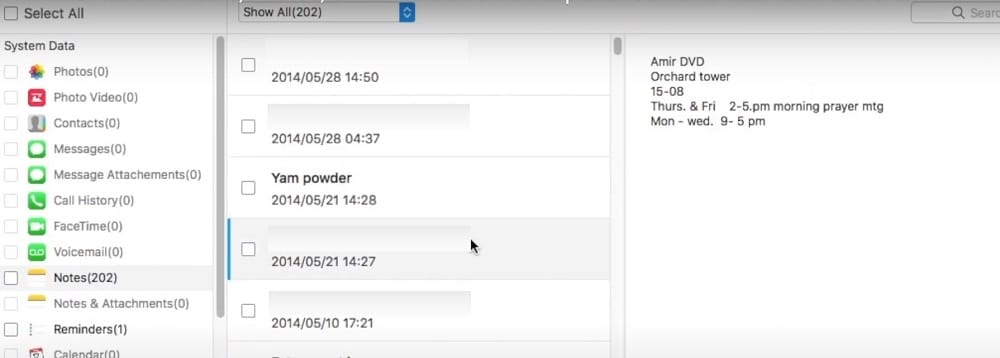
Step 8: After selecting the notes you need, click “Recover.”
Now you can recover deleted notes from iCloud using Tenorshare Ultdata. However, this isn’t the only method available.
Also Read: Tenorshare UltData Review
Restore backup from iCloud including Notes
Before you attempt restoring your notes from iCloud, check whether there is a recent backup. Usually, the iPhone stores your notes on your device. However, if you enable the save to iCloud feature, then your notes, just like emails, calendars, and contacts, should have an iCloud backup.
To check if there is a recent backup on iCloud? Take the following steps:
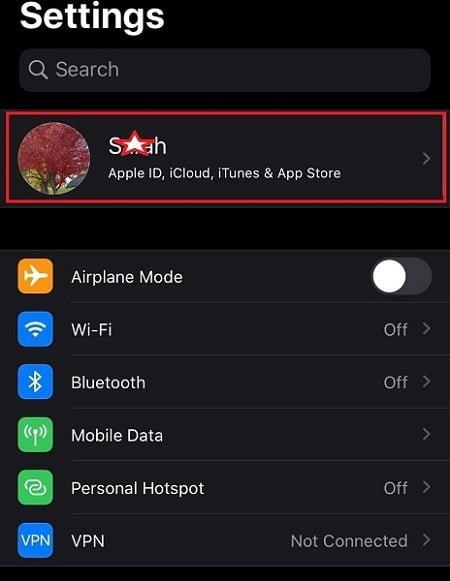
Step 1: From your device’s Home screen, go to “Settings.”
Step 2: Tap on the profile name.
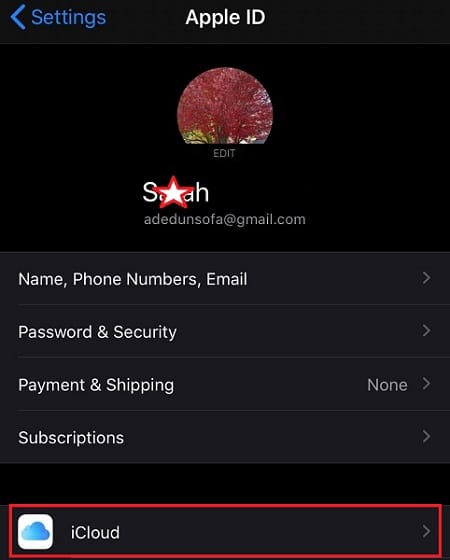
Step 3: Select “iCloud.”
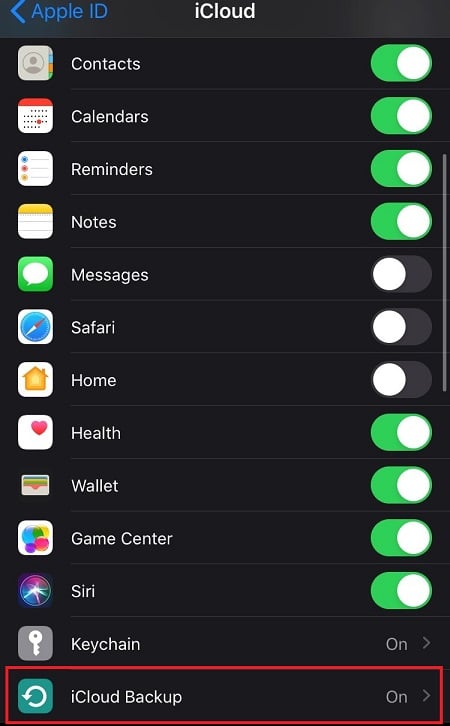
Step 4: Scroll down till you see “iCloud Backup” and check if you enabled it.
Step 5: Open “iCloud Backup” to confirm the last backup date.
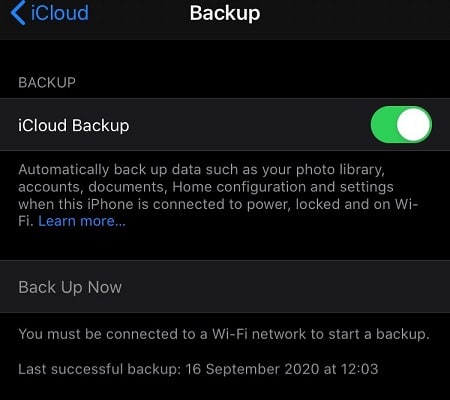
It implies that you can recover notes from iCloud very quickly if the last backup date is in line with when you deleted the note. Check out the steps below to see how:
Step 6: Go to the main “Settings” page.
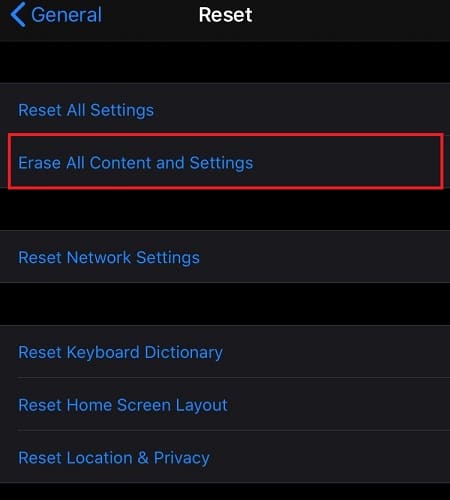
Step 7: Tap on “General” and then select “Reset.”

Step 8: Select “Erase all content and settings.” It will move you to the original setup screen.
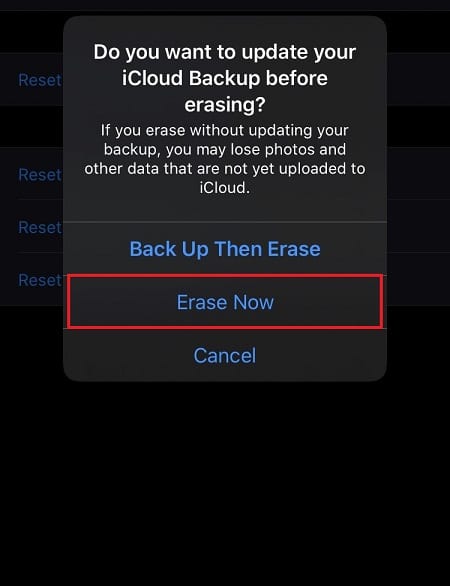
Step 9: The setup assistant will provide a prompt asking you to confirm erasure. Since you already have a backup, select “Erase Now.” However, if you still want to store the latest backup, you can select “Back Up Then Erase.”
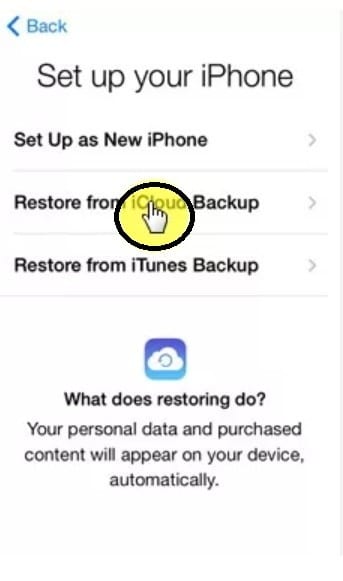
Step 10: Once the erasure is complete, you will see the “Apps and Data” page.
Step 11: Tap on “Restore from iCloud Backup.”
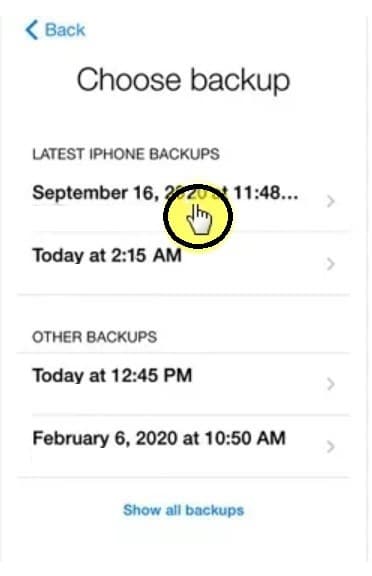
Step 12: You will need to provide your iCloud login details. Once you do, you can choose the most appropriate backup. After selecting the backup, the process begins.
Note that it is best to make use of a wireless network connection for this process and not mobile data. Remember that you erased all your content and settings, so you are restoring everything on your device. The method may take a while, so you should also leave your device plugged into power.
Recover Deleted Notes on iCloud.com
What if you don’t want to make use of the methods above? Not to worry, there’s another way to recover deleted notes from iCloud. In this case, you will be retrieving the notes from iCloud.com.
There’s a catch to this. Firstly, you must be using the upgraded version of iOS Notes. With this version, anytime you delete a note, it moves to a folder in iCloud labeled “Recently Deleted.”
Here is where the second catch comes in. The note must have been deleted within 30 days to recover using this method. If you act after 30 days, you can’t recover it from the dedicated folder.
If you meet the two conditions above, then follow these steps below:
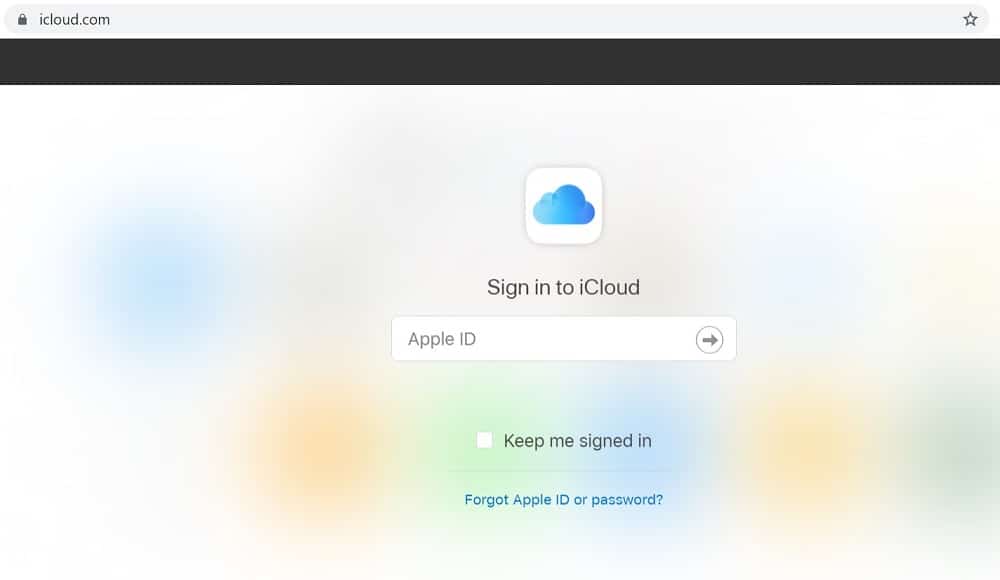
Step 1: Type in “iCloud.com” in your web browser and log in using your iCloud account details. Make sure the account is the same one linked to your iPhone.
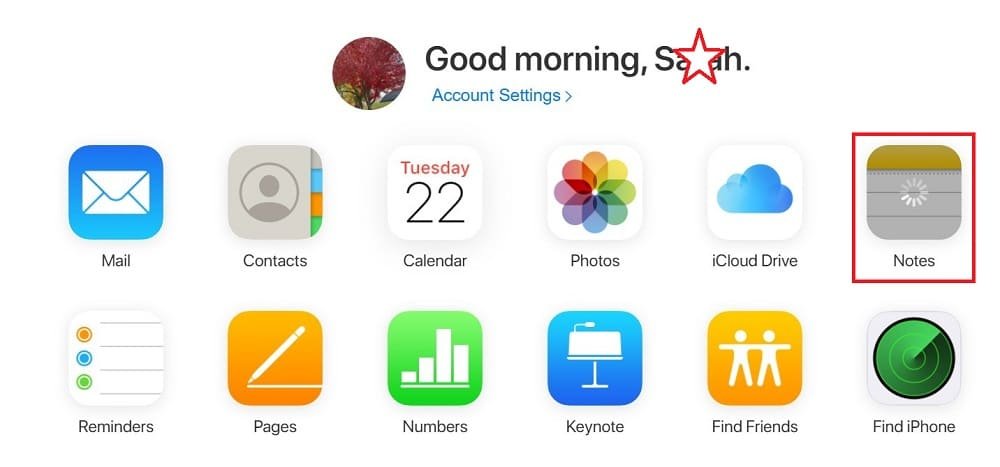
Step 2: Navigate to “Notes” to find all your saved notes.
Step 3: Look at the left pane to see the different folders. Click on “Recently Deleted” to see all the notes you deleted within the previous 30 days.
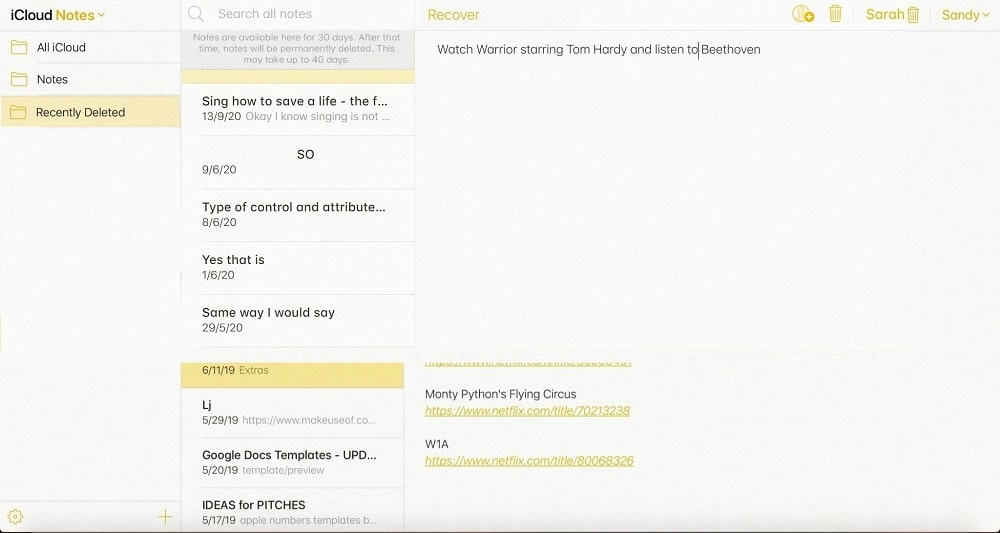
Step 4: Click on any of the notes to preview the contents.
Step 5: If you wish to recover any notes, click on “Recover.” Another method is to drag the note from this folder to any other folder under this section.
Awesome! Now you know how to retrieve notes from iCloud via iCloud.com.
Conclusion
Using any of the above-listed methods, you should know how to recover notes from iCloud. Are there other methods you want us to try out? Leave your comments below.