
Accidentally deleting important Word documents can be a heart-stopping moment. This is especially the case when the documents happen to be highly important. The loss of critical data can lead to frustration and panic as hours of hard work and valuable information seemingly vanish into thin air. However, before you give in to despair, there’s good news.
Various techniques and tools are available to help you recover those precious files. In this article, we will delve into the methods and strategies on how to recover deleted Word documents on Windows 10/11. It will ensure that you have the knowledge and resources needed to retrieve your lost data.
Part 1: Is it Possible to Recover Deleted Word Documents?
Before we delve into how to recover a deleted Word document on Windows 10/11, it is essential to address a critical question. Is it even possible to recover deleted files once they are seemingly gone? The answer to this question largely depends on the actions taken after the deletion and the available recovery options. After a file is deleted from the Windows operating system, it does not get immediately eradicated.
Instead, the operating system marks the space occupied by the deleted file as “available” for new data to be written over it. Until new data overwrites the space previously occupied by the deleted file, there remains a window of opportunity to recover it. This window is particularly crucial if you act promptly after realizing the file has been deleted.
As time passes and you continue using your computer, the probability of successful recovery decreases. This is due to the increased likelihood of new data overwriting the deleted file. However, it’s vital to recognize that not all deleted files can be recovered. The success of the recovery largely depends on factors like the file’s size, the time elapsed since its deletion, and the storage device’s condition.
Part 2: Searching for AutoRecover Files
One of the first avenues to explore when attempting to recover deleted Word documents on Windows 10/11 is through the AutoRecover feature. Microsoft Word automatically creates temporary backup copies of your documents at regular intervals, which can be a lifesaver in situations where your work was lost due to a sudden system crash or accidental closure. To search for AutoRecover files, you can follow these steps:
Step 1: Start by launching MS Word on your computer and clicking “File” from the top left corner. On the following screen, choose “Open” and click “Recover Unsaved Documents.”
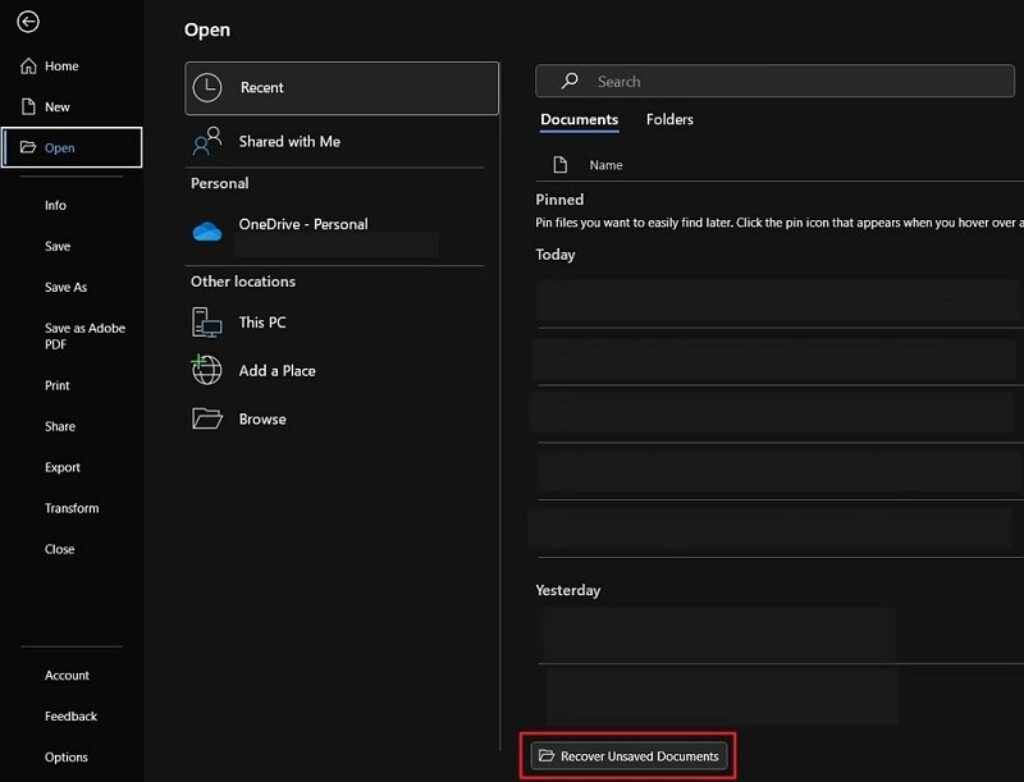
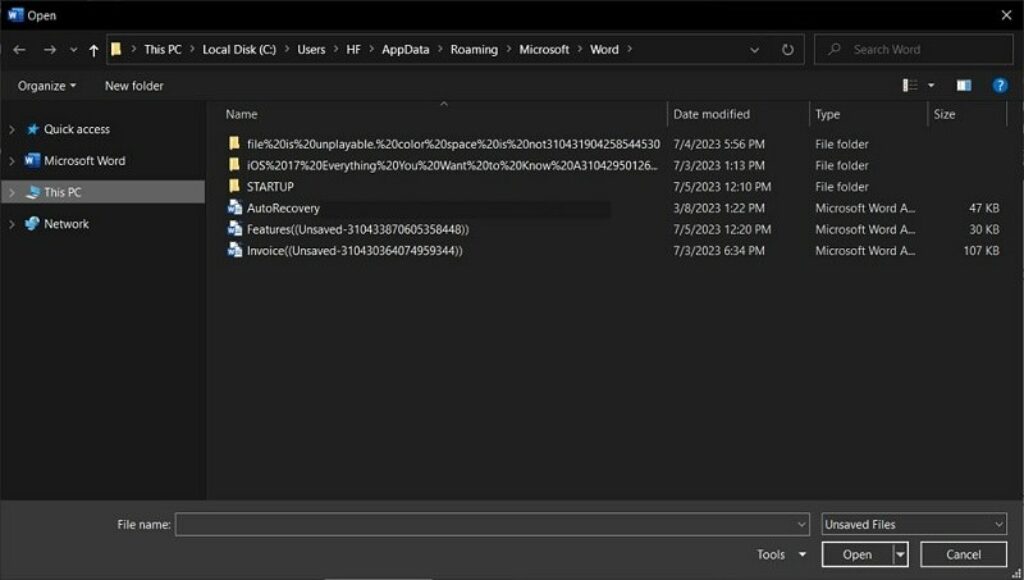
Step 2: Here, search for files with the “.asd” extension. These files represent your automatically saved backup copies. Find the targeted file and save it properly to recover it.
Part 3: Restarting Word to Open AutoRecover Files
No need to fret if your computer unexpectedly crashes while you have AutoRecover enabled. There’s a straightforward and reliable method to recover your Word file. Thanks to Word’s automatic restoration feature, your work-in-progress document will be restored. Just follow these simple instructions for how to recover lost Word documents:
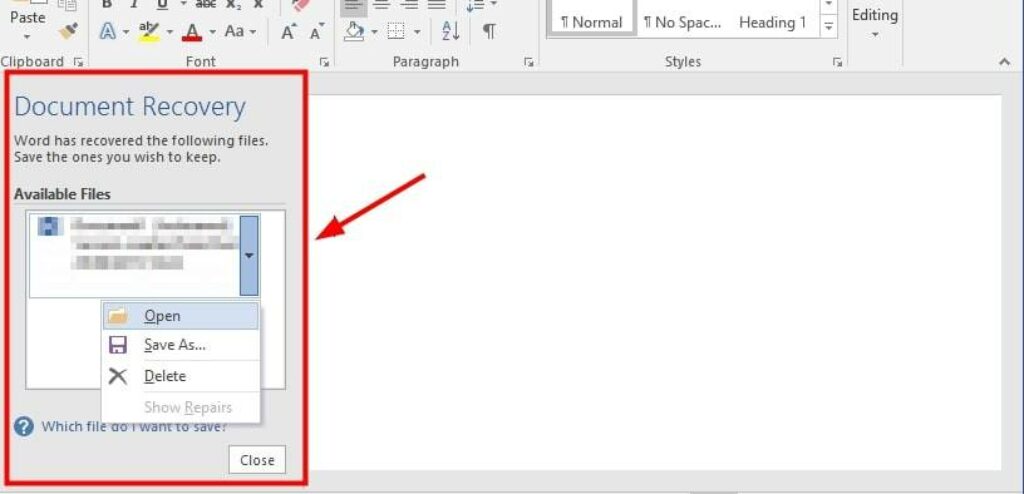
Step 1: Launch Microsoft Word on your Windows 10/11 computer. Once Word opens, look for the “Document Recovery” panel on the left side of the screen. This panel should appear automatically when Word detects any AutoRecover files.
Step 2: In the “Document Recovery” panel, you should see a list of recovered documents, including the ones retrieved from the AutoRecover files. Simply click on the document you wish to recover, and it should open for you to save or work on as needed.
Part 4: Recover Deleted Word Documents from Recycle Bin
When you accidentally delete your Word document, it doesn’t get permanently removed from your system. There is a good chance it might still be in the Recycle Bin. Follow these steps to retrieve deleted Word documents from the Recycle Bin:
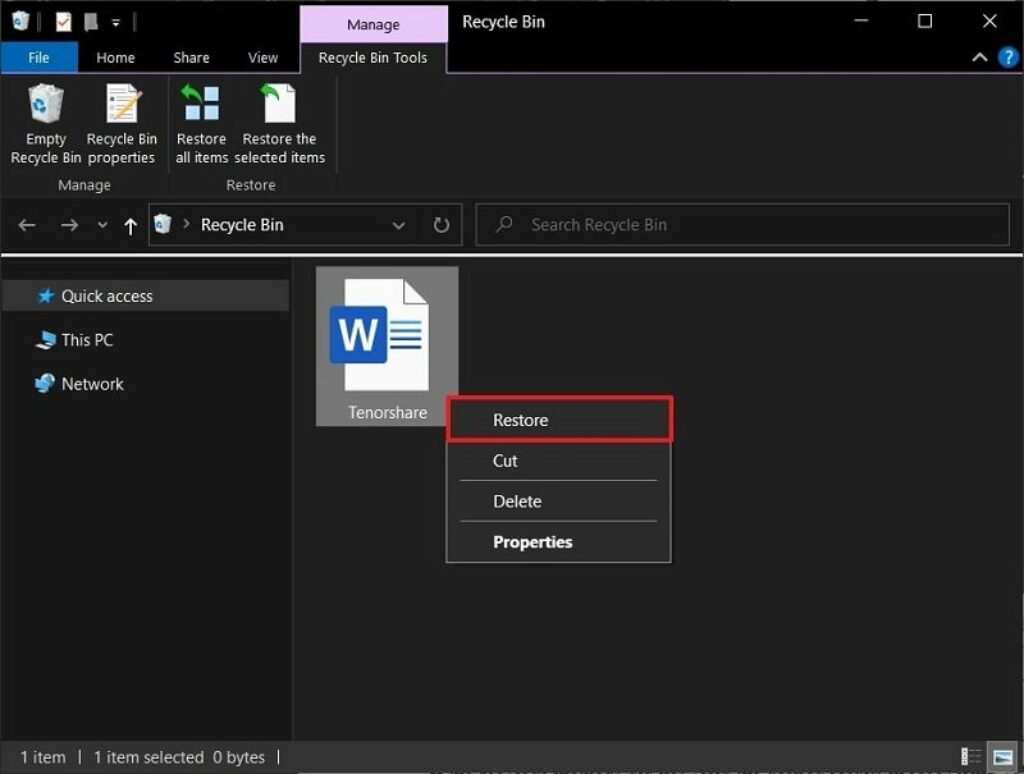
Step 1: Locate the Recycle Bin icon on your desktop and double-click to open it. Once the Recycle Bin is open, look for the deleted Word document in the list of files.
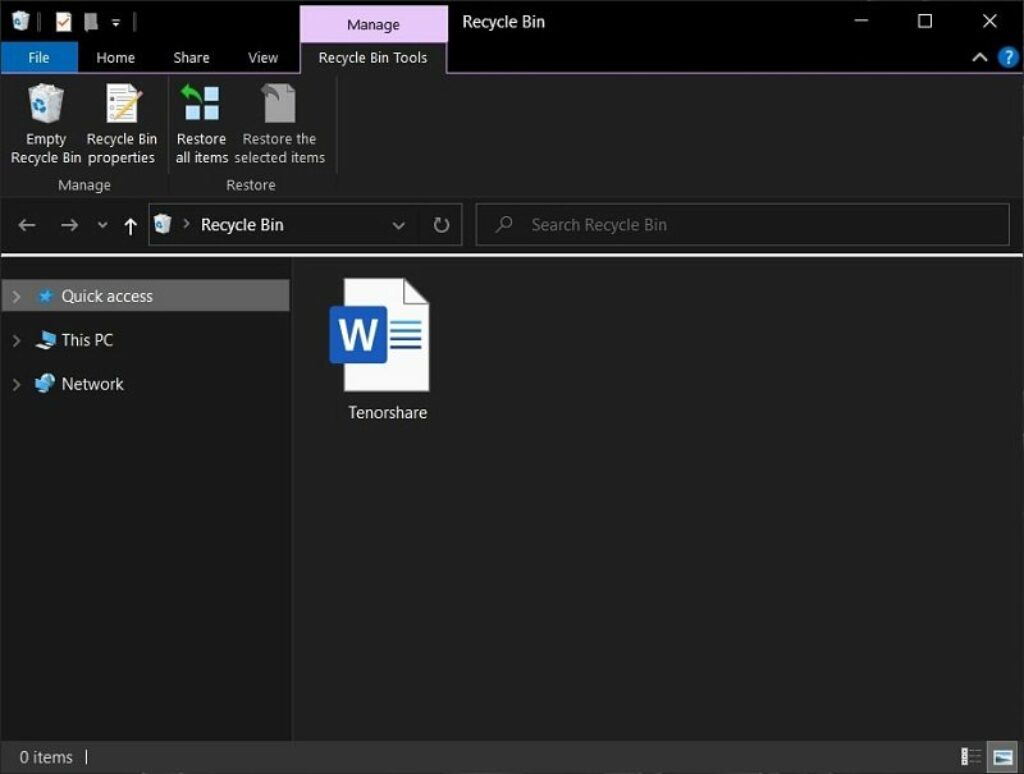
Step 2: When you find the deleted Word document, right-click on it and choose “Restore” from the context menu. This action will return the file to its original location on your computer. After restoring the Word document from the Recycle Bin, navigate to the original location where the file was saved. Open the folder and verify that the recovered document is back in its rightful place.
Part 5: Recover Deleted Word Documents with Data Recovery Software
If the previous methods did not yield the desired results in recovering your deleted Word document, don’t lose hope. There are powerful third-party Windows data recovery software solutions available, such as 4DDiG Windows Data Recovery. This unique data recovery tool can recover over 1000 types of data from your computer.
It works in all sorts of data loss scenarios, ranging from accidental deletion to system crashes and malware attacks. With this tool, you can recover data from empty recycle bins, formatted drives, and RAW disks. Here is how to retrieve deleted Word documents via 4DDiG Windows Data Recovery:
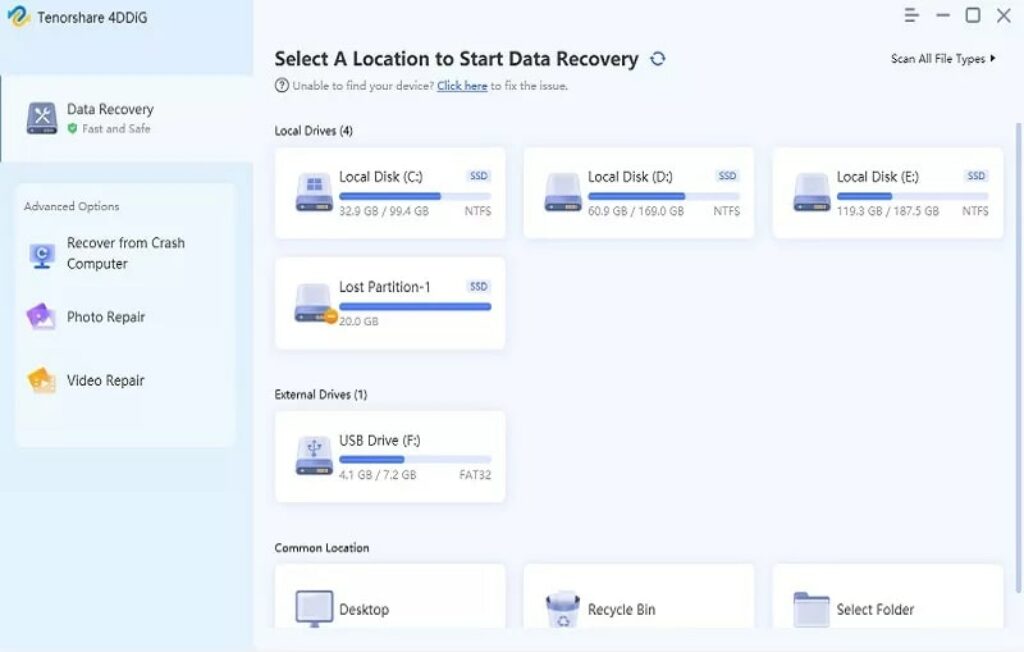
Step 1: Install and Launch 4DDiG Windows Data Recovery
After installing 4DDiG Windows Data Recovery on your computer, launch it and select the hard disk where the lost Word documents were located. You can also pre-defined the data types you want to recover through the “Scan File Types” option located at the top right corner. Now click “Start” to begin the scan.
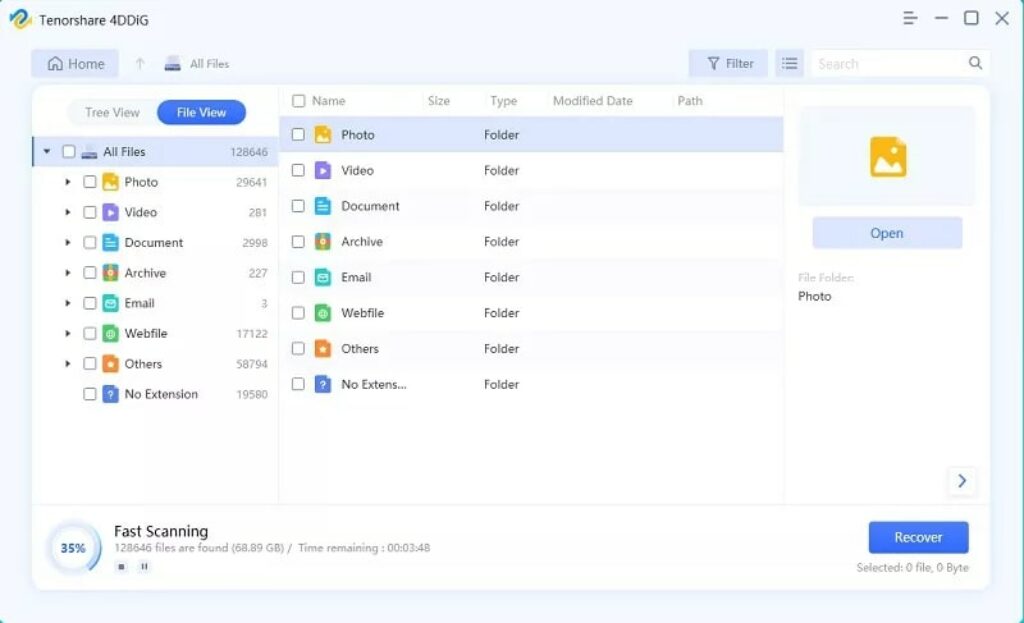
Step 2: Scan the Targeted Hard Drive
As the scan to recover files continues, the recovered data will start appearing on the screen. You can view the data using “Tree view,” where data is categorized into deleted files, RAW files, tag files, and more. There is also a “File view” panel where data is arranged according to data types.
Step 3: Recovered the Lost Word Documents
Once you have found the required Word files, you can pause or stop the scan. To confirm the recovered files are actually the ones you were looking for, 4DDiG Windows Data Recovery allows you to preview the files. After you are satisfied with the recovered files, you can restore them on your computer using “Recover.”

Part 6: How to Prevent Your Word Documents from Being Lost or Deleted?
Preventing the loss or accidental deletion of your Word documents is crucial to safeguarding your valuable data and ensuring a smooth workflow. While data recovery methods can be effective, it’s always better to implement preventive measures to reduce the risk of such incidents. Here are some essential tips to help you protect your Word documents on Windows 10/11:
Regular Backups
Create and maintain regular backups of your Word documents. Use external storage devices like external hard drives, USB flash drives, or cloud storage solutions to store copies of your essential files. Cloud services like OneDrive, Google Drive, or Dropbox offer automatic syncing and version history, providing an extra layer of protection.
Enable AutoSave and AutoRecover
Make sure the AutoSave and AutoRecover features are enabled in Microsoft Word. These features automatically save your work at regular intervals, reducing the risk of losing progress in case of system crashes or accidental closures.
Be Cautious with Deletion
Exercise caution when deleting files. Double-check the contents of folders before permanently removing them or using the “Shift + Delete” shortcut, which bypasses the Recycle Bin.
Use File Permissions
For shared computers or network drives, implement appropriate file permissions to restrict access and prevent unauthorized deletions.
Avoid Frequent Storage Device Removal
If using external storage devices, avoid removing them abruptly or without proper ejection. Abrupt removal may cause file system errors and data loss.
Utilize File Recovery Software
Consider keeping data recovery software like 4DDiG Windows Data Recovery handy, as it can be helpful in emergencies to retrieve accidentally deleted Word files.
Create a Document Recovery Plan
Establish a document recovery plan for your organization or personal use. Outline the steps to be taken in case of data loss incidents and ensure all relevant parties are aware of the procedures.
Frequently Asked Questions
Do you have more questions on how to retrieve deleted Word documents? Read on to learn the answers to the commonly asked questions regarding this topic.
1. How to enable the AutoRecover feature in MS Word?
To enable the AutoRecover feature in Microsoft Word, follow these steps:
Step 1: Open Microsoft Word and click on the “File” tab in the top-left corner. Select “Options” at the bottom left-hand side. In the Word Options dialog box, choose “Save” from the left-hand side navigation pane.
Step 2: Look for the “Save AutoRecover information every” option and check the box next to it. Now specify the time interval (in minutes) for AutoRecover saves. Lastly, click “OK” to save your settings and enable the AutoRecover feature.
2. What does the AutoSave feature do in MS Word?
The AutoSave feature in Microsoft Word is designed to automatically save changes made to a document as you work on it. It is distinct from the AutoRecover feature. Unlike AutoRecover, which creates backup copies at specified intervals, AutoSave continuously saves changes to the original document in real time.
3. Can I recover a Word document after formatting my computer?
Formatting your computer erases all data from the storage drive, making data recovery challenging. If you haven’t backed up your Word documents before formatting, the chances of recovery through conventional means are low. In such cases, employing data recovery software specifically designed for formatted drives, like 4DDiG Windows Data Recovery, might offer a better chance of recovering lost files.
Conclusion
In summary, accidental data loss, including deleted Word documents, can be a distressing and all-too-common occurrence. However, armed with the knowledge and techniques covered in this article, you now possess valuable tools to deal with how to recover deleted Word documents from Windows 10. We explored various methods to recover lost data by leveraging Microsoft Word’s built-in AutoRecover and AutoSave features to restore deleted files from the Recycle Bin.
However, for more complex and challenging data loss scenarios, we highly recommend 4DDiG Windows Data Recovery as the best choice. This powerful and user-friendly data recovery software specializes in retrieving lost, deleted, or formatted files from Windows-based systems, including valuable Word documents. With its intuitive interface, comprehensive scanning capabilities, and support for various file types, 4DDiG ensures a high likelihood of successful data recovery.