While using your Apple phone, many times you may experience that the bottom of the iPhone screen is not working correctly or has become unresponsive altogether. Although the issue could have occurred due to any physical abuse such as exposure to water or other fluid types, falling on the floor from a significant height, etc., in several instances, it is seen that a minor app conflict or iOS glitch can also be the culprit.
With that said, the following sections discuss a couple of methods in an attempt to help you fix the problem without visiting an Apple Store.
Why Is the Bottom of the iPhone Screen Not Working?
If the display screen of your iPhone is wet or dirty, or your iPhone is overpopulated with several apps, including those you don’t need anymore, you may end up having the bottom of the iPhone screen not working. Apart from this, a few other reasons could be:
- Inadequate quality of the protection case
- Your iPhone is exposed to extremely hot or cold temperatures (Note: Usually, this issue is mostly temporary and is resolved automatically after a couple of hours.)
- Obsolete iOS (which may further cause lagging)
How to Fix the Bottom Half of iPhone Screen Not Working?
The troubleshooting process could be comparatively simple if you have an iPhone with the Home button. On the other hand, if you are using iPhone X or later and need to swipe up the lock screen to unlock your device, you may have to take a long route to perform some tasks to fix the issue.
The phrase ‘long route’ means you might be unable to tap many options only available in the lower area of your phone. Therefore, you need to turn off the ‘Portrait Orientation Lock’ to use your iPhone in landscape orientation. You can do this by getting to the ‘Control Center’ screen and tapping the ‘Portrait Orientation Lock’ icon.
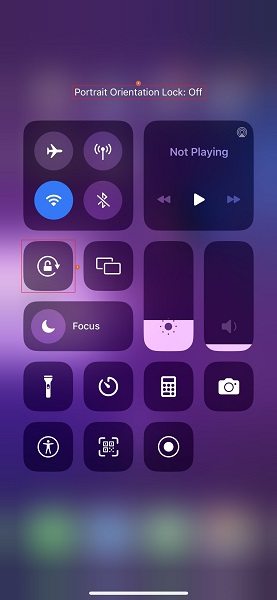
Once this is done, you can start using your iPhone in the landscape orientation, where you will see the categories in the ‘Settings’ screen on the left and their corresponding options on the right.
Also, if you cannot tap the options on the bottom-right area of the right pane due to the unresponsive screen, you can rotate your iPhone 180 degree. This brings the non-responding portion to the other side while the positions of the options remain at the same screen location. Notice that you can now access the bottom-right area seamlessly. This means that you’re good to go.
WARNING: Some solutions discussed below require erasing everything from your iPhone. As a result, you may lose your data. Therefore, before proceeding, ensure you have backed up all your important files to recover them once the problem is resolved.
Method 1: Restart iPhone
Most iPhone problems are temporary, and therefore, it’s widespread that if your iPhone has started behaving obnoxiously recently, the first thing that you should do is restart it and see if this helps.
You can follow the instructions given below to restart your iPhone:
Note: Before going further, ensure that you have turned off the ‘Portrait Orientation Lock’ and are holding your iPhone in the landscape orientation.
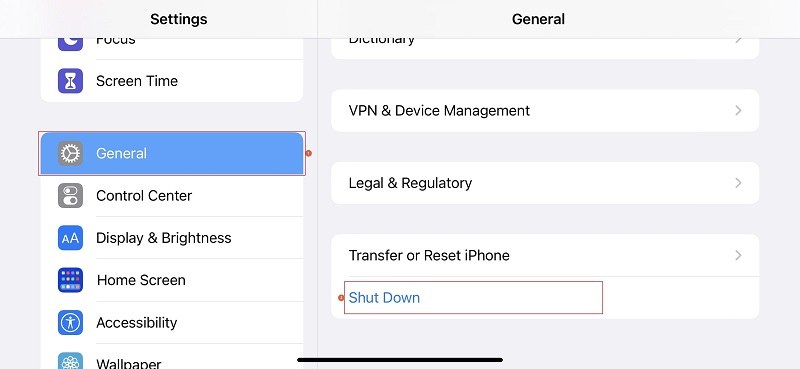
- Go to Settings
- While on the Settings screen, tap General from the left pane
- Scroll down the right pane
- Tap Shut Down from the bottom
- Swipe the slide to power off slider to the left
- Wait while your iPhone is powered off
- Wait for 30 seconds
- Long press the Sleep/Wake button on your phone
- Wait while the Apple logo appears
- Release the Sleep/Wake button
- Wait for your iPhone to start normally
Check if the issue is resolved.
About the Following Methods: Apart from ‘Shut Down,’ many other options are at the bottom of the screens. Therefore, you are advised to turn the Portrait Orientation Lock off while trying the following solutions.
Method 2: Force Restart iPhone
Force restarting pulls off the current from your iPhone’s motherboard momentarily and then releases the supply. This flushes all the junk data from the phone’s memory, and upon restart, your iPhone starts afresh.
Now, because Apple has made some significant changes to its iPhone models in the past couple of years, the steps to force restart them vary depending on their hardware architecture and the availability of the Home button.
That being said, for your convenience, processes to force restart all iPhone models are explained below:
For iPhone 8 or Above and iPhone SE (2nd Generation)
- Press and release the Volume Up button
- Quickly press and release the Volume Down button
- Press and hold down the Sleep/Wake button
- Wait while your iPhone restarts
- Release the Sleep/Wake button once the Apple logo appears on the screen
For iPhone 7 and iPhone 7 Plus
- Press and hold down the Volume Down and Sleep/Wake buttons together
- Wait while your iPhone powers off and then back on
- Release the buttons when you see the Apple logo
For iPhone 6s or Earlier and iPhone SE (1st Generation)
- Press and hold down the Home and Sleep/Wake buttons together
- Wait while your iPhone shuts down and powers on again
- Release the buttons as the Apple logo shows up on the display
After your iPhone restarts, see if the issue about the bottom half of the iPhone screen not working is resolved.
Method 3: Clean the iPhone Screen and Your Fingers
Sometimes your iPhone screen may stop responding if it is dirty, i.e., covered with microscopic dust particles/debris. In other scenarios, your fingers could be dirty, which may obstruct the inputs that you send through the iPhone touchscreen. You can easily resolve these issues if you:
- Clean the Screen: Using a piece of soft microfiber cloth is highly recommended.
- Clean your Hands: It would be best if you could wash your hands thoroughly and dry them completely before using the phone.
Check if this fixes the problem after this.
Method 4: Free Some Storage on iPhone
If your device doesn’t have enough storage, you will most likely notice that not only the bottom of the iPhone screen is not working, but the entire phone starts lagging altogether. Due to this, when your smartphone responds late, you may feel that the screen has become unresponsive.
To fix this, you can remove unused apps and unnecessary files so your iPhone has space to breathe. The process to get this done is given below:
- Follow the procedure explained above to turn off Portrait Orientation Lock, go to Settings, and ensure that both left and right panes can detect your touch inputs
- Go to Settings
- Tap General from the left pane
- Scroll down the right pane and tap iPhone Storage

- From the top of the right pane, check the amount of free space mentioned next to the iPhone label
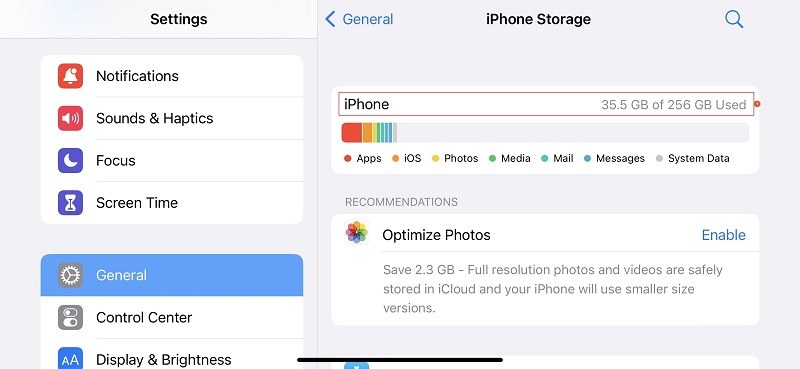
- Scroll down the right screen and notice the amount of storage each app is consuming on your iPhone

- Tap the program that you don’t use much
- On the next screen, tap Delete App
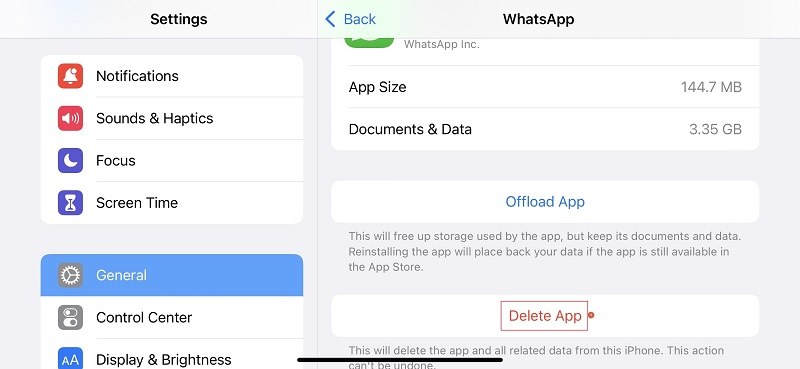
- Tap Delete App again on the information box to delete the app from your iPhone to free up some space
- Get back to the iPhone Storage screen
- Repeat these steps to remove other space-intensive apps too
- Optionally, you can tap Enable next to the Offload Unused Apps label to allow your iPhone to automatically offload the unused apps if it runs out of storage

- Restart your phone and see if the problem is fixed
Method 5: Adjust 3D Touch
Depending on the model of your iPhone and the version of iOS you have, 3D touch options may or may not be the culprit for the bottom half of the iPhone screen not working issue. Nevertheless, trying a few simple tweaks wouldn’t harm it. No?
You can follow the instructions given below to access all the adjustable options to configure how your iPhone should respond to your touch inputs:
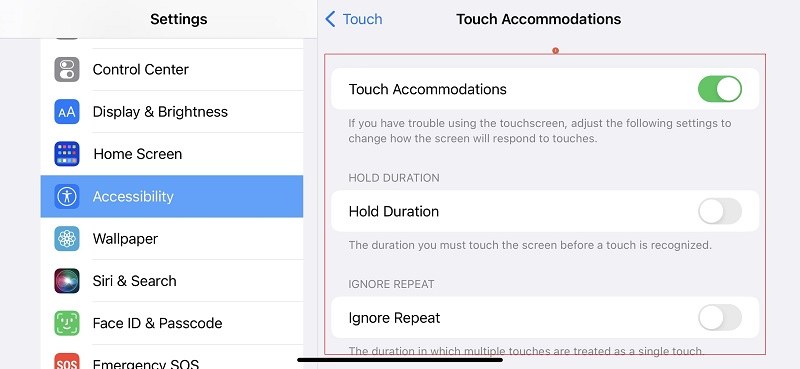
- Go to Settings on your iPhone
- Scroll down the left pane and tap Accessibility
- Tap Touch from the right pane
- Tap Touch Accommodations
- Try enabling each option on the Touch Accommodations screen and adjusting its values to see which configuration fixes the issue.
Note: Although this method may consume some of your time, picking the best settings for your iPhone would be the permanent solution for the error.
Method 6: Upgrade iPhone to the Latest iOS Version
Sometimes iPhones start acting weird if running on an obsolete iOS version. Therefore, checking for the latest operating system and updating your iPhone could fix the issue.
Nevertheless, problem or no problem, Apple always recommends updating your device to the newest iOS newest as soon as it rolls out for the masses.
To check and install the latest iOS to fix the iPhone bottom of the screen not working issue, you can follow the instructions given below:
- Ensure that your iPhone is at least 50% charged
- If possible, connect it to a power outlet
- Confirm that it is connected to a Wi-Fi network and not using your cellular data
- Go to Settings
- Hold your iPhone in the landscape orientation as explained in the previous method
- Tap General from the left
- Tap Software Update from the right pane of the General screen
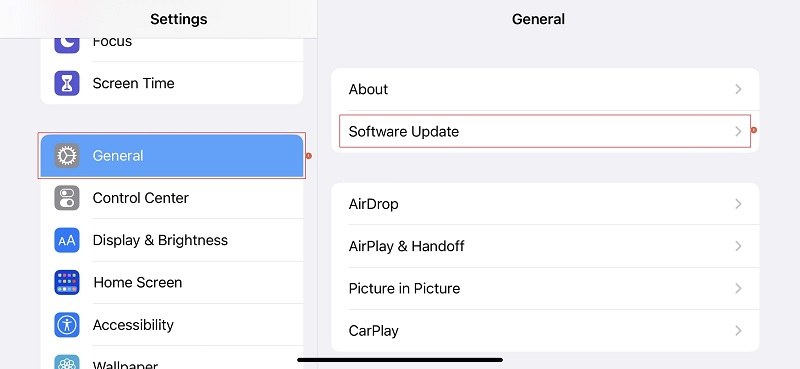
- Wait while your iPhone checks for any available updates
- When/If the screen shows that new updates are available, tap Download and Install from the right pane
- Wait while the newer iOS version is installed and your iPhone restarts
Check if the issue is resolved.
Method 7: Reset All Settings
This method ensures that all custom settings and configurations on your iPhone are back to the state when your phone was unboxed, thus removing all the issues (including the bottom of the iPhone screen not working) almost instantaneously. The good thing is that this solution keeps all your personal data and files intact.
You can follow the instructions given below to reset all factory settings to default:
- Go to Settings
- Tap General from the left pane
- Scroll down the right pane and tap Transfer or Reset iPhone
- Tap Reset from the bottom of the next window
- Tap Reset All Settings from the menu that appears

- Tap Reset All Settings from the bottom
- Tap Reset All Settings again to confirm your action
After the process completes and your iPhone restarts, check if the issue is resolved.
Method 8: Repair iOS without Data Loss
If you’re using iTunes (on Windows) or Finder (on Mac), repairing a faulty iOS through these apps may cause permanent data loss. If you have saved your files on iCloud, you may recover them post-repair. On the other hand, if you didn’t buy an iCloud subscription or upload any data, your important documents could be erased forever.
If you don’t want this to happen, you must first back up your iPhone and then begin the troubleshooting process.
However, there’s a simpler method to this. You can always go for an efficient third-party tool specifically designed and developed for the purpose. One such application that can help you with this is Tenorshare ReiBoot.
>> Get Tenorshare ReiBoot Coupon (30% OFF) <<
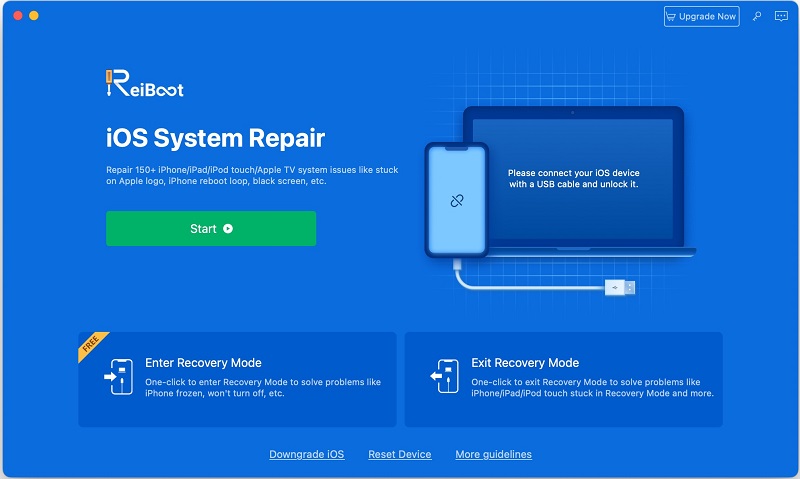
You can consider ReiBoot a one-stop shop for almost all the troubles related to your iPhone, iPad, and Apple TV. Apart from repairing your iOS without any data loss, ReiBoot can also:
- Repair or downgrade macOS (on Mac computers)
- Downgrade iOS to an earlier version for a more stable user experience
- Reset your iDevices without iTunes or Finder
…and much more.
Method 9: Factory Reset iPhone
The factory reset process removes all data and settings from your iPhone and makes it as fresh as new. Therefore, you must back up all your files using your preferred method before proceeding.
Once everything is in place, you can follow the steps given below to resolve the bottom of the iPhone screen not working issue:
Note: In some cases, this method may not work. This is because, as you start the process, your iPhone automatically switches back to the portrait orientation. If this happens, some options may again become inaccessible.
When/If this happens to your iPhone, you can skip this solution and jump to the next one, which explains the procedure of doing a factory reset via iTunes.
Nevertheless, for the eligible phones, the step-by-step instructions on performing a factory reset without iTunes or Finder are explained below:
Pre-Reset Steps
- Tap Settings
- Hold your iPhone in the landscape orientation
- Tap your name from the top of the left pane
- Scroll down the Apple ID window and tap Find My from the right
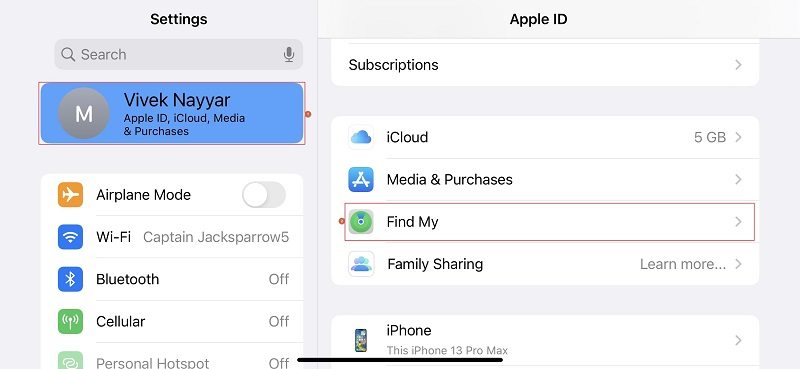
- Tap Find MY iPhone
- Tap the Find My iPhone switch on the next screen
- Enter your Apple account password when your iPhone prompts
- Wait while Find My iPhone is turned off on your phone
- Get back to the Apple ID screen
- Scroll down and tap Sign Out
- Follow the on-screen instructions to sign out from your Apple account
Reset Your iPhone
- Go to Settings > General
- Scroll down and tap Transfer or Reset iPhone from the right pane
- Tap Erase All Content and Settings from the next screen
- Follow the on-screen instructions to erase all your data from your iPhone and revert all its settings to factory defaults
- When the process completes and your iPhone restarts, restore your data to your device
Check if the problem is fixed.
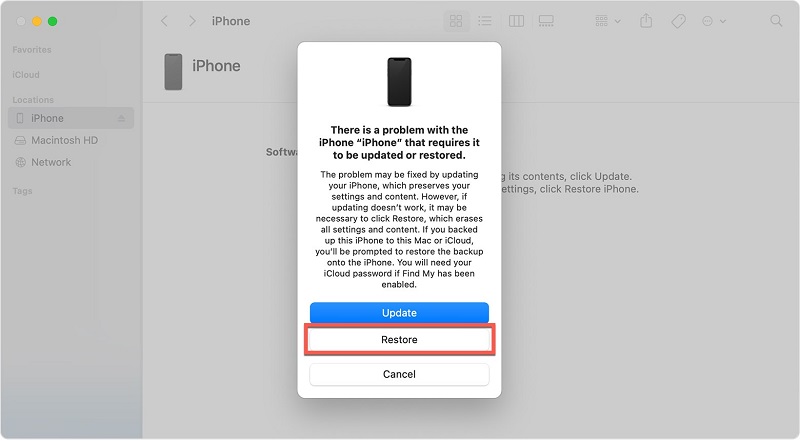
Method 10: Restore iPhone via iTunes (Recovery Mode)
Restoring your iPhone via iTunes or Finder through Recovery Mode erases all your files and content and reinstalls the latest version of iOS on your device. If you don’t want this, you can first try updating your smartphone when in Recovery Mode, and if this doesn’t work, you may consider restoring it as a last resort.
The steps given below explain how you can get the job done:
Note: Before proceeding, ensure you have the latest version of iTunes installed on your PC.
On iPhone 8 or Later and iPhone SE (2nd Generation)
- Launch iTunes on your computer
- Press and release the Volume Up button
- Quickly press and release the Volume Down button
- Press and hold down the Sleep/Wake button until you see the Recovery Mode icon on the screen
- Release the button
On iPhone 7 and iPhone 7 Plus
- Press and hold down the Volume Down and Sleep/Wake buttons together
- Wait until your iPhone restarts and the Recovery Mode icon appears on the screen
- Release the buttons
On iPhone 6s or Earlier and iPhone SE (1st Generation)
- Press and hold down the Sleep/Wake and Home buttons together
- Wait while your iPhone powers off and then back on to the Recovery Mode screen
- Release the buttons
When your iPhone enters Recovery Mode, you must:
- Get back to your PC
- Go to the iTunes interface
- Click Update on the iTunes box that pops up
- Follow the on-screen instructions to update your iPhone while keeping all your data and settings intact
If updating doesn’t help, put your iPhone back in Recovery Mode, choose Restore from the iTunes box on your computer, follow the instructions that appear on the screen, and see if that fixes the lower part of the touch screen not working problem.
Method 11: Remove iPhone Case
Although this method may cost you a bit, the solution is worth a try if the lower part of the touchscreen is not working in iPhone.
The reason why sometimes this approach works is that as you use your iPhone, its protective case may deteriorate over time, especially if its quality is not up to the mark. If the iPhone case is the culprit, the lower half, upper half, or the entire screen may become non-functional.
Therefore, the best way to resolve the problem is by removing the case and seeing if it helps. If this trick works, you can visit the nearest authorized Apple store to get a new case/cover for your iPhone.
Frequently Asked Questions About iPhone Bottom of Screen Not Working
What if the problem persists even after trying all the above solutions?
In that case, you may want to visit the nearest authorized Apple Store and get your iPhone diagnosed by professionals. This is because the problem could be related to the hardware.
What if I can’t access the Settings app as it is at the bottom of the screen?
A good workaround is to get to the ‘App Library’ and tap ‘Settings.’ To access ‘App Library,’ you can swipe all your Home screens to the left. After you swipe left the last one, you will see the ‘App Library’ with all the app icons you can access easily.
Is using a third-party tool safe?
As far as ReiBoot is concerned, the company adheres to its strict privacy policies and doesn’t expose your private details to any person or organization. For your passwords and other sensitive information, even Apple can’t see them, let alone Tenoshare.
Therefore, to answer your question, yes, it’s pretty safe to use a third-party iOS repair tool to fix the issues that your iPhone may face.
Conclusion
The bottom half of the iPhone screen is not working issue is quite common. While the problem could be due to faulty hardware, before rushing to the nearest Apple Store and shedding several bucks there, you can try the solutions given above and see if the bug related to the bottom of the iPhone screen not working is resolved.