
Adding a new local user account on Windows 10/11 opens up a world of benefits and opportunities. Creating a separate user account gives you privacy, security, and productivity advantages. For context:
- With a new user account, you can ensure privacy and security on Windows 10/11. A new user account lets you keep personal files private, customize your desktop, and safeguard sensitive information from unauthorized access.
- You will have a separate digital realm for enhanced privacy and peace of mind, even when multiple users are using the computer.
- Even if you’re the sole user of your computer, managing multiple accounts boosts efficiency. You will have dedicated accounts for personal projects, work, or school assignments. This lets you stay organized, switch seamlessly between accounts, and enhance productivity.
Discover six effortless methods to create local user accounts on Windows 10/11 in this comprehensive guide.
Way 1. Create A Local User Account on Windows 10/11 via Settings
The Settings app is the most convenient and user-friendly method for creating a local user account on Windows 10/11.
Step 1. Press “Windows key + I” or click the Start option and select the gear icon to open Settings on Windows 10/11.
Navigate to the “Accounts” option in the Settings app.
Step 2. On the left-hand side of the Accounts settings page, click on the “Family & other users” tab.
In the “Other users” section, you’ll notice a nifty little option: “Add someone else to this PC.”
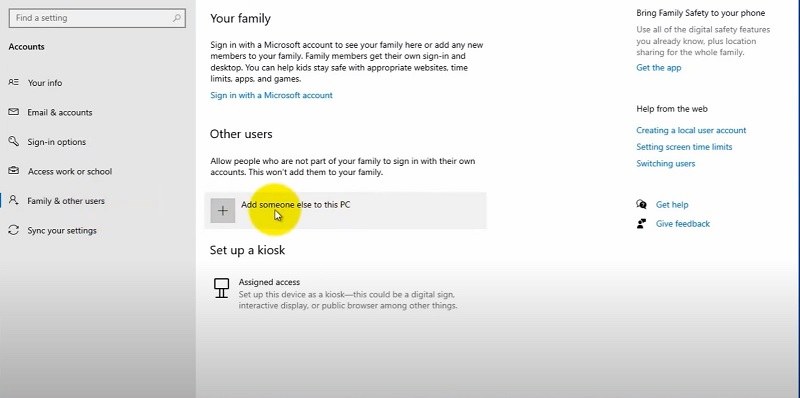
Step 3. Select the “I don’t have this person’s sign-in information” link to create a new local user account.
On the next screen, opt for the “Add a user without a Microsoft account” option to create a local user account.

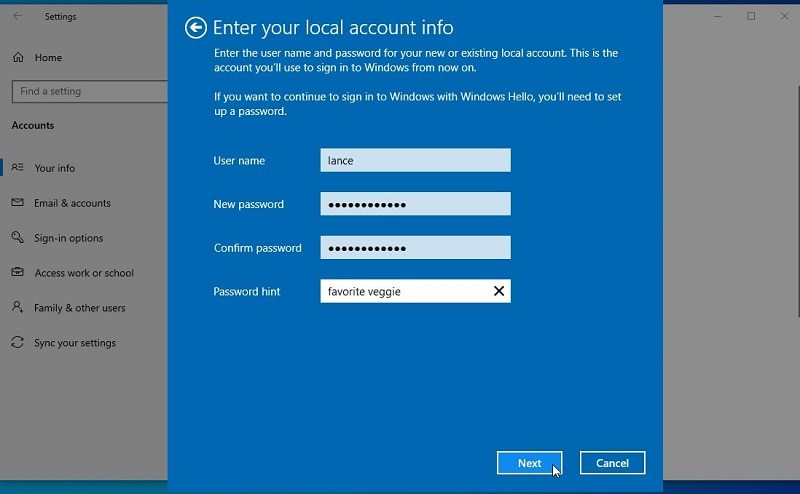
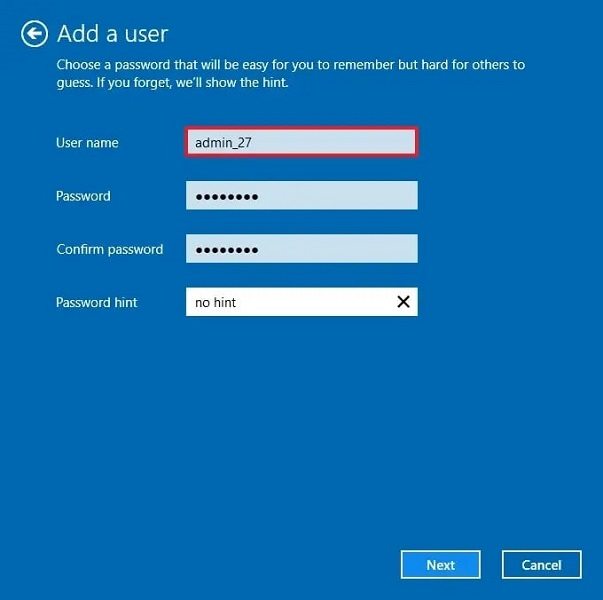
Step 4. Provide the necessary details for the new user account — the username, password (optional), and password hint. You can grant administrative privileges to the account by clicking the “Change account type” option.
Click the “Next” option once you have provided the necessary information.
You will see a confirmation message. Simply click the “Finish” option to complete the account creation process.
The above steps show how to create a local user account on Windows 10. There is a slight difference in steps when creating a local user account on Windows 11. For context, in Windows 11 — you need to select “Family & other users” and choose “Add account” next to “Add other user.” The remaining steps remain the same for both versions, such as selecting “I don’t have this person’s sign-in information” and providing the necessary account details.
Way 2. Create A Local User Account on Windows 10/11 via CMD
The Settings app provides a convenient and user-friendly method to create a local user account. However, there are situations where Command Prompt (CMD) can offer unique advantages. For instance, you have more control and flexibility over the account-creating process — such as setting specific user permissions, configuring group memberships, or assigning complex password policies.
Step 1. Press “Windows key + X” on your keyboard and select “Command Prompt (Admin).”
Step 2. In the Command Prompt window, type the following command and press Enter:
net user <username> <password> /addNote: Replace <username> with the desired username for the local account and <password> with the password you want to set.
Close the Command Prompt window. You can also create a local admin account on Windows 10/11 via CMD via the following command:
net localgroup administrators <username> /addNote: Replace <username> with the username of the account you created in the previous step.
Using CMD to create a local account requires administrative privileges and should be done with caution to ensure security and proper account management.
Way 3. Create A New User on Windows 10/11 via Powershell
Powershell, similar to Command Prompt, is a command-line shell. So, creating a new user on Windows 10/11 via Powershell is similar to the above Command Prompt method.
Step 1. Type “PowerShell” in the search bar next to the Start option. From the search results, click on “Windows PowerShell (Admin).”
In the elevated Powershell window, type the following command and press Enter:
$password = Read-Host -AsSecureString

New-LocalUser -Name "Username" -Password $password -FullName "Username" -Description "Test user"Note: Replace <username> with the desired username for the local account and <password> with the password you want to set.
You can give administrative privileges to the new account by using the following command:
Add-LocalGroupMember -Group "Administrators" -Member "<username>"Note: Replace <username> with the username of the account you created in the previous step.
Once you execute the first command, the new local user account will be created on Windows 10/11. The second command in the above method allows you to grant Administrators privileges.
Also Read: How to Reset Local User Password Using Powershell
Way 4. Create A New User on Windows 10/11 from Computer Management
Creating a new user account via the Computer Management app has several benefits. For context, it provides more extensive control over user configuration and management, like setting specific permissions, automating tasks, and managing multiple accounts simultaneously.
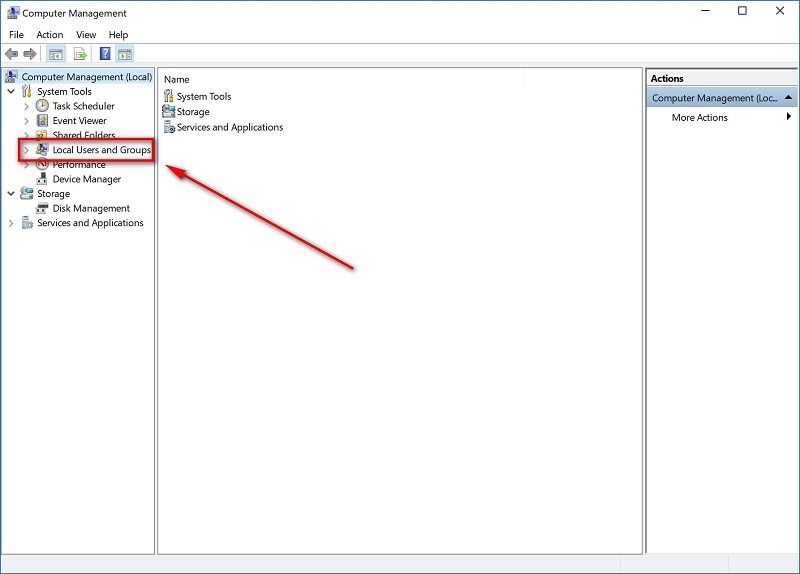
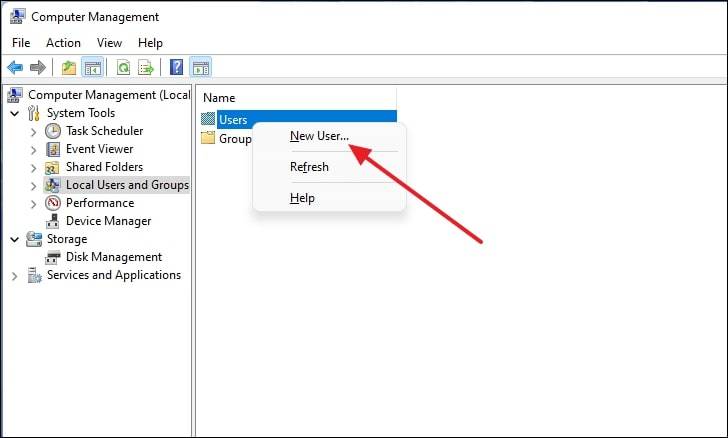
Step 1. Type “Computer Management” in the search bar. And double-click on the “Computer Management” app to open it.
In the Computer Management window, navigate to “System Tools” > “Local Users and Groups” > “Users.”
Step 2. Right-click on an empty area in the Users folder and select “New User.”
- In the New User dialog box, type the desired username and fill in the necessary details, including the full name and description.
- You can also set an initial password and specify permission to users to change the password at the next login.
- And then click “Create.”
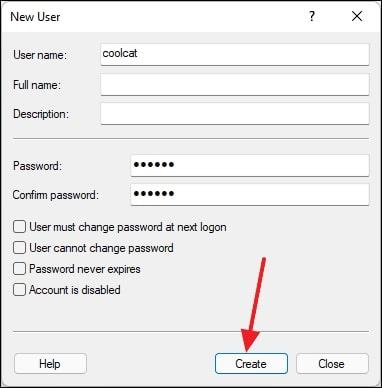
Step 3. You will find the new user account in the “Users” folder.
You can further configure the account by right-clicking on it and selecting “Properties.” You will find options for group membership, assign user rights, and configure other account settings.
Way 5. Create A New Local Account on Windows 10 via Netplwiz
Netplwiz is a powerful Windows utility that simplifies creating a local user account. Like Computer Management, Netplwiz offers the advantage of creating a user account without requiring a Microsoft account.
Additionally, Netplwiz’s ability to manage user authentication settings, such as automatic logins, is another reason to use this method for creating a new local user account on Windows 10.
Step 1. Press the “Windows key + R” to open the Run dialog box.
Type “netplwiz.exe” in the Run dialog box and press Enter.
Step 2. The User Accounts window will appear. Click on the “Add…” option.
- Click on the “Sign in without a Microsoft account (not recommended)” option in the next window.
- Click on the “Local account” option.

Step 3. Fill in the required information for the new local account, including the username, password (optional), and password hint (recommended for account recovery).
- Click on the “Next” option.
- Click on the “Finish” option to create the new local account on the next page.
The User Accounts window will close, and you will return to the main netplwiz window. The newly created local account will be listed in the Users for this computer section.
Way 6. How to Create A New User on Windows 10 without Logging In
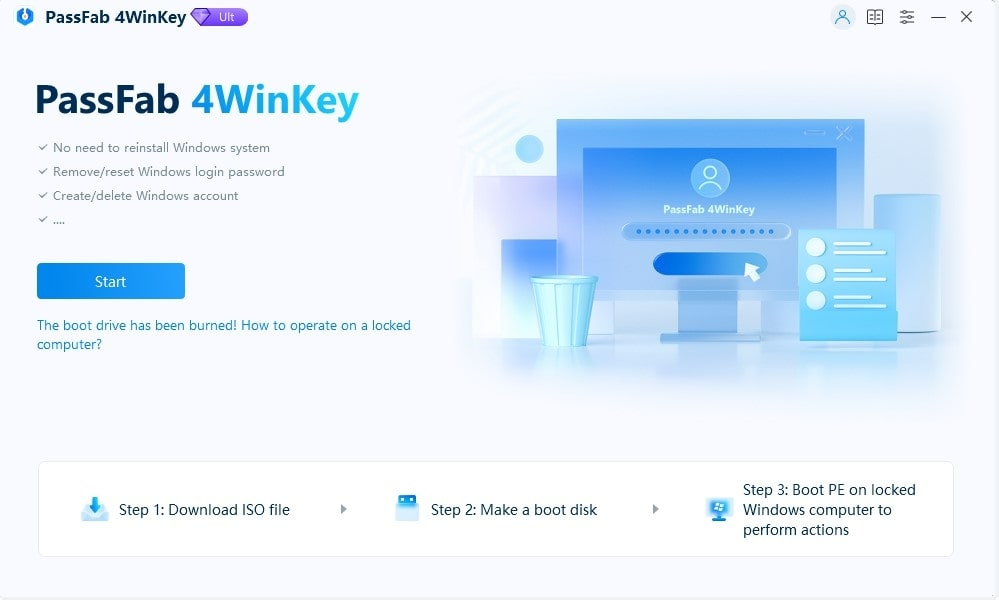
You can create a local user account on Windows 10 without logging in using Windows password recovery software like PassFab 4WinKey. This tool lets you make a new account directly from a bootable USB or CD/DVD without needing an existing user account.
>> Get PassFab 4WinKey Coupon (30% OFF) <<
There are a few reasons why you might want to create a new local user account without logging in:
- Forgot login credentials: If you need help remembering your password or username, PassFab 4WinKey can help. So, you can bypass the login screen and create a new user account to gain access to your system.
- Troubleshooting issues: If your current user account is corrupted or causing problems, creating a new account can help. It isolates the issue, giving you a stable environment to troubleshoot and fix problems.
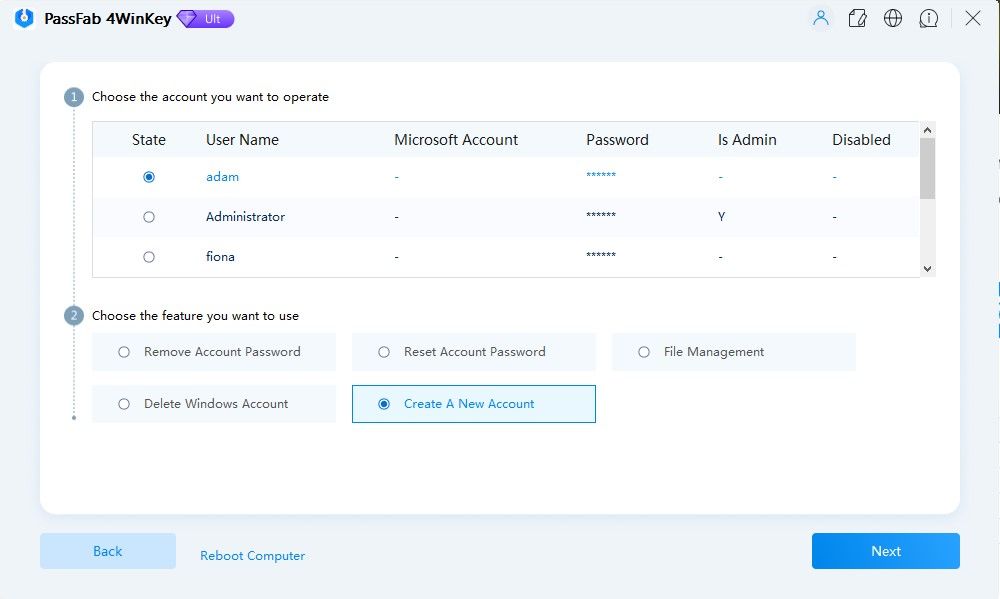
Whatever the reason may be, PassFab 4WinKey makes it easy to create a new user account without logging in. 4WinKey offers a user-friendly interface that simplifies the process, making it accessible even for tech novices to easily create a local user account on Windows 10 without logging in.
Frequently Asked Questions About Local User Account
1. How can I change the username of an existing local user account?
- Open the “Settings” app.
- Choose the “Accounts” option.
- Click on “Family & other users” to see the list of user accounts on your device.
- Locate the desired user account and select it. This will bring up options related to that account.
- Click on the “Rename” option. This will prompt a text field where you can enter the new username for the account.
- Type in the new username and press Enter.
2. How can I delete a local user account on Windows 10/11?
To delete a local user account:
- Go to the “Settings” app.
- Navigate to “Accounts” > “Family & other users.”
- Select the desired user account you want to delete. And click on the “Remove” button.
Confirm the deletion when prompted.
3. How can I switch between user accounts on Windows 10/11?
To switch between user accounts on Windows 10/11:
- Navigate to the Start button.
- You will see your account name or picture displayed at the top. Click on it.
- A menu will appear showing all the user accounts on your system — select the desired one.
- If the selected user account has a password — type in the password and press Enter or click on the arrow button to proceed.
Windows will now switch to the selected user’s desktop environment, and you can start using that account.
Alternatively, to switch user accounts on the login screen, choose the desired user account from the bottom-left corner and enter the password.
4. How can I change the account type of an existing user account?
- Go to the “Settings” app.
- Navigate to “Accounts” > “Family & other users.”
- Click on the desired user account and click on the “Change account type” option.
- Choose the desired account type (e.g., Standard User, Administrator).
5. How can I create a new user account on Windows 10/11 without an internet connection?
You can use any of the above methods described in the article to add new users on Windows 10/11 without an internet connection.
Conclusion
Hopefully, you have learned how to create a new local user account on Windows 10/11. Following the various methods described, you can experience enhanced privacy, security, and productivity benefits.