During their computer usage journey, most users will inevitably reach a point where they need to install or reinstall an operating system. In the case of Windows 10, having a bootable USB drive can prove remarkably advantageous. Especially when installing the operating system on numerous devices or carrying out a fresh installation is required.
Creating a bootable USB from an ISO file provides a portable and efficient solution that allows you to install Windows 10 easily. This article provides a comprehensive step-by-step guide to create a Windows 10 bootable USB from ISO. It will equip you with the essential knowledge to create your own bootable USB drive effortlessly.
Part 1. Why Create Windows 10 Bootable USB from ISO?
Creating a Windows 10 bootable USB from an ISO file offers several advantages and is useful in various scenarios. Outlined below are some potential reasons why you may wish to create a Windows 10 bootable USB from an ISO file:
- System Recovery: A bootable USB can serve as a recovery tool if your computer encounters critical issues or becomes unbootable. You can access advanced troubleshooting options, repair startup problems, restore system images, or perform system restores.
- Password Reset: You can also use a bootable USB to reset your Windows password if you have forgotten the password. A bootable USB is your key to unlocking your computer in these scenarios.
- Installation and Reinstallation: With a bootable USB drive, you can install or reinstall Windows 10 on a computer. It is especially advantageous when an optical drive (CD/DVD) is unavailable or when a quicker installation process is desired.
- Upgrading or Downgrading: When aiming to upgrade your operating system from an older version, such as Windows 7 or 8.1, to Windows 10, a bootable USB offers a straightforward method to execute the upgrade process. Moreover, a bootable USB can also serve that purpose if you revert from Windows 10 to a previous version.
- Portable Windows Environment: A bootable USB enables you to carry a fully functional Windows 10 environment wherever you go. This can be handy if you need to use your own personalized Windows setup on different computers or need access to specific software tools without altering the host system’s configuration.
Part 2. How to Create Windows 10 Bootable USB from ISO
Given below are the three most commonly used methods to create bootable USB Windows 10 from ISO:
Method 1: Create Windows 10 Bootable USB from ISO Using Windows Media Creation Tool
Using the Windows Media Creation Tool to create a Windows 10 bootable USB is a convenient method provided by Microsoft. It simplifies creating a bootable USB and ensures you have the latest version of Windows 10.
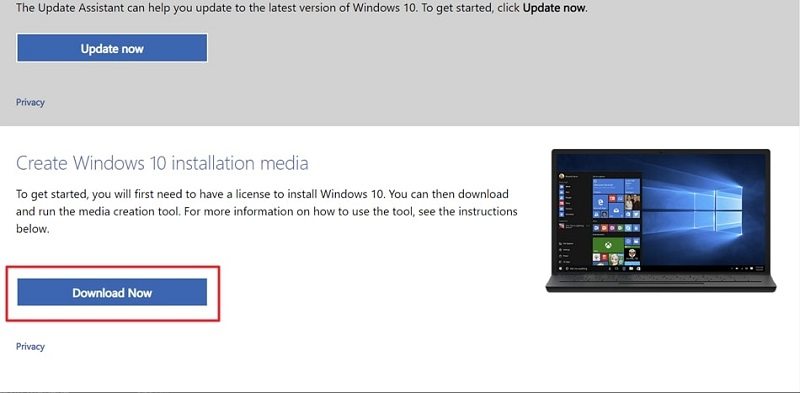
Step 1: Open your computer web browser and navigate to Windows 10 download page. Click “Download Now” from “Create Windows 10 installation media” to download Windows Media Creation Tool.
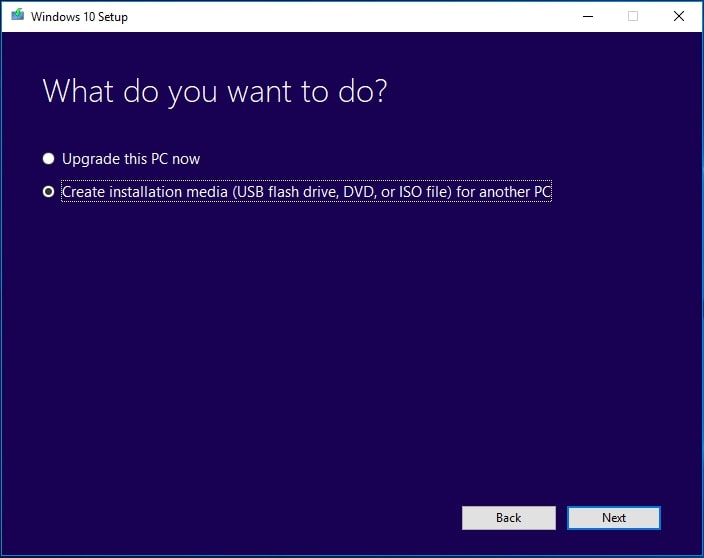
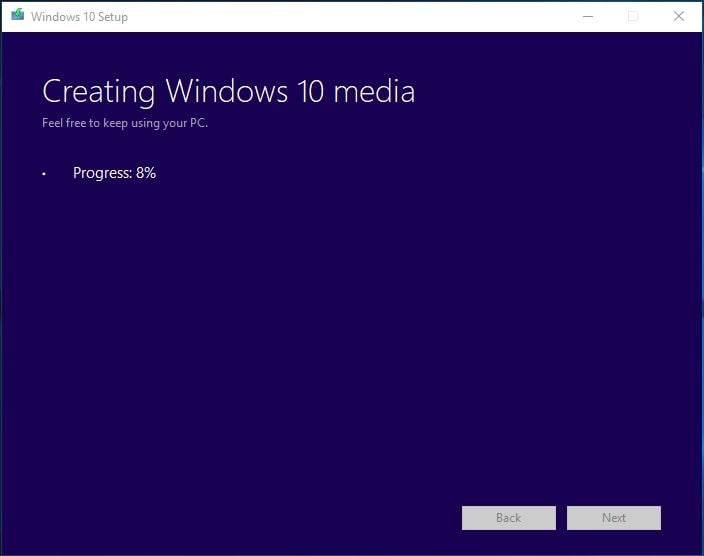
Step 2: Once the tool has been downloaded, double-click to run the file. It will open the “Windows 10 Setup” interface where you need to select “Create installation media (USB flash drive, DVD or ISO file) for another PC” and tap “Next.”
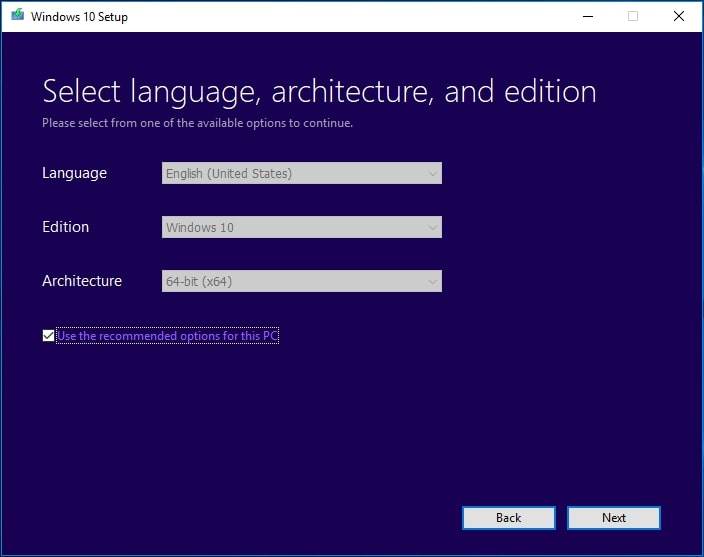
Step 3: On the next screen, the tool auto-captures the details about the language, Windows edition, and architecture from your computer. If you want to change something, uncheck the “Use the recommendation for this PC” box, manually add the information, and press “Next” to proceed.
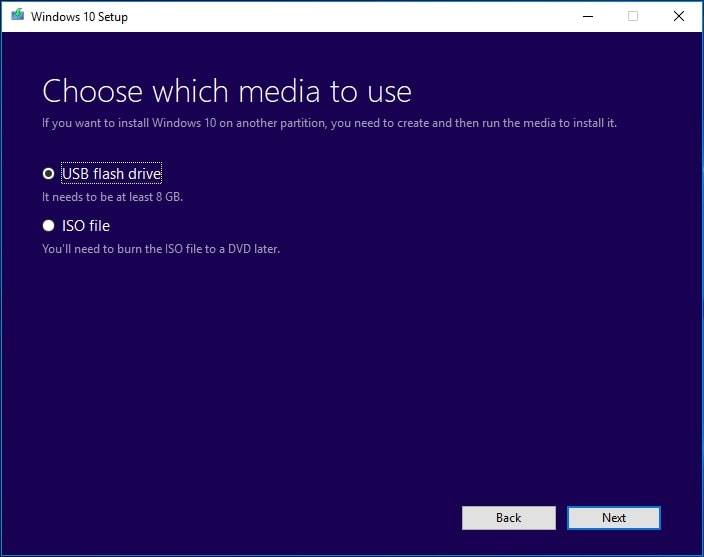
Step 4: Now you need to choose the media, and it gives you two options, “USB flash drive” and “ISO file.” Here, choose “USB flash drive” and connect one to the PC. Remember that the flash drive needs to be at least 8GB.
Step 5: After selecting “USB flash drive,” click “Next” and choose the flash drive on the following screen. Now, tap “Next” and wait for Windows 10 to download. Once it is downloaded, click “Finish” to complete the process.
Method 2: Create Windows 10 Bootable USB from ISO Using Rufus
Many third-party tools can also help you create a bootable USB for Windows 10 using the ISO file. One of the most famous and used tools is Rufus. It is a trusted and user-friendly tool that simplifies the process. You can use the simplified steps given below to successfully create a Windows 10 bootable USB from an ISO file using Rufus:
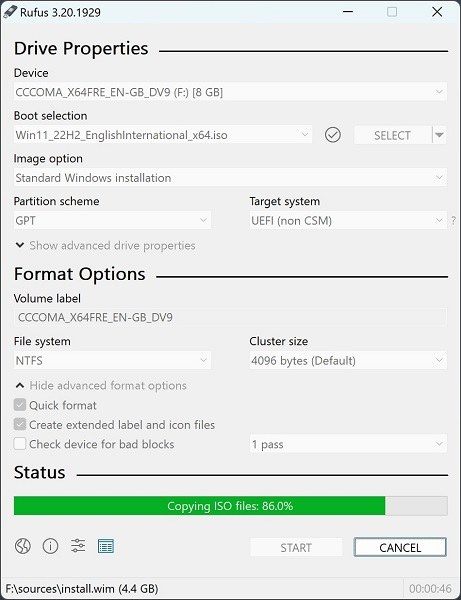
Step 1: Connect your USB drive to your computer and download Rufus from its official website. You must have the Windows 10 ISO with you, or you can also download it through Rufus itself. After downloading Rufus, double-click to run it.
Step 2: Rufus will automatically select the USB drive connected to the computer. If more than one flash drive is connected, select the desired one from the “Device” menu. Afterwards, click “Select” to choose the Windows 10 ISO file. Conversely, you can tap on the arrow adjacent to the “Select” option to choose the “Download” option for downloading the Windows 10 ISO file.
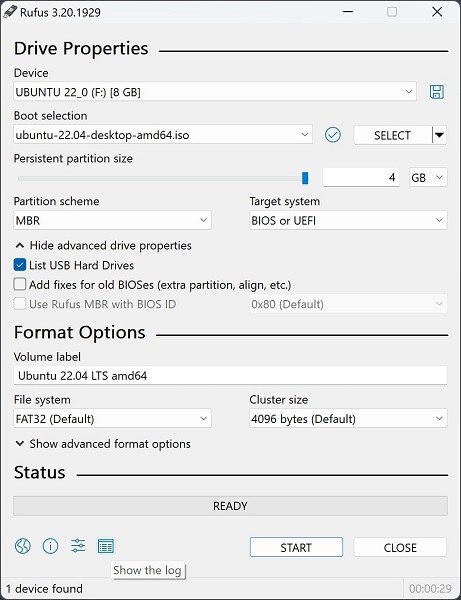
Step 3: Once you have added the file, select “Standard Windows Installation” in “Image Options.” Now, tap “Start” to initiate creating a Windows 10 bootable USB. Remember, you will need to format the USB before starting the process.
Method 3: Create Windows 10 Bootable USB from ISO Using CMD
This section will explore an alternative method to create a Windows 10 bootable USB from an ISO file using Command Prompt (CMD). Utilizing the capabilities of the command line interface empowers you to complete the given task without relying on external utilities. Presented here are detailed, sequential guidelines that will assist you in generating a bootable USB drive for Windows 10 by utilizing CMD:
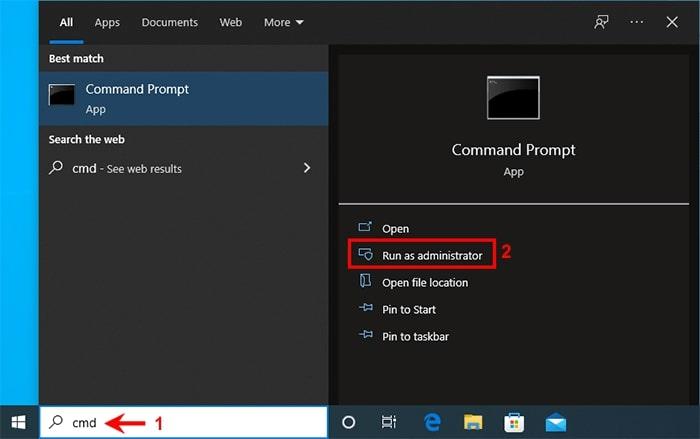
Step 1: Search for the “Command Prompt” in the Windows search bar. When it appears, click “Run as administrator” to open the Command Prompt with admin privileges. In the Command Prompt, run the command “diskpart.”
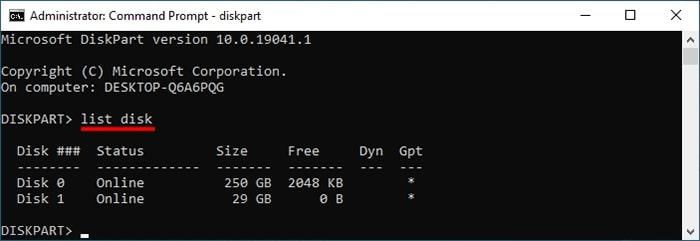
Step 2: Afterward, type and run the command “list disk” to see all the drives connected to your computer. Ensure that your USB is connected to the computer and select it using the command “select disk X.” Here, the “X” is the disk number of your flash drive.
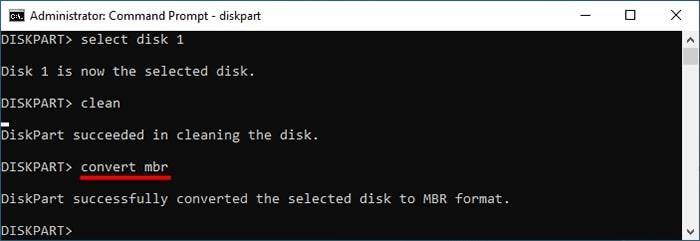
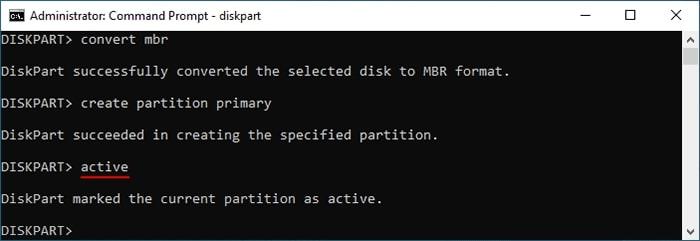
Step 3: To format the flash drive and clear all partitions, run the “clean” command. Afterwards, run the command “convert mbr” to convert your USB drive to MBR format. Now, run “create partition primary” to create a primary partition on your flash drive.
Step 4: After creating the primary partition, make it active by running the “active” command. The next part is to format the primary partition with FAT32 and give the label a name, for which you can use the following command:
format quick fs=fat32 label=”VMP” (Here, “VMP” is a label name that you can change according to your preferences)
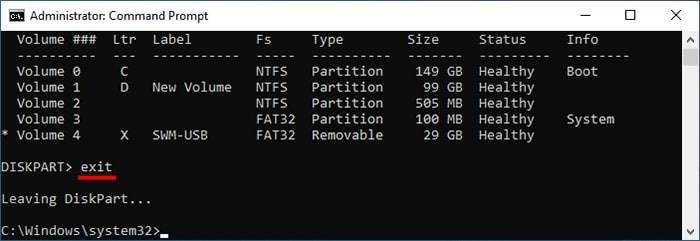
Step 5: Now, give the partition on the flash drive a label with the command “assign letter=”I.” Now run “list volume” to see your USB and “exit” to exit the diskpart. Afterwards, minimize the Command Prompt and download the Windows 10 ISO file.
Step 6: Once the file is downloaded, double-click it to mount the image. Windows will auto-assign it a DVD letter. Now re-open the Command Prompt and run the following command to copy all files except the “install.wim” file from the newly mounted DVD drive:
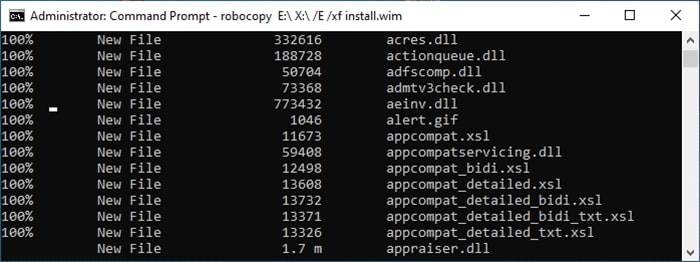
robocopy D:\ I:\ /D /xf install.wim (Here, “D” is the DVD letter assigned to the mounted image, while “I” is your USB drive.”
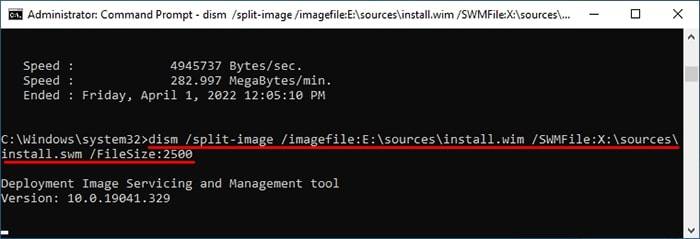
Step 7: The next part is to copy the “install.wim” file to the USB drive. However, this file is larger than 4GB, and your drive can’t store a single file of over 4GB due to FAT32 formatting. That’s why you will need to split the file into two files. Here is the command to split the file and store it on the USB drive:
“Dism /Split-Image /ImageFile:D:\sources\install.wim /VMPFile:I:\sources\install.swm /FileSize:2500”
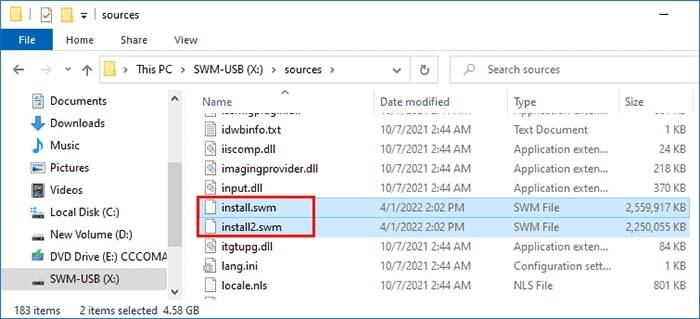
Step 8: When the command execution is complete, exit the Command Prompt. Now check your USB drive to ensure there are two “install.swm” files. Now, your USB is bootable, which you can use to install Windows 10.
Frequently Asked Questions About Windows 10 Bootable USB
Got more questions about Windows 10 bootable USB from ISO? Read on to find the answers to some of the FAQs on this topic:
Can I create a bootable USB for Windows 10 on a Mac?
Creating a bootable USB for Windows 10 on a Mac is possible. You can use tools like Boot Camp Assistant or third-party software like Rufus to create the bootable USB. Remember that you require a Windows 10 ISO file and a compatible USB drive.
Is it possible to use a bootable USB for Windows 10 to reset my computer?
By utilizing a bootable USB for Windows 10, you can restore your computer to its original factory settings. Boot your device from the USB drive and access the Windows recovery options. Select the “Reset this PC” option to commence the factory reset procedure.
Can you use a bootable USB for Windows 10 password reset?
Yes, it is possible to use a bootable USB for Windows 10 password reset. The process is effectively simple to follow, where you create a reset disk adjacent to the USB and utilize it accordingly
Conclusion
In conclusion, creating a Windows 10 bootable USB from an ISO file is a straightforward process that offers numerous benefits and flexibility. This article gives you easy instructions to make a USB drive that can start up your computer using a file called ISO. This approach offers a dependable and convenient means to access the Windows 10 installation media whenever needed, eliminating the necessity for physical disks.