A Microsoft account offers numerous benefits, like enhanced security, access to Microsoft services, and sync settings and files across devices. But some users might be looking to switch to a local account. This could be because they might want increased privacy, simplified account management, or switch to a different Microsoft account altogether.
This guide will show you how to remove a Microsoft account from Windows 10. We’ll explore several methods for removing a Microsoft account and cover what to do if you’ve forgotten your Microsoft account password.
Part 1. Remove Microsoft Account from Windows 10 by Switching to A Local Account
You can remove the Microsoft Account from Windows 10 by switching to a local account. This approach retains your files and settings while removing the Microsoft account. To follow this method, ensure your computer is connected to the internet, as it must communicate with the Microsoft servers to complete the account unlinking.
Here’s how to remove Microsoft Account from Windows 10 by switching to a local account:
Step 1. Right-click on the Start button and choose Settings from the menu to open the Settings app.
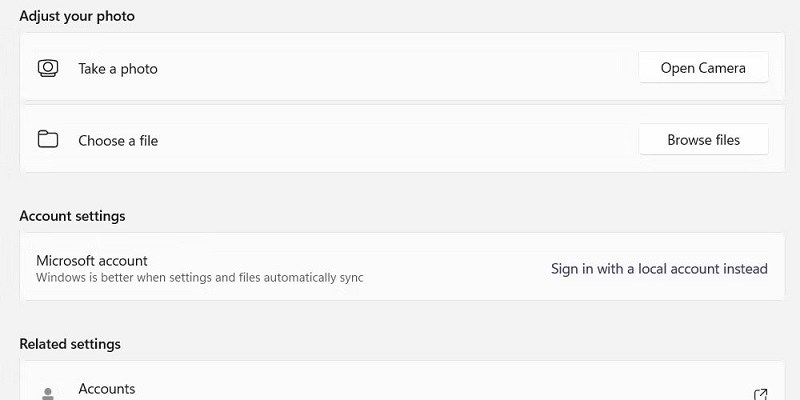
- Within Settings, choose Accounts from the left pane. On Windows 10, the Your info screen will be automatically selected.
- On the Your info screen, choose “Sign in with a local account instead” of a link to initiate creating a local account and removing a Microsoft account.
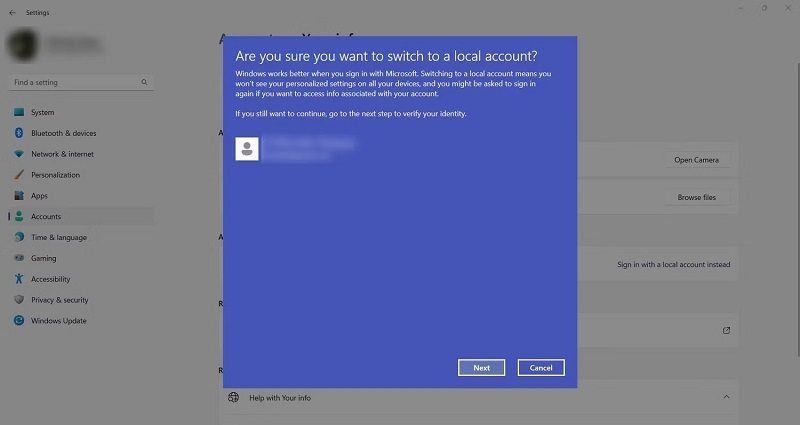
Step 2. You have to enter the PIN code or Microsoft account password to continue. Enter the required information and choose “Next.”
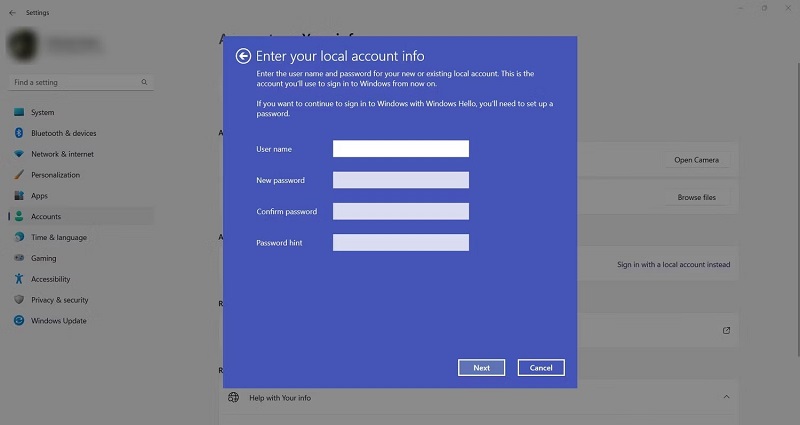
Step 3. Create a new local account by providing a username, password, and password hint. And click “Next.”
Then, select “Sign out and finish” to create a new local account. Once you select the option, Windows 10 will take you to the lock screen. Enter the password to sign back into Windows via your local account.
The above steps will allow you to remove your Microsoft account from your Windows 10 and switch to a local account.
Part 2. Remove Microsoft Account from Windows 10 by Using A Local Admin Account
The local admin account has administrative privileges, granting the user full control over the computer and its settings. This also means you can manage and delete other user accounts, including the Microsoft account. Furthermore, you can achieve the same result — removing a Microsoft account — through different methods such as the Settings app, Control Panel, Netplwiz, and Registry Editor.
Method 2.1. Delete Microsoft Account from Computer via Settings
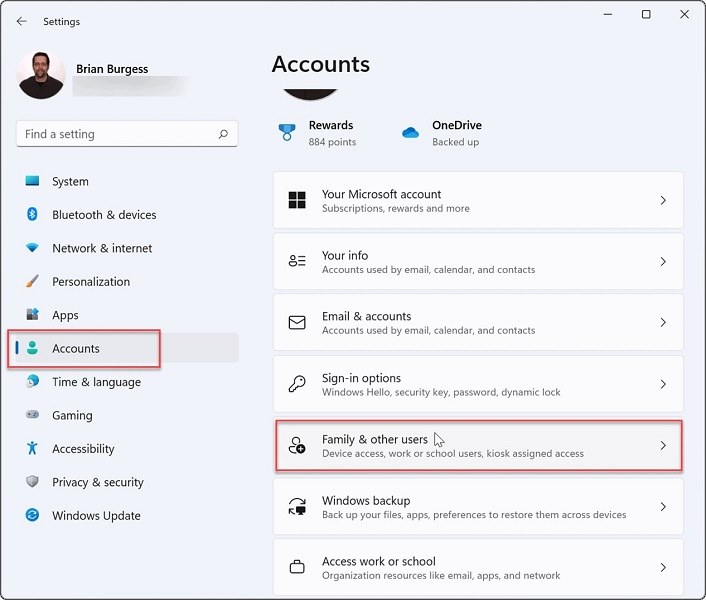
Step 1. Press the Windows key and type Settings to open the Windows Settings app.
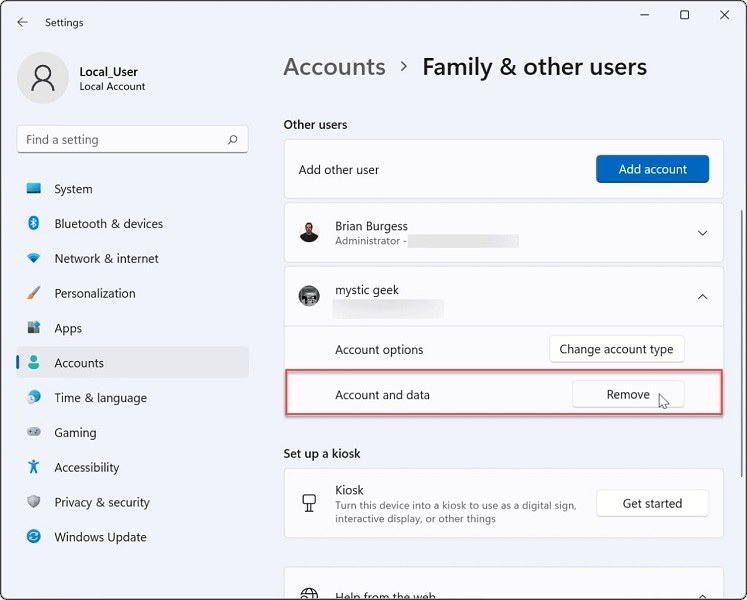
- Navigate to “Accounts” and choose “Family & Other Users.” This will show you the list of accounts on the Windows 10 computer.
- Locate the desired Microsoft account and remove it from the “Other Users” section.
Step 2. Click on the account, and choose “Remove.”
Choose “Delete account and data” in the confirmation dialog box. This will remove the Microsoft account and its associated data from your computer.
Method 2.2. Delete Microsoft Account from Computer via Control Panel
Control Panel is the classic Windows management tool that provides access to various system settings and configurations, including removing User Accounts on the Windows 10 computer. The benefit of this method is that you can keep the files associated with your Microsoft Account even after deleting it.
Step 1. Press the Windows key and type in “Control Panel.” Press Enter to open Control Panel on Windows 10.
In the Control Panel, set the “View by” option to “Category” and click on “User Accounts.”

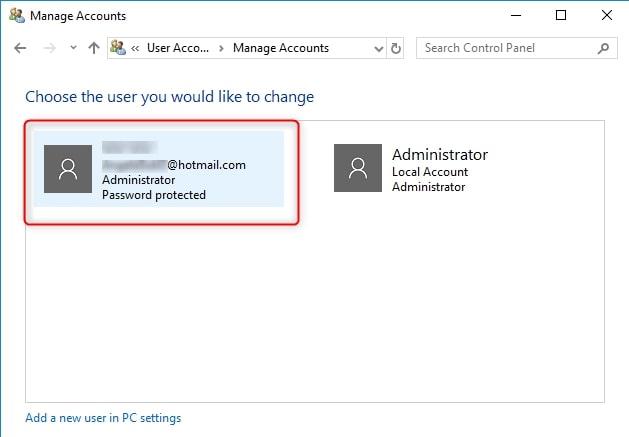
Step 2. Select “Manage another account.” This will show you the list of user accounts on your computer.
- Select the desired Microsoft Account and click on it.
- Then, choose “Delete the account” to remove the Microsoft Account.
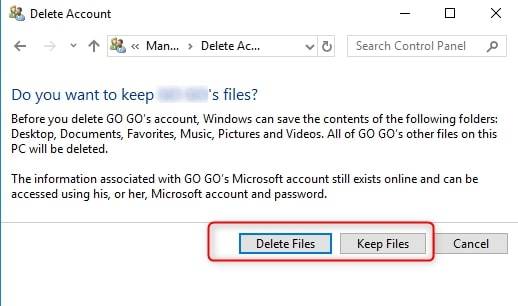
Step 3. The pop-up will ask you to choose: “Delete Files” or “Keep Files.” Choose the desired option. If you choose to keep the files, they will be saved in a folder on the desktop.
That’s how to delete Microsoft Account from a computer via Control Panel. But note that the Control Panel might not work in some cases due to system configuration or permission issues. So, if this method does not work, use one of the following methods.
Method 2.3. Delete Microsoft Account from Computer via Netplwiz
Netplwiz is an advanced user accounts management tool in Windows 10 that allows you to configure user accounts and lets you remove Microsoft accounts from your computer.
Step 1. Press the Windows key and type “netplwiz” in the search bar. Select the “Open” option to open the User Accounts window.

Step 2. You will see a list of user accounts in the User Accounts window on your computer.
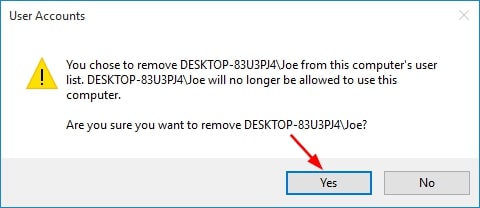
Choose the Microsoft account you want to remove and select the “Remove” option.
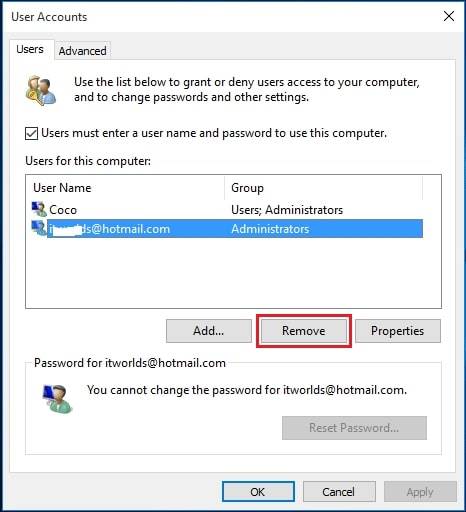
Step 3. You will see a confirmation dialog box asking whether you want to proceed with the removal of the desired Microsoft Account. Choose “Yes” to continue.
Unlike the Control Panel option, Netplwiz does not give you the option to keep files. So, ensure to back up any critical data before proceeding with this method.
Method 2.4. Delete Microsoft Account from Computer via Registry Editor
The Registry Editor is a powerful Windows tool that lets you modify system settings, including managing accounts. But you should use the Registry Editor with caution, given editing the registry incorrectly can cause system instability and other issues. Plus, creating a backup of your registry or a system restore point is best.
Step 1. Press the Windows key and type “regedit.” Then, press “Enter” to open the Registry Editor.
Navigate to the following key: HKEY_USERS.
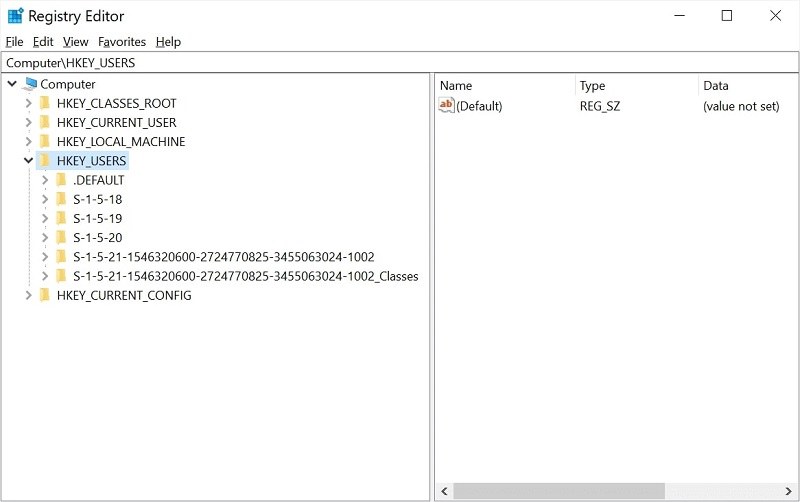
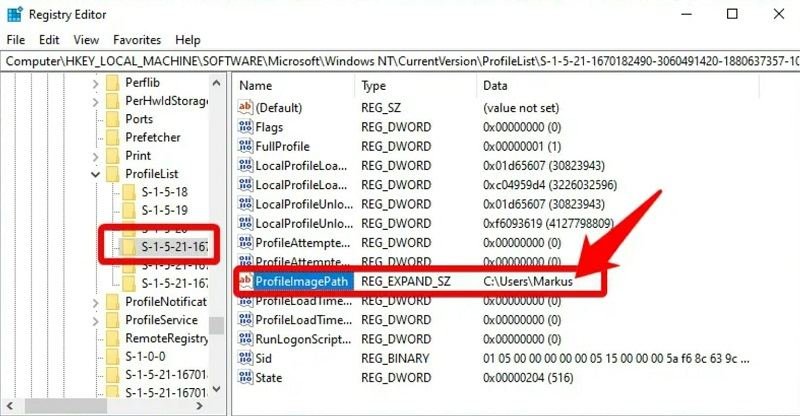
Step 2. Expand the HKEY_USERS key. And locate the subkey corresponding to the Microsoft Account you want to remove from the computer. Each subkey will contain a long string of numbers and letters. You have to click on each SID (security identifier) and check the “ProfileImagePath ” value in the right pane. The path will contain the username of the Microsoft Account you want to remove.
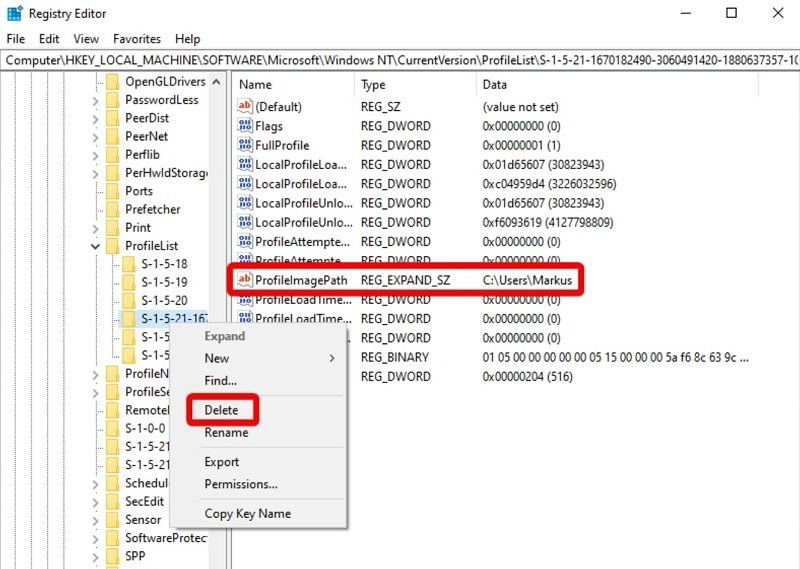
Step 3. Once you locate the desired SID subkey, right-click on it and select “Delete.”
Confirm by selecting “Delete” again when you see the pop-up.
Part 3. Remove Microsoft Account from A PC Online
You can also remove the Microsoft account from Windows 10 from the Microsoft account management website. This involves unliking the Microsoft account from the Windows 10 PC, so it will not delete the account itself; instead, it dissociates from the PC.
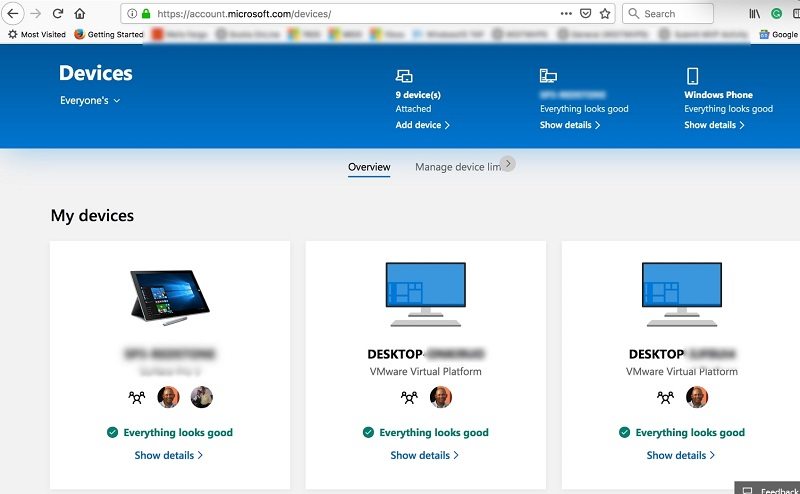
Step 1. Visit the official Microsoft Account device page. Sign in with the credentials of the desired Microsoft account that you want to remove from your PC.
Step 2. You will see a list of devices linked to the Microsoft account. Choose the Windows 10 PC from which you want to remove the Microsoft Account and choose “Show details.”
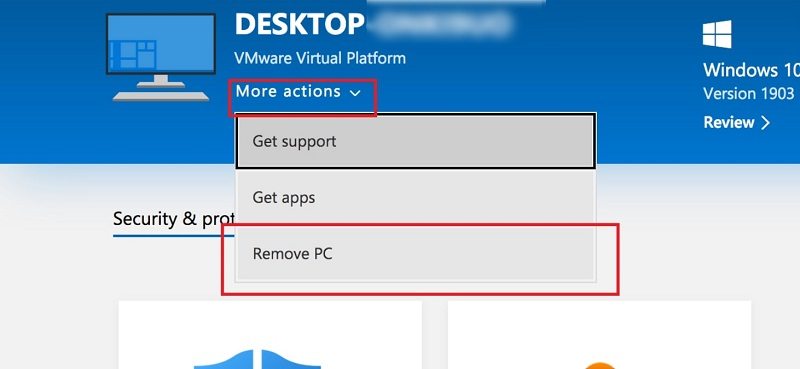
Step 3. In the device details section, choose the “More actions” button.
- And choose the “Remove PC” button to dissociate the Microsoft account from the selected Windows 10 computer.
- Click on “Yes” in the confirmation dialog box.
That’s how to unlink the Microsoft account online from your Windows 10 computer. However, the Microsoft account will be accessible on the other connected devices.
Part 4. Disconnect School/Work Account
If you are switching to a different school or workplace and the resources associated with that account are no longer necessary, you can disconnect it from your Windows 10 PC. So, anything linked to the organization’s network, like policies, restrictions, apps, and settings, will be removed.
Furthermore, this process only disconnects the school or work account, so the account will not be deleted. This means you can access the account on other devices or reconnect it to the same PC if needed. However, all the data, apps, and settings tied to the Work/school account will be removed from the PC. So, back up and arrange alternatives accordingly.
Step 1. Open Settings on Windows 10. Navigate to “Accounts.”
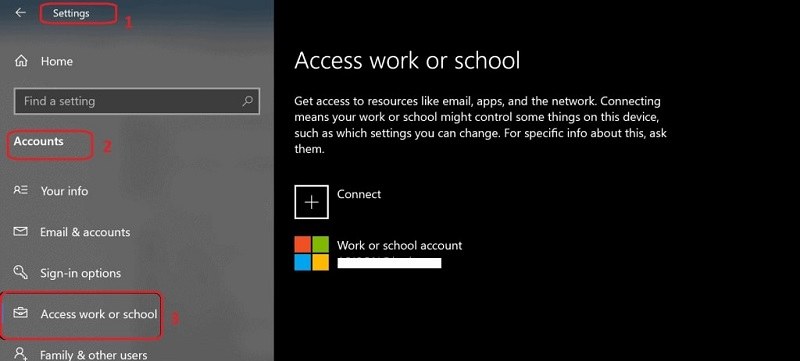
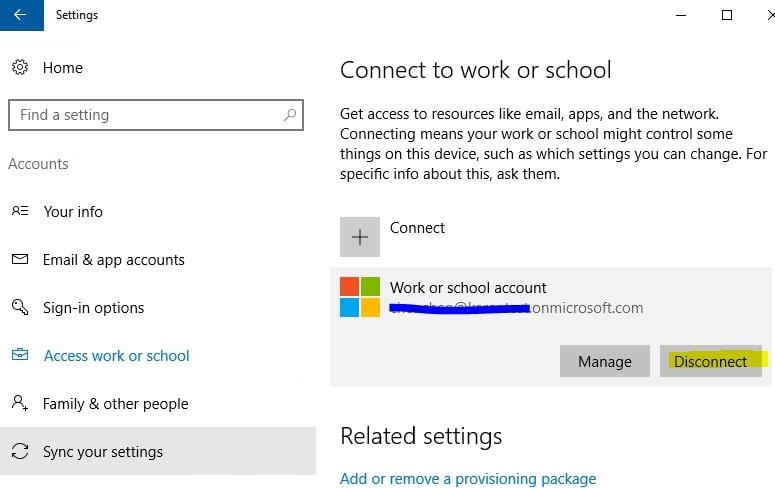
Step 2. From the left sidebar, choose “Access work or school.” This will show you the list of all the school or work accounts connected to your Windows 10 PC.
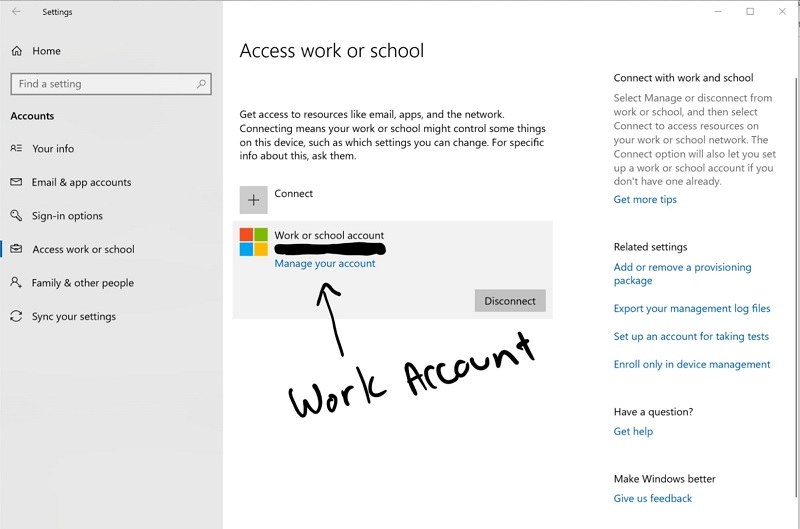
Step 3. Choose the school or work account you want to remove, and then choose the “Disconnect” button.
You will see a confirmation dialog box. Choose “Yes” to dissociate the school or work account from your computer.
That’s how to disconnect the school or work account from your Windows 10 PC.
Part 5. What to Do If Forgot Microsoft Account Password to Log Into Windows 10
For those who have forgotten their Microsoft Account password, multiple ways exist to regain access to your Windows 10. Some options include a password reset disk or changing the password through another administrative account on the same PC. However, using a third-party Windows password reset tool is the most direct and simple solution to reset the Microsoft account password and log into Windows 10. While there are several tools online, PassFab 4WinKey stands out as one of the most convenient and effective options.
>> Get PassFab 4WinKey Coupon (30% OFF) <<
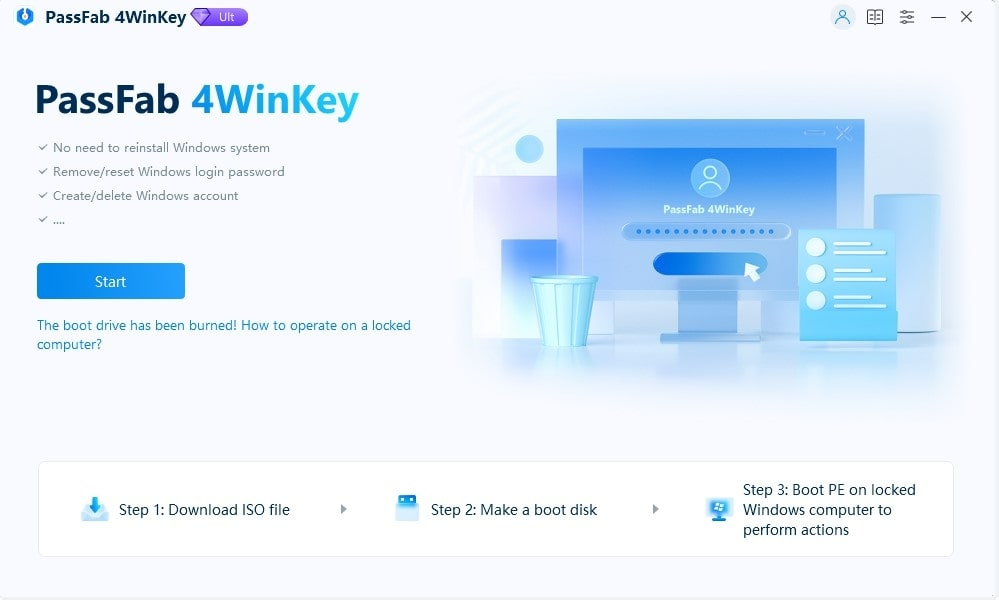
PassFab 4WinKey is a professional tool that can proficiently reset or remove passwords for both Microsoft and local accounts on Windows 10 without causing data loss. Moreover, its user-friendly interface ensures that even those with limited technical knowledge can reset or remove their Microsoft account password and regain access to Windows 10 quickly and securely.
Frequently Asked Questions About Microsoft Account on Windows 10
What are the potential risks of removing a Microsoft account from a Windows 10 computer?
Removing the Microsoft account from your Windows 10 computer will cause data loss. All the data, settings, and apps linked with the Microsoft account will be deleted. So, ensure to back up any important data beforehand.
Furthermore, services that rely on Microsoft accounts, such as OneDrive or Microsoft Store, will lose synchronization and become inaccessible. It will also impact the access to Microsoft services, like Office 365, Xbox Live, and Skype, linked to your Windows 10 computer account.
Are there any alternative methods to manage a Microsoft account without completely removing it from the computer?
Yes. You can modify the settings, preferences, and privacy settings from “Settings” on Windows 10. You can also manage these settings via the online website.
Plus, you can disconnect the Microsoft account from one device and access it from other devices or computers.
How to back up data before removing a Microsoft account from a Windows 10 computer?
To back up data before removing the Microsoft account from your Windows 10 computer:
- Choose a backup destination, like an external hard drive, cloud storage, or even a local folder on your computer.
- Identify all the necessary files, such as documents, photos, videos, and other personal files associated with the Microsoft account.
- Copy and paste the files if you are backing up on an external drive or folder. Or upload the files to the cloud storage.
Additionally, keep a record of the product keys, licenses, and subscriptions associated with the Microsoft account.
How to switch from a local account to a Microsoft account on a Windows 10 computer?
Switching from a local account to a Microsoft account on Windows is straightforward. Here’s how to do it:
- Open Settings on Windows 10.
- Choose “Accounts.”
- Under the “Your info” tab, choose the “Sign in with a Microsoft account instead” option.
- The new window will ask you to enter the account details, like your Microsoft email address and password. If you do not have an account, click “Create one!”
- Then, enter your email address and click “Next.”
- You must verify your email or phone number if you previously opted for two-step verification.
- And then click “OK.”
This will allow you to switch from a Microsoft account to a local account.
Conclusion
This guide has provided different methods to remove a Microsoft account from your Windows 10 computer. Additionally, we discussed how to switch from a Microsoft account to a local account and address a forgotten password issue.