Is there something worse than taking a screen recording and then realizing it has no sound? Nope. Nothing is worse than that feeling!
We know you’re going through the same pain right now, hence why you’re reading this post. However — your struggle ends here! This article covers everything you need to know about the “iPhone screen recording no sound” problem.
In the following sections, we will give you multiple fixes to deal with the issue.
Without any further ado, let’s get right into it.
Part 1. Why Do My Screen Recordings Have No Sound?
You must be wondering, “Why my screen recording has no sound iPhone in the first place?” — that’s a good question!
You see, there could be a few reasons why you can’t record audio in your screen recordings. Let’s walk you through them one by one.
- If you’re trying to record audio through your microphone, i.e., you want to record your own voice and/or your surrounding sounds, you need to enable the microphone. It’s very likely that you have not enabled the microphone for screen recordings, so you’re not getting any sound.
- If you’re trying to screen record an app that doesn’t have audio in silent mode, you won’t be able to record its sounds in your screen recordings either. Some examples of such apps are games like Clash of Clans, PUBG, Call of Duty, etc. In this case, all you need to do is turn OFF silent mode by flipping the mute switch on your iPhone.
- Your iPhone may have some sort of system-related bug. It may be because of an outdated iOS version or other system glitches. Don’t worry; we will tell you how to get rid of those in the coming sections.
- Some apps don’t allow you to record audio. This might be because of copyrighted content. For example, if you try to screen record Netflix, you won’t hear any sound or see any footage in your screen recordings. That’s because Netflix’s content is copyrighted, and it prohibits you from recording it and sharing it with others.
- Lastly, your iPhone may have some operating system issues. In such cases, you have to completely reinstall your OS. We will tell you how to do that in the following sections.
Part 2. How to Fix iPhone Screen Recording No Sound?
Now that you know why screen recording has no sound on iPhone, it’s time to explore some working solutions for the problem.
We recommend you follow the fixes in ascending order, which means you should try fix #1 first, then fix #2, and so on. That’s because we have enlisted the easiest fixes first, so you don’t have to take major steps to fix your problem if it can be done easily.
That said, let’s take a look at the first fix.
Turn on the Microphone Audio
The most common reason people can’t record their voice during a screen recording is that they simply have the mic turned OFF.
It’s very easy to fix this. All you have to do is follow the steps below.
- Open your Control Center by swiping down from the top-right corner of your iPhone.
- Tap and hold on to the Screen Recorder icon.
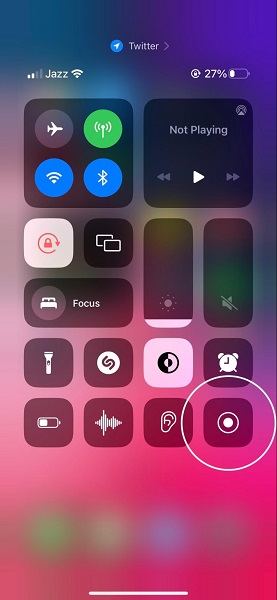
- Tap the Microphone icon to toggle it ON.
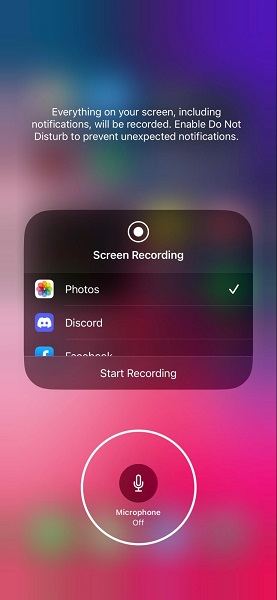
Now, when you start screen recording, you will be able to speak to the microphone and record your voice with it.
Be noted that the microphone audio is different from the system audio. Turning ON the microphone will let you record your voice.
If you only want to record the system sounds and not your voice, you don’t need to turn ON the mic. In that case, you can skip this fix and proceed to the next one.
Toggle the Mute Switch
If you’re trying to record a game’s audio, you need to ensure your phone is not in silent mode. That’s because most games block their audio when you’re in silent mode — hence, your screen recorder cannot capture their sound either.
This is super easy to fix.
- Find the mute switch on your iPhone. On all new iPhone models, it’s on the left side, right above the volume buttons.
- If the toggle is switched towards the back of your iPhone, simply switch it to the front.
- If the game you’re trying to record had no sound before, you should instantly start hearing its sound now. Be sure to turn up the volume to see if that’s the case.
- Now, simply start the screen recording as you normally would, and it will record the sound too.
Check If Apps Allow You to Record Audio
As mentioned earlier, some apps completely prohibit you from recording their media. When you screen-record them, you will only see a blank video.
Here are several apps that do this to prevent copyright infringement.
- Video streaming services, like Netflix and Amazon Prime Video.
- Password manager apps, like LastPass and 1Password. Even iOS’s native Keychain hides some parts of the UI when you screen record them.
- Many banking apps, like Wells Fargo, Chase, and Bank of America.
Unfortunately, there’s no iOS feature you can use to find out whether a specific app allows recordings. However, there’s a very easy workaround you can use to find that out.
What you need to do is try screen recording in another app. If the screen recorder can record audio from the other app just fine, that means the app you were using firsthand prohibits audio recordings.
A popular app we recommend to test this out is YouTube. YouTube allows sound and video recordings. So, you only need to play a YouTube video and screen-record it. If the recording comes out with sound, that means the app you were screen recording earlier doesn’t let you record audio. In this case, you can’t do anything to bypass that limitation.
Restart Your iPhone
If you have turned ON the mic, put your phone in ringer mode, and verified that the app you’re trying to record supports audio recordings — and you still can’t record audio, there’s a software issue.
In such cases, the easiest fix you can apply is to restart your iPhone. A restart is a perfect way to quickly refresh your operating system and boot it up from scratch. This helps remove any temporary glitches.
Here’s how you can restart your iPhone.
- Press and hold the side button and volume down button on your iPhone at the same time.
- Keep holding the buttons for a few seconds until you see the Power Off slider.
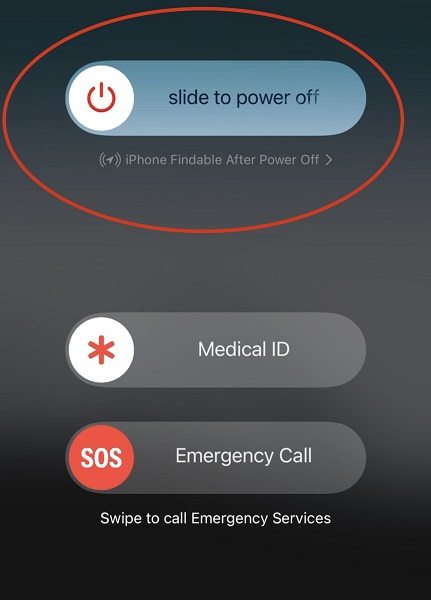
- Drag the slider to the right to turn OFF your iPhone.
- Wait for 30 seconds.
- Press and hold the side button to turn ON your iPhone again.
Now, you should try screen recording again and see if it has fixed the issue for you.
Fix iPhone Screen Recording No Sound without Data Loss
If a restart doesn’t fix the issue, it means the problem is a bit deeper. In such cases, you need to repair your iOS system.
Doing that using iTunes or Finder erases your iPhone’s internal storage. However, there’s a way you can do that without having to erase your storage.
We’re going to use Tenorshare ReiBoot. It’s a super handy utility to fix your iOS system in no time — and without any kind of data loss!
Here’s what you need to do.
>> Get Tenorshare ReiBoot Coupon (30% OFF) <<
- Download and install Tenorshare ReiBoot on your computer. It supports Windows and macOS.
- Launch ReiBoot.
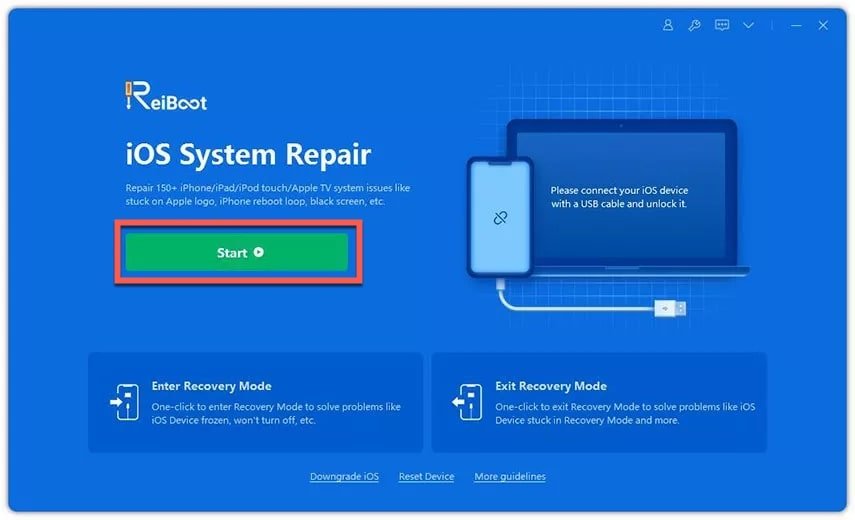
- Connect your iPhone to the computer using a USB cable.
- Click the green “Start” button in the main interface of Tenorshare ReiBoot.
- Click “Fix Now.”
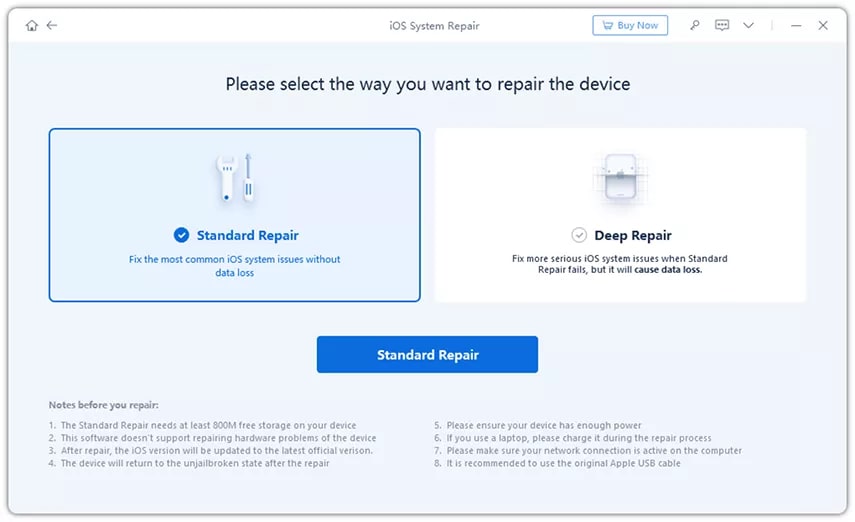
- Select “Standard Repair” from the page shown below, then hit the “Standard Repair” button.
- If your phone isn’t being detected, enter recovery mode by following the on-screen instructions.
- If your phone is still undetected by the program, you need to enter the DFU mode by following the on-screen instructions.
- Now, durreadan01 will download the latest stable update package for your iPhone. To proceed, simply click “Download.”

- The download may take anywhere from a minute to an hour — depending on your internet speed. When it’s done, click “Start Standard Repair”.
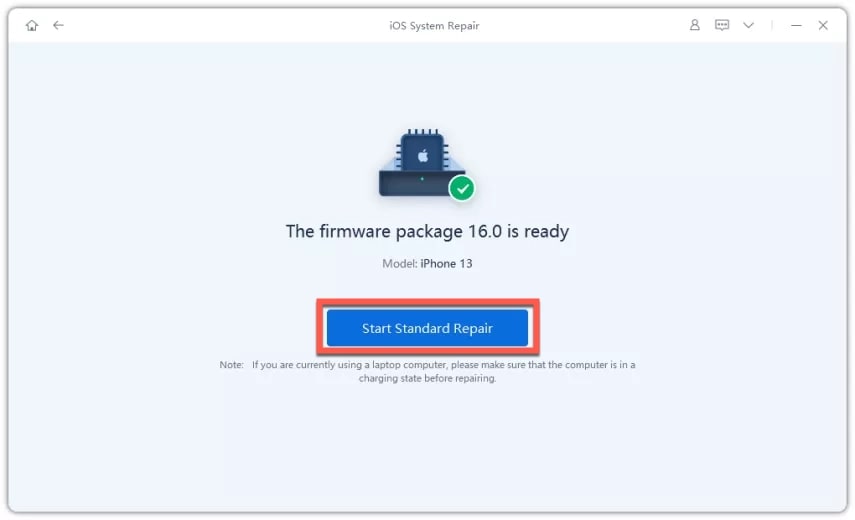
- The system is now repairing. Wait for around 10-20 minutes for it to complete.
After it’s done, your phone will restart — and your iOS system has now been repaired. Now, you should try screen recording again.
Reset All Settings on iPhone
Another handy way to fix common system problems is to reset all system settings. By doing that, you can undo any unwanted changes you might have accidentally made to your iPhone.
To do this, follow the steps below.
- Open the Settings app on your iPhone.
- Go to General > Transfer or Reset iPhone, then tap the Reset button at the bottom.
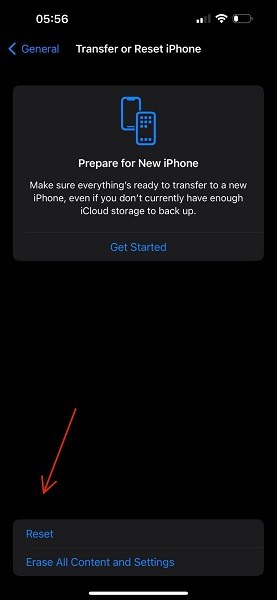
- Tap “Reset All Settings.”
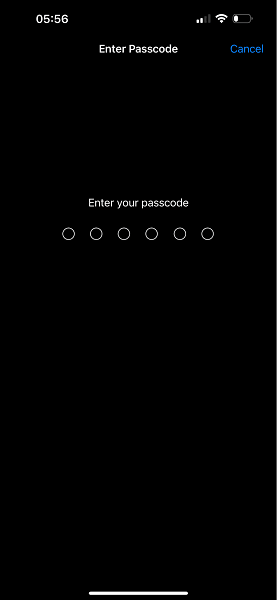
- Enter your passcode, then tap “Reset All Settings” again to confirm.
Now, try screen recording again and see if the audio works.
Update iOS System
Sometimes, you may face bugs on your iPhone because you’re not running the latest version of iOS.
To get rid of those, you should always keep your iOS version updated.
To install any available updates to your iPhone, follow the steps.
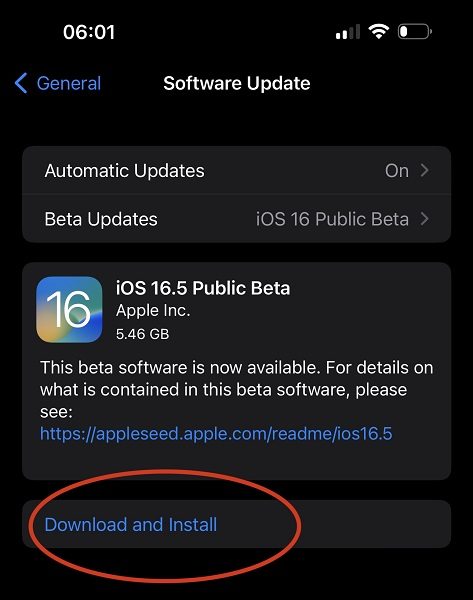
- Open the Settings app, and go to General > Software Update.
- If there’s an available update, you should see it alongside the “Download and Install” button.
- Tap the Download and Install button, and wait for the update to get installed.
After installing the update, try screen recording again and see if the issue is resolved.
Use Another iOS Screen Recorder
In some cases, using a third-party screen recorder might help you out.
While the success rate of this fix is considerably lower than the ones mentioned above, it’s still worth a try.
Here’s what you need to do.
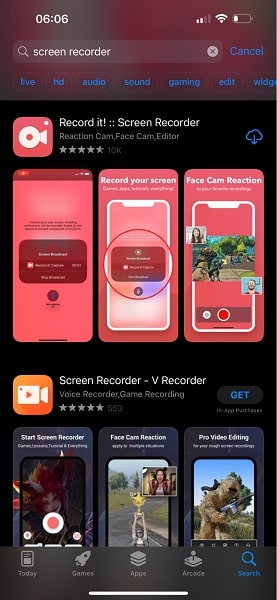
- Open the App Store and search for “screen recorder.”
- Choose any recorder app you like and download it to your phone. In this guide, we’re using “Record It!”.
- Open the app when it’s installed.
- Tap the record button in the middle.
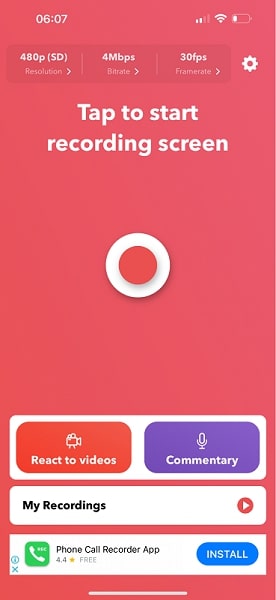
- Finally, tap “Start Broadcast” to start the recording.
- When you’re done recording, reopen the app and hit “Stop Recording,” then tap “Stop Broadcast.”
Erase All Content and Settings on Your iPhone [Data Loss]
If none of the fixes above have worked, you might need to factory reset your iPhone completely. This involves erasing all the content and apps you have on your device.
Before proceeding, we recommend you back up your data to iCloud or a computer.
When you’re done with that, follow the steps.
- On your iPhone’s home screen, tap on the Settings app.
- In the Settings app, scroll down and tap on General.
- In the General menu, scroll all the way down to the bottom and tap on Transfer or Reset iPhone.
- Tap on “Erase All Content and Settings.” This option will erase all the data and settings on your iPhone and restore it to its factory default state.
- If you have a passcode set on your iPhone, you will need to enter it to confirm the reset.
- After entering your passcode, your iPhone will ask you to confirm the reset. Tap on “Erase iPhone” to confirm.
- Your iPhone will begin the reset process, which may take several minutes. Once the reset is complete, your iPhone will restart, and you will see the setup screen.
Restore iPhone via iTunes Recovery Mode [Data Loss]
Finally, the most advanced solution is to restore your iPhone. A restore completely reinstalls the iOS system on your device, fixing many of the system glitches and bugs.
To do this, connect your iPhone to a computer. If it’s a Windows PC, install iTunes. If it’s a Mac, you don’t need to install anything, as you will use Finder for the job.
After connecting your iPhone, enter recovery mode by following the steps below.
- Press and release the volume up button.
- Press and release the volume down button.
- Press and hold the side button.
- Keep holding the button until you see the recovery mode screen.
Now that you have entered recovery mode, restore your iPhone using the steps below.
- On your computer’s Finder/iTunes, you will see an option saying something’s wrong with your iPhone, and you need to restore it.
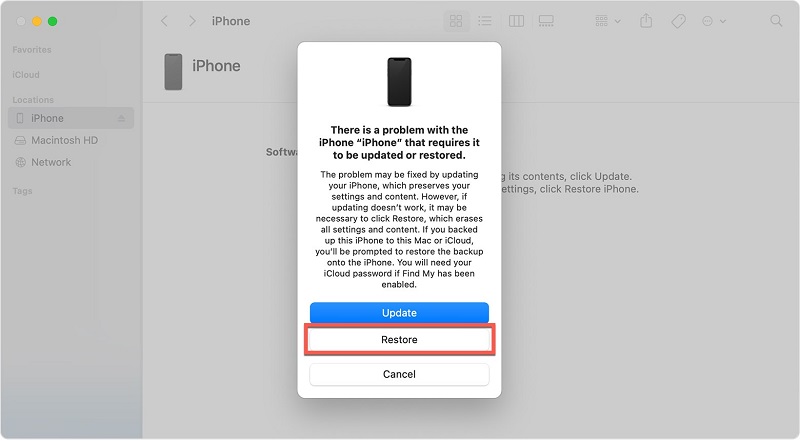
- Click “Restore.”
- It will download and install the latest available iOS version to your phone. Wait for it to complete.
After it’s done, set up your iPhone and try screen recording again.
Frequently Asked Questions About iPhone Screen Recording No Sound
I can record audio in some apps but not others. Why is that?
Due to copyrighted content, some apps prohibit you from screen recording their audio or video. You won’t be able to record the sound in those apps.
What’s the best screen recorder for iPhones?
The default screen recorder of iOS is the best you can get for your iPhone. It has all the essential features you need, and it’s built into the system. So you don’t need to install anything to use it.
Is Tenorshare ReiBoot safe?
Yes, Tenorshare ReiBoot is completely safe to download and use on your PC. All your important data never leaves your computer; hence, there are no security or privacy risks.
The Bottom Line
There you go — now you know how to deal with the iPhone screen recording no sound issue.
You should start your issue-fixing journey by making sure you have the right settings, i.e., the mic is turned ON, and silent mode is OFF. Then, restart your iPhone. If you’re still facing the issue, use Tenorshare ReiBoot to repair iOS.
And finally, if nothing else works, you will have to erase all data on your iPhone and restore it.