“Hi guys, I am facing an annoying problem on my Windows 10 computer. No matter how many times I start my computer in a day, I have to enter the login password every single time. I set the password while installing the OS but now it is useless as I am the only one using the computer. Is there a way to enable auto login Windows 10 so that my computer starts without asking password?”
You must create a default user account when installing Windows 10 on your PC. If you set a password for the user account, you will have to enter the password every time you log into your computer. This is useful for preventing anyone from logging into your computer and accessing your private documents.
However, when no one uses your computer except you, entering a login password every time you switch it on is annoying. This happens because auto login without a password is disabled on your Windows 10 PC. If you enable the auto login option, you can log into your computer without entering any password. You can disable the option when someone logs into your computer behind your back. We will illustrate how to enable or disable Windows 10 auto login option.
How to Enable or Disable Auto Login In Windows 10?
Several legitimate methods are available to enable or disable auto login in Windows 10. You can use the built-in utility tools and settings and external tools to set the auto login option in Windows 10. We will state the simple steps to change Windows 10 auto login setting one by one.
1. Enable or Disable Auto Login In Windows 10 via Netplwiz
Netplwiz is a shortcut command in Windows 10 to open User Accounts settings. You can see all the user accounts on your computer, and you can change the option of entering a password to log into your computer. This change in the auto login option will apply to all the user accounts. Here are the steps to enable or disable Windows 10 automatically sign in on your computer via Netplwiz.
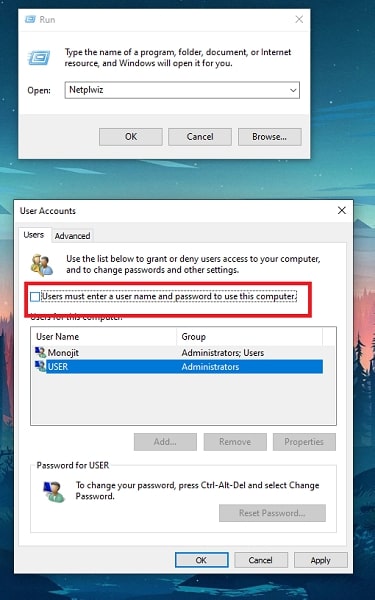
Step 1: Press the Windows+R keys to open the Run dialog box. Now, enter “netplwiz” in the box and click on the Ok button.
Step 2: You will see the User Accounts settings box on the screen. Turn off “Users must enter username and password to use this computer” to enable auto login without any password.
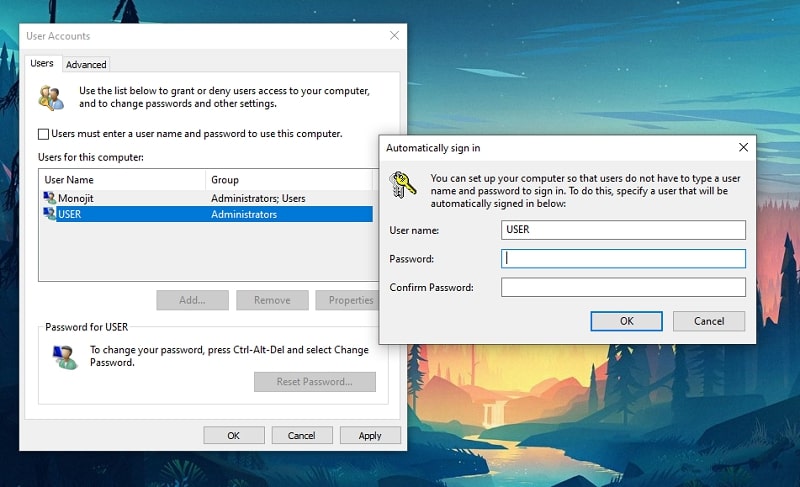
Step 3: Click on the Apply button. You will get an “Automatically sign in” dialog box where you need to enter the admin password to confirm the change.
Step 4: Enter the admin password and reconfirm it. Click on the OK button to enable auto login on your computer.
The next time you start your computer, you will land directly on the desktop without entering your account’s password. You can again disable the auto-login option by following the above steps and turning on the checkbox you turned off.
2. Enable or Disable Auto Login In Windows 10 via Registry Editor
Registry Editor is a utility tool that provides a graphical view of the Windows registry. It is an advanced tool for advanced users and administrators who wants to make root-level changes to the operating system. The settings and configurations are represented in terms of keys in Registry Editor. There is a subkey called Winlogon through which you can change the auto login option per your requirements. Here are the steps for Windows 10 to disable auto login without a password via Registry Editor.
Step 1: Press the Windows+R keys to get the Run dialog box. Now, type “regedit” and press Enter to open the Registry Editor.
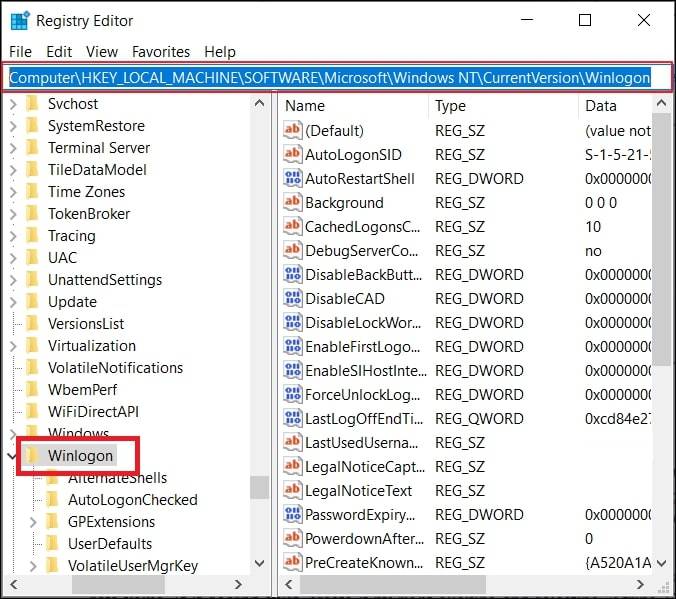
Step 2: In the Registry Editor, go to Computer> HKEY_LOCAL_MACHINE> Software> Microsoft>Windows NT>CurrentVersion>Winlogon from the left panel.
Step 3: Double-click on the DefaultUserName string value on the right panel. You need to ensure that the Value Data parameter has the account user name for which you want to turn automatic login on without any password.
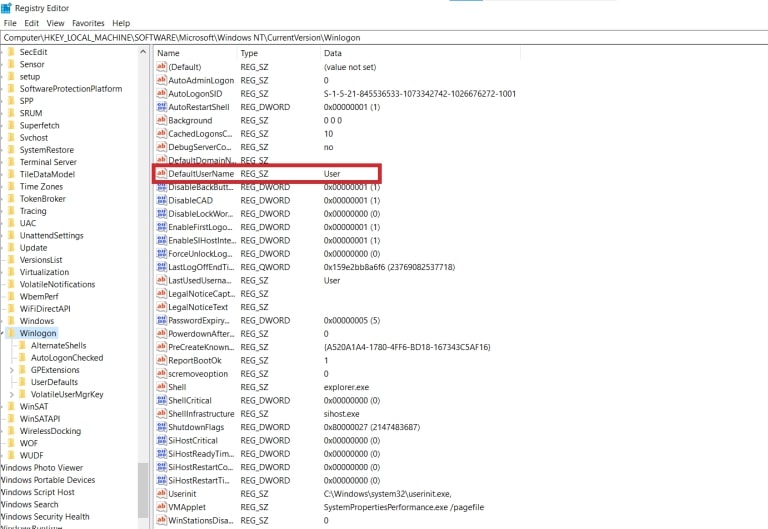
If the DefaultUserName string value does not exist, you must create it. Right-click on the blank area in the Registry Editor. From the menu, go to New>String Value. Name the new string value as DefaultUserName and set the value data the same as your account’s user name.
Step 4: Double-click on the DefaultPassword string value and ensure that the Value Data has the password of your user account. If the string value is absent, you must create it and set the value data.
Step 5: Double-tap AutoAdminLogon string value and set the Value Data to 1. If the string value does not exist, you need to create and set the value accordingly.
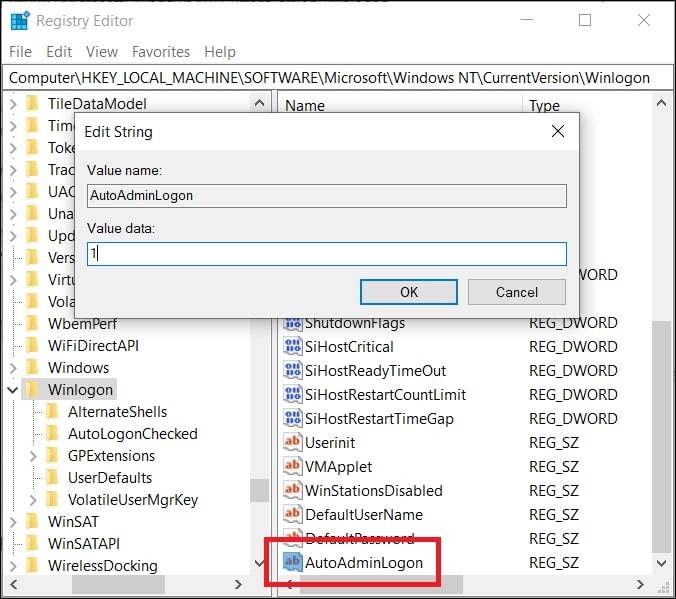
Restart your computer, and you will not be asked to enter your account’s password. To disable auto-login, you need to change the value data of AutoAdminLogon from 1 to 0.
3. Enable Auto Login In Windows 10 by Removing the Password
You can remove the password associated with your user account so that Windows does not ask for the password when you log in. When you remove the password from your user account, the auto-login option gets enabled automatically, and you will land on the desktop directly when you start your computer. Here are the steps to remove the password from your user account to enable auto login in Windows 10.
Step 1: From the desktop, click on the Start button, search for “Sign-in options,” and click on the system settings.
Step 2: When Settings opens, click on the Sign-in Options from the left panel.
Step 3: Click on the Password option from the right panel.
Step 4: Click on the Change button. Enter the current password, and you should leave all other fields blank.
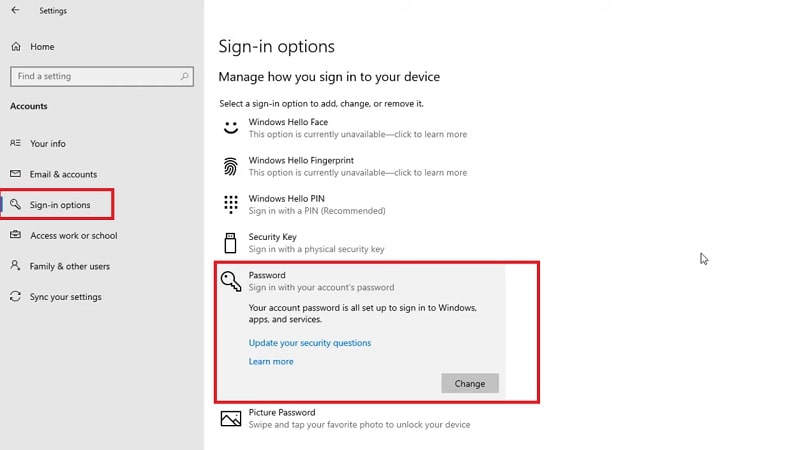
This will remove the current password from your user account and enable auto login the next time you start your computer.
4. Enable or Disable Auto Login In Windows 10 via Autologon
Autologon is an external utility tool for Windows 10 users. You can download and install the tool and configure the auto-login option in your operating system conveniently. Instead of turning on the option for all users via Netplwiz, Autologon helps you to enable the auto-login option for specific users.
You need to enter the username and password through Autologon once, and Windows will automatically validate the credentials when you log into your computer. Therefore, you will land directly on the desktop without entering any password. Here are the steps to enable auto login Windows 10 via Autologon.
Step 1: Download and extract Autologon on your computer.
Step 2: Launch Autologon, and the tool will automatically fetch your account’s username and password.
Step 3: You need to click the Enable button to activate automatic login without password from next time onwards.
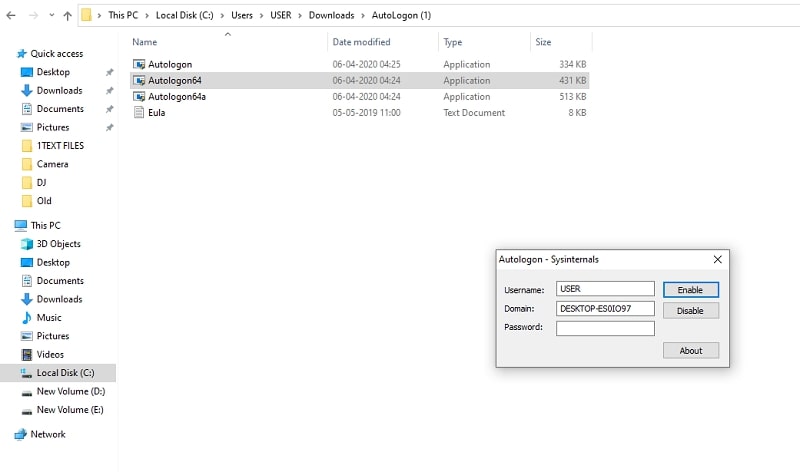
If you want to disable anytime, launch the tool and click on the Disable button.
Frequently Asked Questions About Auto Login In Windows 10
How can I bypass the password of any Windows computer?
If you know the password, you can turn on the auto-login option to bypass the password every time you start your computer. If you do not know the password or you cannot type the password on the login screen, you need to remove the password through a Windows password remover. PassFab 4WinKey is the best Windows password recovery through which you can safely bypass the password of any Windows computer in simple steps.
Is it safe to enable auto login from Registry Editor?
Registry Editor is designed for advanced users who want to tweak internal parameters for customized configurations. As long as you stick to the steps to enable auto login via Registry Editor, there is nothing to worry about. But any misstep can alter the functioning of the Windows operating system as a whole.
How to skip the Windows 10 login screen and log into your user account automatically?
You need to turn on the auto-login option in your Windows 10. You can use the Windows command “netplwiz” and turn on the login option for all users. Besides, you can get the auto-login option for a specific user via the Autologon tool. Moreover, you can change the value of strings under Winlogon from Registry Editor to bypass the login screen and instantly log into your user account.
Conclusion
The auto-login option in Windows 10 is useful for computers with single users. You should definitely enable the auto login option where there is no chance of a third party logging into your computer. After that, you can log into your computer without entering your account password. You can also disable auto-login whenever there are chances of other users logging into your computer. We have stated all the legitimate ways how to enable or disable Windows 10 automatically sign-in option conveniently.